
Android APP修改dex文件实现插件加载

前言
首先,你可能看到的是一篇假的插件化方案。因为Android开发发展到现在出现了很多插件化的方案,但是目前还没发现哪个方案是通过修改插件的dex文件来实现的,估计很大可能性是别人在研究这个方向的时候发现是条死路吧。本人研究这个完全是出于好奇心,想看看这条路上到底有多少坑。
原理
其实原理很简单,插件化要迈的第一道坎,就是解决插件内四大组件的启动问题(主要是activity,以下就用activity代替四大组件)。因为Activity要通过AMS来启动,AMS要去PMS那边查询Activity的相关信息,PMS的信息来自manifest。我们可以先在宿主的manifest内预埋一些Activity声明,比如com.abc.pluginActivity。然后加载插件时读取插件的manifest获知插件的Activity,比如com.xxx.xxxActivity。然后我们修改插件的classes.dex,将里面的com.xxx.xxxActivity改成com.abc.pluginActivity。这样插件的Activiy就在宿主的manifest内有声明了。
当然,这么简单粗暴肯定是不行的,还要解决context问题,包名访问权限问题等。但是我们有了修改dex的能力,这些还是有办法解决的,这个在后面细说。
优势和劣势
据我所知,现在主流的插件化方案,一种是用hook的方式将activity偷梁换柱(例如DroidPlugin),另一种是在编译阶段将插件的manifest声明都merge到宿主工程。早期还有用代理方式实现等方式。这里还要特别提一下非主流的黑科技,动态字节码实现插件化android-pluginmgr。
用hook的方式兼容性要稍微差些,可能在某些厂商修改过的ROM会运行出错。Merge插件manifest的方式则对于插件新增的四大组件可能就无法处理了。
本文的方案不需要merge插件的manifest,也不需要hook ActiviyThread。当然劣势也很多,一是修改Activiy类名包名可能会导致插件一些代码出问题,比如反射、getClassName之类。二是插件安装效率很低,这种方式需要重新生成整个dex文件,时间很长,不过可以在插件编译期进行修改来避免。还有就是,不知道有多少坑要填……
既然这样,为什么还要研究? 因为之前的方案,对于Android N混合编译的支持有些问题,参考Android N混合编译与对热补丁影响解析(这是热补丁的,插件化也同理)。简单来说,Android N在运行时会将部分“热代码”缓存起来,然后编译成Native代码,提升下次运行效率。程序使用loaddex动态加载的代码是无法享受混合编译带来的好处的,但是如果采用类似MultiDex的方案,缓存的代码跟其依赖和被依赖的代码无法同步更新,就会引发问题。本文的方案理论上是支持Android N的(现在并没有实现……),相当于对插件进行新的一次混淆,让缓存的代码无法命中(需要在宿主manifest预埋足够多的Activiy)。
代码实现
说了这么多,还是“Show me the code”吧。这里只贴一些关键部分代码。详细请到github, Junhua102/Chameleon
dex文件操作库采用dexlib2。
第1步:插件加载器初始化
调用PluginLoader.init
初始化就是创建内部存储路径,然后用FrameworkClassLoader将Application conetext的ClassLoader替换掉。FrameworkClassLoader用于将来加载插件的类。
    /**
     * 初始化
     * @param context    宿主application context
     */
    public void init (Context context) {
        mContext = context;
        pluginParentClassLoader = ClassLoader.getSystemClassLoader().getParent();
        File optimizedDexPath = context.getDir(Globals.PRIVATE_PLUGIN_ODEX_OUTPUT_DIR_NAME, Context.MODE_PRIVATE);
        odexOutputPath = optimizedDexPath.getAbsolutePath();
        pluginInternalStoragePath = context.getDir(
                Globals.PRIVATE_PLUGIN_OUTPUT_DIR_NAME, Context.MODE_PRIVATE
        );

        // 替换ClassLoader
        try {
            Object mPackageInfo = ReflectionUtils.getFieldValue(context,
                    "mBase.mPackageInfo", true);
            mFrameworkClassLoader = new FrameworkClassLoader(
                    context.getClassLoader());
            // set Application's classLoader to FrameworkClassLoader
            ReflectionUtils.setFieldValue(mPackageInfo, "mClassLoader",
                    mFrameworkClassLoader, true);
        } catch (Exception e) {
            e.printStackTrace();
        }
    }
第2步:插件安装
调用PluginLoader.install
2.1读取插件manifest信息
先调用PluginManifestUtil.setManifestInfo获取插件apk的manifest信息,保存到PlugInfo。
PlugInfo info = new PlugInfo();
info.setId(pluginApk.getName());

String pluginApkPath = pluginApk.getAbsolutePath();
//Load Plugin Manifest
try {
    PluginManifestUtil.setManifestInfo(context, pluginApkPath, info, getPluginLibPath(info, pluginInternalStoragePath));
} catch (Exception e) {
throw new RuntimeException("Unable to create ManifestInfo for "
            + pluginApkPath + " : " + e.getMessage());
}
2.2对插件dex进行重构
先将PlugInfo中保存的插件Activity读取出来,给它们各自分配一个预设的Activity名称,保存在RefactorItem。然后将RefactorItem列表refactorItems传递给ApkRefactor.refactoring进行重构,重构完成后生成新的apk,保存到newApkFile。
// 搜索所有activity,并设置对应的替换名称
int activityIndex = 0;
List<ApkRefactor.RefactorItem> refactorItems = new ArrayList<>();
for (ResolveInfo resolveInfo : info.getActivities()) {
    String pluginActivityName = "me.dreamheart.demo.PluginActivity" + activityIndex;
    refactorItems.add(new ApkRefactor.RefactorItem(resolveInfo.activityInfo.name, pluginActivityName));
    resolveInfo.activityInfo.name = pluginActivityName;
    activityIndex ++;
}
ApkRefactor.ApkInfo apkInfo = new ApkRefactor.ApkInfo(info.getPackageInfo().packageName);
// application可能会受到重构的影响
info.getPackageInfo().applicationInfo.className = ApkRefactor.getNewApplicationName(info.getPackageInfo().applicationInfo.className, refactorItems);
// 重构apk的保存路径
File newApk = new File(pluginInternalStoragePath, info.getPackageName() + ".apk");
// 删除以前生成的旧apk
newApk.delete();
String newApkFile = newApk.getAbsolutePath();
Trace.store("generate " + newApkFile);
// 开始重构
ApkRefactor.refactoring(pluginApkPath, apkInfo, refactorItems, newApkFile, pluginInternalStoragePath.getAbsolutePath());
2.3 dex文件重构
上一步调用ApkRefactor.refactoring将apk和其他信息传递过来,ApkRefactor.refactoring方法内将classes.dex解压出来,调用另一个版本的ApkRefactor.refactoring对dex数据进行重构。然后用新的dex文件跟原apk的其他文件一起打包成新的apk。
2.3.1 将同包名其他类的Field和Method由default改成public(private 和 protected的可以不用管),解决Activity改包名后无法访问的问题。
        DexRewriter accessFlagRewriter = new DexRewriter(new RewriterModule() {

            /**
             * 将同包名其他类的Field由default改成public
             * @param rewriters
             * @return
             */
            @Nonnull
            @Override
            public Rewriter<Field> getFieldRewriter(@Nonnull Rewriters rewriters) {
                return new Rewriter<Field>() {
                    @Nonnull
                    @Override
                    public Field rewrite(@Nonnull Field value) {
//                        System.out.print(value.getName() + "\n");
                        for (RefactorItem refactorItem : refactorItems) {
                            if (refactorItem.isSamePackage(value.getDefiningClass()) &&
                                    AccessFlagUtils.isDefault(value.getAccessFlags())) {
                                int accessFlag = AccessFlagUtils.changeToPublic(value.getAccessFlags());
                                return new ImmutableField(value.getDefiningClass(), value.getName(),
                                        value.getType(), accessFlag, value.getInitialValue(), value.getAnnotations());
                            }
                        }
                        return value;
                    }
                };
            }

            /**
             * 将同包名其他类的Method由default改成public
             * @param rewriters
             * @return
             */
            @Nonnull
            @Override
            public Rewriter<Method> getMethodRewriter(@Nonnull Rewriters rewriters) {
                return new Rewriter<Method>() {
                    @Nonnull
                    @Override
                    public Method rewrite(@Nonnull Method value) {
//                        System.out.print(value.getName() + "\n");
                        for (RefactorItem refactorItem : refactorItems) {
                            if (refactorItem.isSamePackage(value.getDefiningClass()) &&
                                    AccessFlagUtils.isDefault(value.getAccessFlags())) {
                                int accessFlag = AccessFlagUtils.changeToPublic(value.getAccessFlags());
                                return new ImmutableMethod(value.getDefiningClass(), value.getName(),
                                        value.getParameters(), value.getReturnType(),accessFlag,
                                        value.getAnnotations(), value.getImplementation());
                            }
                        }
                        return value;
                    }
                };
            }
        });
        DexFile rewriteDexFile = accessFlagRewriter.rewriteDexFile(dexBackedDexFile);
2.3.2将Activity改名,同时也将Activity的内部类改名。
        DexRewriter typeRewriter = new DexRewriter(new RewriterModule() {
            @Nonnull
            @Override
            public Rewriter<String> getTypeRewriter(@Nonnull Rewriters rewriters) {
                return new Rewriter<String>() {
                    @Nonnull
                    @Override
                    public String rewrite(@Nonnull String value) {
//                        System.out.print(value + "\n");

                        for (RefactorItem refactorItem : refactorItems) {
                            if (value.equals(refactorItem.srcClassType)) {
                                return refactorItem.desClassType;
                            } else if (value.indexOf(refactorItem.srcSubClassTypePrefix) == 0) {
                                return value.replace(refactorItem.srcSubClassTypePrefix, refactorItem.desSubClassTypePrefix);
                            }
                        }

                        return value;
                    }
                };
            }
        });
        rewriteDexFile = typeRewriter.rewriteDexFile(rewriteDexFile);
2.3.3 这个循环有两个操作,一是发现同包名的类,将访问权限由default改成public。二是在Activity中注入attachBaseContext方法,这个方法中带了个hook,可以将带有插件资源的context放到Activity的mBase中,这个后面会讲到。
        for (ClassDef classDef: fileWrapper.getClasses()) {
            for (RefactorItem refactorItem : refactorItems) {

                // 同包名的类,将访问权限由default改成public
                if (refactorItem.isSamePackage(classDef.getType()) &&
                        AccessFlagUtils.isDefault(classDef.getAccessFlags())) {
                    ClassDefWrapper classDefWrapper = new ClassDefWrapper(classDef);
                    classDefWrapper.setAccessFlags(AccessFlagUtils.changeToPublic(classDef.getAccessFlags()));
                    classDef = classDefWrapper;
                }

                if (!refactorItem.isActivity)
                    continue;

                String activityType = refactorItem.desClassType;
                // 向Activity注入attachBaseContext的钩子代码
                if (classDef.getType().equals(activityType)) {
                    ClassDefWrapper classDefWrapper;
                    if (classDef instanceof ClassDefWrapper) {
                        classDefWrapper = (ClassDefWrapper) classDef;
                    } else {
                        classDefWrapper = new ClassDefWrapper(classDef);
                    }
                    Method attachBaseContextMethod = InjectMethodBuilder.buildAttachBaseContextMethod(activityType);
                    classDefWrapper.addMethod(attachBaseContextMethod);
                    classDef = classDefWrapper;
                }
            }
            dexPool.internClass(classDef);
        }
这是注入代码的smali代码
# virtual methods
.method protected attachBaseContext(Landroid/content/Context;)V
    .locals 1
    .param p1, "newBase"    # Landroid/content/Context;

    invoke-static {p0, p1}, Lme/dreamheart/chameleon/Hook;->attachBaseContext(Ljava/lang/Object;Ljava/lang/Object;)Ljava/lang/Object;

    move-result-object v0

    check-cast v0, Landroid/content/Context;

    invoke-super {p0, v0}, Landroid/app/Activity;->attachBaseContext(Landroid/content/Context;)V

    return-void
.end method
生成attachBaseContext方法的dex字节码的代码

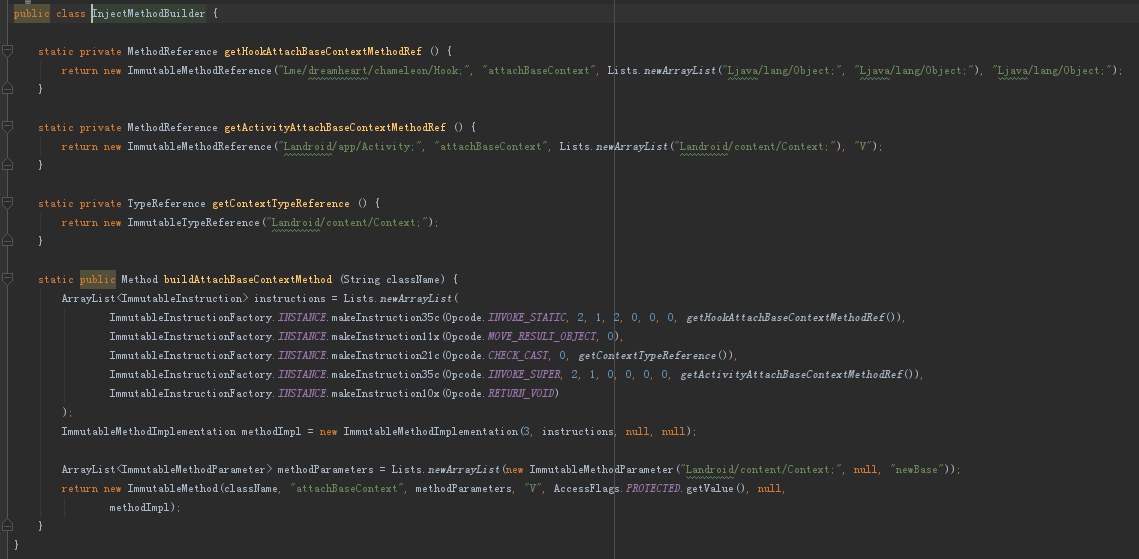
2.4 创建资源、Classloader和Application
创建对应的AssetManager、PluginClassLoader和Application,将宿主context通过反射赋值给插件Application的mBase。这些都保存到PlugInfo中。
//Load Plugin Res
try {
    AssetManager am = AssetManager.class.newInstance();
    am.getClass().getMethod("addAssetPath", String.class)
            .invoke(am, newApkFile);
    info.setAssetManager(am);
    Resources hotRes = context.getResources();
    Resources res = new Resources(am, hotRes.getDisplayMetrics(),
            hotRes.getConfiguration());
    info.setResources(res);
} catch (Exception e) {
throw new RuntimeException("Unable to create Resources&Assets for "
            + info.getPackageName() + " : " + e.getMessage());
}
//Load  classLoader for Plugin
PluginClassLoader pluginClassLoader = new PluginClassLoader(info, newApkFile, odexOutputPath
, getPluginLibPath(info, pluginInternalStoragePath).getAbsolutePath(), pluginParentClassLoader);
info.setClassLoader(pluginClassLoader);
ApplicationInfo appInfo = info.getPackageInfo().applicationInfo;
// 创建插件的Application
Application app = makeApplication(info, appInfo);
attachBaseContext(context, info, app);
info.setApplication(app);
第3步:运行插件
到目前为止,PlugInfo保存着这些信息:插件manifest,插件AssetManager,插件classloader,插件Application。运行的时候,先取出插件的初始Activity,然后告诉mFrameworkClassLoader从插件的classloader中加载类,接着创建一个PluginHook用于往插件的Activity中注入内容。再调用plugInfo.ensureApplicationCreated确保插件Application的onCreated函数得到调用,最后就可以startActivity了。
/**
 * 启动插件
 * start插件的默认activiy
 * @param plugInfo    安装插件时生成的插件信息
 */
public void startPlugin (Context context, PlugInfo plugInfo) {
if (null == plugInfo)
return;

    ActivityInfo activityInfo = plugInfo.getMainActivity().activityInfo;
    if (activityInfo == null) {
throw new ActivityNotFoundException("Cannot find Main Activity from plugin.");
    }

mFrameworkClassLoader.setPlugin(plugInfo);
    Hook.sHookListener = new PluginHook(mContext, plugInfo);
    plugInfo.ensureApplicationCreated();

    Intent intent = new Intent();
    try {
        intent.setClass(context, plugInfo.getClassLoader().loadClass(activityInfo.name));
        context.startActivity(intent);
    } catch (ClassNotFoundException e) {
        e.printStackTrace();
    }
}
插件Activity钩子注入过程
前面我们在修改dex的时候,在插件Activity注入了attachBaseContext方法,方法内部会调用Hook.onAttachBaseContext,Hook会返回一个PluginContext给Activity,PluginContext内包含了插件的AssetManager和Classloader,Activity的super.attachBaseContext将这个PluginContext赋值给mBase,这样,插件就可以使用自身的资源和类了。
public class PluginHook implements Hook.HookListener {

private PlugInfo plugInfo;
    private Context context;

    public PluginHook(Context appContext, PlugInfo plugInfo) {
this.plugInfo = plugInfo;
        context = appContext;
    }

/**
     * 插件activity调用onAttachBaseContext时,调用此函数
     * @param activity      插件activity
     * @param orgContext    原context
     * @return PluginContext
     */
    @Override
    public Object onAttachBaseContext(Object activity, Object orgContext) {
return attachBaseContext((Activity)activity, (Context)orgContext);
    }

/**
     * 将插件的baseContext替换成PluginContext
     * @param activity      插件activity
     * @param orgContext    原context
     * @return PluginContext
     */
    private Context attachBaseContext(Activity activity, Context orgContext) {
return new PluginContext(context, plugInfo);
    }
}
总结
现在对插件安装效率没有进行优化,安装速度极慢,请耐心等待……
目前只是实现了Activity的简单替换,做了一些简单测试。希望大家多多提意见,让这个项目将来能做的更加完善。
Github
本项目很多代码来自houkx/android-pluginmgr,感谢作者的奉献。