量化训练:Quantization Aware Training in Tensorflow(一)

本文的内容包括对神经网络模型量化的基本介绍、对Tensorflow量化训练的理解与上手实操。
此外,后续系列还对量化训练中的by pass和batch norm两种情况进行补充解释,欢迎点击浏览,量化训练:Quantization Aware Training(二)。
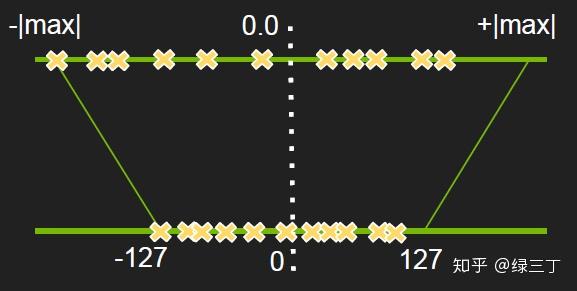
量化(quantized),即将神经网络前向过程中浮点数运算量化为整数运算,以达到计算加速的目的。通常是指将float32转化为int8进行运算,经实践部署dsp上能提升2.5~3倍左右的推理速度。我们知道对浮点数的量化操作是将其从一个高维度映射到低维度的转换过程,如图所示:

量化的主要流程如下:
(1)统计出网络某一层的最大值与最小值:
x_{float}\epsilon [x_{float}^{max},x_{float}^{min}]
(2)计算scale与zero_point
x_{scale}=\frac{x_{float}^{max}-x_{float}^{min}}{x_{quantized}^{max}-x_{quantized}^{min}}
x_{zeropoint}=x_{quantized}^{max}-\frac{x_{float}^{max}}{x_{scale}}
(3)通过以下公式计算出任意float32量化后的int8结果
x_{quantized}={\frac{x_{float}}{x_{scale}}}+x_{zeropoint}
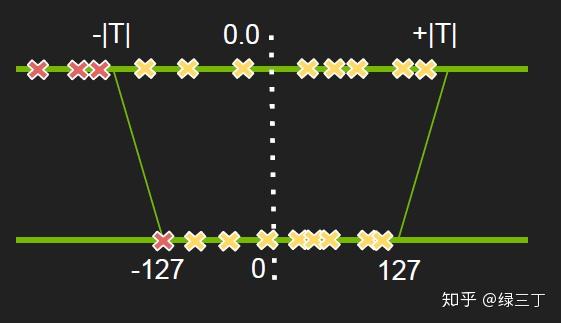
由公式可以看出量化中的精度损失不可避免的,当浮点数的分布均匀时,精度损失较小。但当浮点数分布不均匀时,按照最大最小值映射,则实际有效的int8动态范围就更小了,精度损失变大。
对此,NVIDIA的PPT中提出通过寻找最优阈值进行非饱和截取的思路改善精度损失,如下图,先不做具体赘述,有时间再填坑。

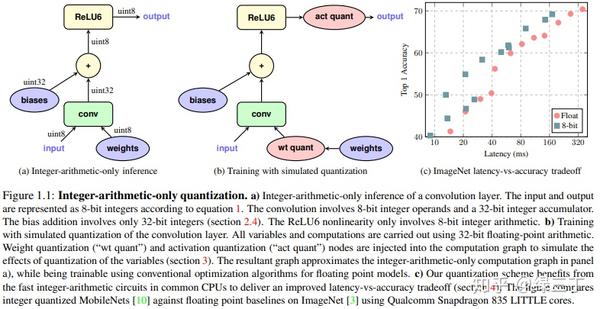
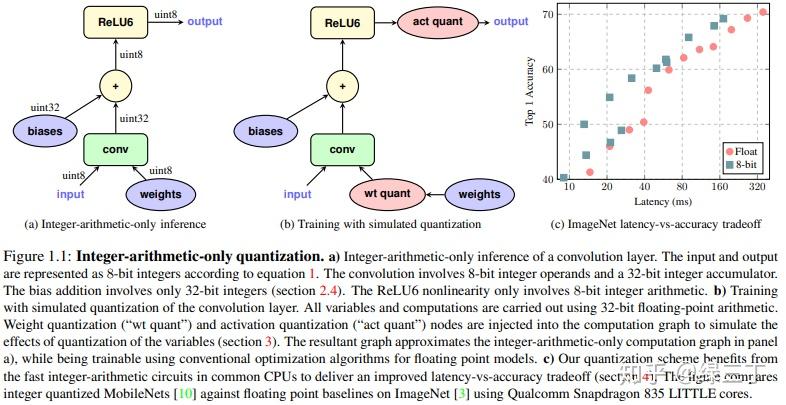
2017年,Google发表了关于神经网络量化方面的文章Quantization and Training of Neural Networks for Efficient Integer-Arithmetic-Only Inference。文中提出一种新的量化框架,在训练过程中引入伪量化的操作,用于模拟量化过程带来的误差(这一框架无论在resnet这种大模型,还是mobilenet这种本身比较精简的网络上效果都不错)。所谓的伪量化,即将模拟量化操作引入训练过程中,在每个weight的输入后与output的输出前进行伪量化,将浮点量化到定点,再反量化成浮点,用round过程中所产生的误差的浮点值进行前向运算。伪量化的操作可以使权值、激活值的分布更加均匀,也就是方差更小,相比直接进行后量化的精度损失能更小,其次能够控制每层的输出在一定范围内,对溢出处理更有帮助。值得注意的是,量化训练中都是采用浮点运算来模拟定点运算,所以训练过程中的量化结果与真实量化结果是有差异的。
Tensorflow中开源了量化训练的方法,首先需要创建一个图,图中会自动添加伪量化节点,实现代码如下:
tf.contrib.quantize.create_training_graph(input_graph=graph, quant_delay=delay_step) delay_step表示多少个epoch后开启量化训练。
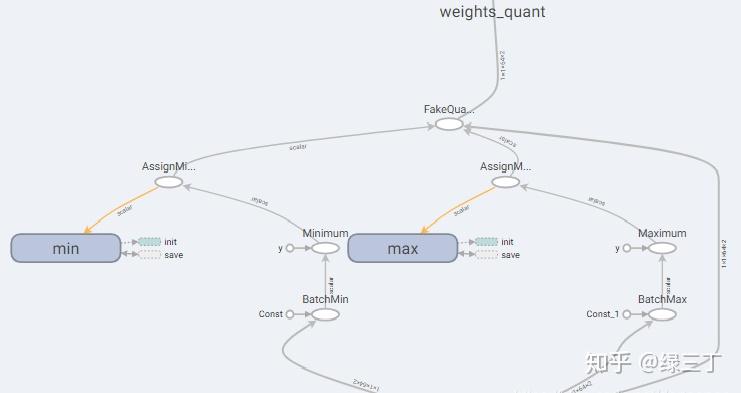
在tensorboard中能看到min、max节点,表示开启了量化训练。

保存完训练结果后,要重新创建一个测试用的Graph,实现如下:
g = tf.get_default_graph()
tf.contrib.quantize.create_eval_graph(input_graph=g)
将网络模型结构与参数用pb文件保存
from tensorflow.python.framework import graph_util
constant_graph = graph_util.convert_variables_to_constants(sess, sess.graph_def,['xxxnet/conv_output/Conv2D'])
with tf.gfile.FastGFile('./models/quant_xxxnet_model.pb', mode='wb') as f:
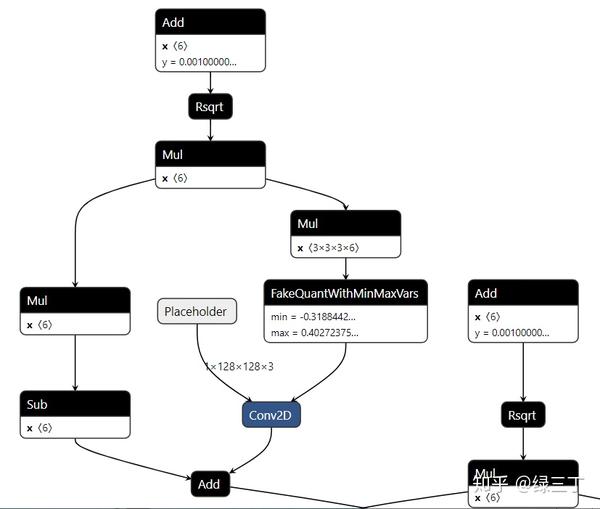
f.write(constant_graph.SerializeToString())用Netron打开生成的pb文件,如下图。可以看到pb中生成了伪量化节点,伪量化节点中保存了min、max,意味着转换成功。
最后将pb转换为tflite格式,可以使用Tensorflow提供官方转换工具toco。推荐用如下简单的Python API来转。
import tensorflow as tf
graph_def_file = "./quant_xxxnet_model.pb"
input_shapes = {'Placeholder':[1,128,128,3]}
input_arrays = ["Placeholder"]
output_arrays = ["xxxnet/conv_output/Conv2D"]
converter = tf.lite.TFLiteConverter.from_frozen_graph(
  graph_def_file, input_arrays, output_arrays,input_shapes = input_shapes)
converter.inference_type = tf.contrib.lite.constants.QUANTIZED_UINT8
converter.quantized_input_stats = {'Placeholder':(127.5,127.5)} # mean, std_dev
converter.allow_custom_ops = True
converter.default_ranges_stats = (0,255)
tflite_model = converter.convert()
open("converted_model.tflite", "wb").write(tflite_model)
对于全整数模型,输入为 uint8。mean 和 std_dev values 指定在训练模型时这些 UINT8 的值是如何值映射到输入的浮点值。mean 是 0 到 255 之间的整数值,映射到浮点数 0.0f。std_dev = 255 /(float_max - float_min) 。
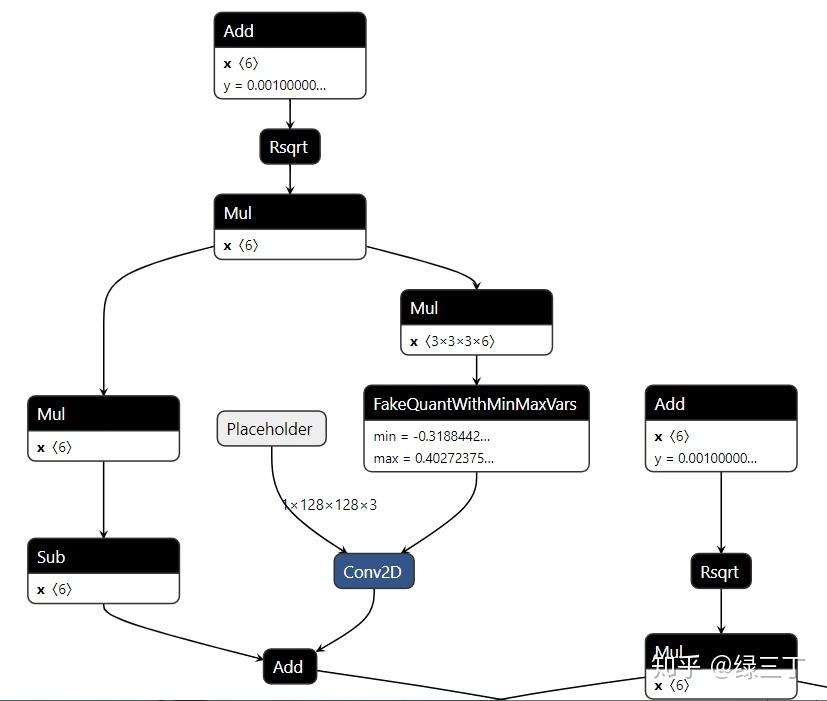
用Netron打开生成的pb文件,如下图,若伪量化节点被消除,则意味着uint8量化转换成功。
最后可以通过tf.lite.Interpreter加载tflite模型,测试量化后的inference结果。
import tensorflow as tf
from PIL import Image
import numpy as np

img = Image.open("./input.png")
img = np.array(img, np.uint8)
img = np.expand_dims(img, axis=0)

# Load TFLite model and allocate tensors.
interpreter = tf.lite.Interpreter(model_path='./converted_model.tflite')
interpreter.allocate_tensors()

# Get input and output tensors.
input_details = interpreter.get_input_details()
output_details = interpreter.get_output_details()

interpreter.set_tensor(input_details[0]['index'], img)
interpreter.invoke()
output_data = interpreter.get_tensor(output_details[0]['index'])
说几点注意事项:
1.train和inference创建的是不同的量化网络,前者是伪量化,后者是真实的量化,故结果会不同。
2.尽量使用标准的网络(尽量不要使用dilated conv)。
3.激活层目前尽量使用relu,relu6和identity。sigmoid,softmax量化误差会比较大。
4.先训练float,在训练好的float上微调quant8,即尽量在float网络收敛后再进行量化训练。
5.尽量在conv时传入激活函数和bn的参数,否则bn在folding时会失败。支持的api为slim.convolution2d或tf.contrib.layers.conv2d。
参考链接:
https://tensorflow.google.cn/lite/convert/python_api?hl=zh-cn
https://tensorflow.google.cn/lite/convert/quantization
码字不易,看完记得点赞哦~