使用rasa构建最新疫情查询问答机器人并部署到微信公众号中


发布时间:2020.1.16
初衷:
武汉的情况越来越严峻, 大家也都很关心各地的情况。已经有很多地方给出了情况报告,或许是最近使用网络的人比较多,我经常打不开各种app,或者加载图片总是加载不出来。所以我就将此功能上线到微信公众号,也方便大家了解目前的情况。祝愿大家一切顺利!
同时也简单介绍一下rasa。Rasa已经更新成为了最新的版本,是将NLU和core部分合并起来的,所以对于新手来说使用不太友好,而之前很多旧的tutorial在操作的时候有一些细节不一样了,导致无法进行下去。很久就想写这个了,今天趁着有心情,就熬一下给弄出来。
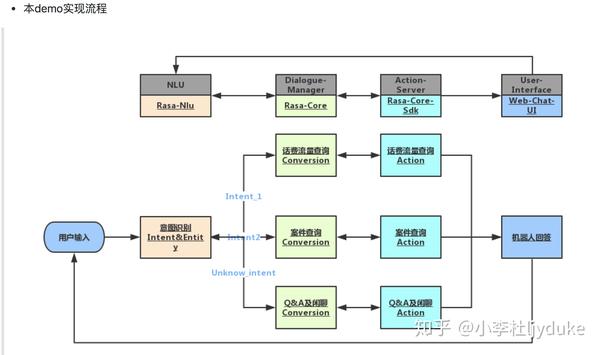
下图copy自https://github.com/xiaoxiong74/rasa_chatbot。画的太好了,对于我开发来说,思路非常清晰。
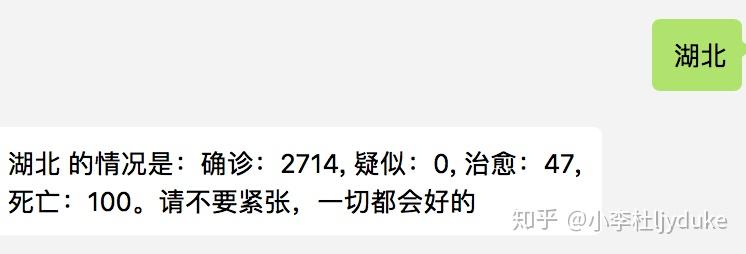
效果:


This creates the following files:


The most important files are marked with a ‘*’. You will learn about all of these in this tutorial.
实现过程如下:
1. 初始化
命令行运行:rasa init --no-prompt
2. 进行NLU训练
涉及:config.yml 以及 data/nlu.md
- 修改config.yml中language和pipleine部分为
# Configuration for Rasa NLU.
# https://rasa.com/docs/rasa/nlu/components/
language: zh
# pipeline: supervised_embeddings
pipeline:
- name: "nlp_mitie"
 model: "total_word_feature_extractor.dat"
- name: "tokenizer_jieba"
- name: "ner_mitie"
- name: "ner_synonyms"
- name: "intent_featurizer_mitie"
- name: "intent_classifier_sklearn"
2. 修改data/nlu.md
说明:NLU的训练数据在data/nlu.md中。NLU的本质是将用户的输入转变为structured data。所以我们需要给rasa提供训练数据,以教会rasa是如何理解用户的信息的。rasa_nlu的工作室预测用户正确的意图,当用户发送新的没有见过的信息的时候,bot都可以做到理解。
示例如下(示例来自https://zhuanlan.zhihu.com/p/44107461):
## intent:greet <!-- 定义了intent的名字,意思是同一组的输入得意思都是greet -->
- hey
- hi
## intent:goodbye
- bye
- goodbye
## intent:weather_address
- 告诉我在[广州](address)怎么样  <!-- 定义了实体的值以及对应的实体类型,这部分实体需要在domain中定义,下一章节说明 -->
- 告诉我在[广州](address)
## synonym:下个星期一 <!-- 定义了同义词,相当于是归一化处理 -->
- 下星期一
3. 训练rasa nlu部分:
# train
rasa train nlu
# test
rasa shell nlu
3. 进行Core训练(DM)
rasa_core执行完成对话管理以及policy部分,本部分涉及data/stories.md, config.yml, domine.yml
3.1 完成stories.md
本环节的重点是教bot如何回复用户的消息。core model从真实对话中进行学习,以stories的format进行学习,一个story就是一个发生在bot和用户之间的真实对话。带有intents和entities的行反映了用户的输入。action的name就表明用户应该给予的回复。简单来说,一个story有两个要素
- user input:包含intents和entities(这个可以没有)
- response:表达为对应的action name
## greet + location/price + cuisine + num people    <!-- name of the story - just for debugging -->
* greet <!-- user intent -->
   - action_ask_howcanhelp <!-- bot action -->
* inform{"location": "rome", "price": "cheap"}  <!-- user utterance, in format intent{entities} -->
   - action_on_it
   - action_ask_cuisine
* inform{"cuisine": "spanish"}
   - action_ask_numpeople        <!-- action that the bot should execute -->
* inform{"people": "six"}
   - action_ack_dosearch
一个story的成分如下:
- name ## 开头的行,仅仅是用来debug的,所以取名的时候最好带有含义
- 一个story以新的一行作为结束,一个新的story用## 开始
- 以*开头的行是用户的输入,格式为intent{"entity1":"value", "entity2":"value"}
- bot采取的action是以-开头的行,内容是action的name所对应的动作。其中utter_作为前缀的动作需要在template中有所定义
- action返回的events会紧跟在action那行的后面。例如如果有一个action返回一个“slotset”event, 将会以{"slot_name":"value"}的形式呈现
关于story的定义有三个主要的compoent需要说明:
- User_messages
在写story的时候,不必specifically点名用户的输入是什么,可以简单的利用NLU的output,可以让你禁用intent和entities的组合来refer to所有可能的input。
entity也很重要,因为policy学习的就是基于intent和entity的组合来预测下一个action - Actions
写story的时候,会有两类actions:utterance和custom action。
- utterance是hardcoded msgs,bot可以利用这个action来回复
- custom action则一般是涉及到要被执行的自定义的代码(例如调用服务,或者进行一些简单的计算)
所有要被bot执行的action是“-”开头的行,而“-”之后是动作的名称
- 所有的utterance ation以prefix utter_开头,必须与domain中定义的template的name是match的才可以
- custom ation, action的名字是自己选择的,从custom action class的“name” 方法中返回的string。尽管我们没有限制,但是最好以prefix, action_来开头
3.2 config.yml
暂时复制:
# Configuration for Rasa Core.
# https://rasa.com/docs/rasa/core/policies/
policies:
  - name: MemoizationPolicy
  - name: KerasPolicy
  - name: MappingPolicy
3.3 domain.yml
这个file定义了bot生存的universe。有点抽象,具体含义如下:
- Bot 期待得到什么样的用户输入
- bot应该具有什么样的action
- bot应该如何回复
- bot(后台)应该存储什么样的信息
所以里面有三大elements
- intents: bot可以期待的用户会说的东西
- actions: bot可以做和说的(同上uttereance和customed action)
- templates: 定义了bot针对不同的用户输入,作出什么样子的response
intents:
- greet
- goodbye
actions:
- utter_greet
- utter_cheer_up
templates:
utter_greet:
- text: "Hey! How are you?"
- text: "你好呀"
utter_cheer_up:
- text: "Here is something to cheer you up:"
image: "https://i.imgur.com/nGF1K8f.jpg"训练
rasa train core
## 可以直接用一句命令对两个模块进行训练
rasa train
# 测试
rasa shell4. 自定义actions
我们需要继承Action,然后实现自己的动作方法。在actions.py中
class ActionReportDisease(Action):
def __init__(self):
pass
def name(self) -> Text:
return "action_report_disease"
def run(self,
dispatcher: CollectingDispatcher,
tracker: Tracker,
domain: Dict[Text, Any]) -> List[Dict[Text, Any]]:
address = tracker.get_slot('address').replace('市', '')
address = address.replace('省', '')
if not address:
disease_data = get_detail_info('general')
return [SlotSet("matches", "{}。如果想了解具体信息,请输入具体地址".format(disease_data))]
try:
disease_data = get_detail_info(address)
except Exception as e:
disease_data = str(e) + ' and your input is run. pls input 地点。例如北京今天的情况'
return [SlotSet("matches", "{}".format(disease_data))]其中get_detail_info函数是为了获取到现在的疫情情况的函数,可以自行实现,取决于自己的数据格式。
其中def name(self) -> Text: return "action_report_disease"就定义了actions的名称。可以在stories中使用。
当actions.py定义完成之后,使用下列命令:
rasa run actions之后所有请求rasa中的动作的query就会调用对应的action 了
5. 部署微信公众号并链接rasa
5.1 部署微信公众号
申请公众号之类的就不多说了,就说说这个的后台应该如何部署,并与rasa http相连接。
微信公众号,我提供一个demo,可以根据这个进行修改。这个我根据网上的开源代码以及微信提供的demo制作的。原本是做来进行一个诗词生成的公众号后台:
其中需要修改的部分是handle.py中的
class Handle(object):
def GET(self):
try:
data = web.input()
if len(data) == 0:
return "hi, 这里是一个新的世界"
# 首次绑定公众号时需要对签名进行验证
signature = data.signature
timestamp = data.timestamp
nonce = data.nonce
echostr = data.echostr
token = "xxxxxxxx" # 请按照公众平台官网\基本配置中信息填写以及
class Basic:
def __init__(self):
self.__accessToken = ''
self.__leftTime = 0
def __real_get_access_token(self):
appId = "xxxxxxxxx" # 公众号的appid 请在公众号网页上查看
appSecret = "xxxxxxxxx" # 公众号的appSecret 请在公众号网页上查看
postUrl = ("https://api.weixin.qq.com/cgi-bin/token?grant_type="
"client_credential&appid=%s&secret=%s" % (appId, appSecret))
urlResp = urllib.urlopen(postUrl)
urlResp = json.loads(urlResp.read())
运行指令:
sudo python main.py 80 # 看你的环境,有些需要在sudo下进行代码:https://github.com/DukeEnglish/wechatdemo.git
5.2 链接rasa
命令
rasa run
rasa run actions
将rasa服务启动后。在reply.py中调用这个函数,使用它对用户输入的信息进行回应
def rasa_serve(content):
connection = http.client.HTTPConnection('127.0.0.1:5005') # 端口看你的需求进行修改
values = {
"sender": "Rasa",
"message": content
}
json_foo = json.dumps(values)
connection.request('POST', '/webhooks/rest/webhook', json_foo)
response = connection.getresponse()
res = (response.read().decode("utf-8"))
res = json.loads(res)
for i in res:
return i['text']
return '不好意思请再说一次, 有任何问题请私信,会及时回复的。 祝你一切顺利'Rasa x 的使用方法,我就不多说了。命令行rasa x就会出现front-end,很直观。
之后会更详细的介绍各个组件应该怎么使用,以及自定义pipeline部分。
参考:
参考资料
使用rasa构建天气查询机器人,同时如果想要分别利用rasa的NLU和core模块,可以参考这个:
https://zhuanlan.zhihu.com/p/44107461
一个教学的系列(推荐):https://www.jianshu.com/p/5d9aa2a444a3
电商的rasa,里面的图特别友好:https://github.com/xiaoxiong74/rasa_chatbot
可以搜索:“小李杜的科幻年” 进行试用。