
hexo+next个性化配置

title: hexo+next主题配置 date: '2020-03-04 23:22' categories: hexo博客主题配置 tags: Next主题美化 mathjax: true abbrlink: 61030
Hexo+next主题配置踩的坑
下载安装完next主题后才发现一堆的坑。由于next的版本不同。所以有的配置文件和网上的教程不大一样。自己踩了N多坑,于是打算记录一下。于是自己试了好几天才差不多配置好。但是网站图标就是显示不出来。我是真哭辽。下面开始具体配置:
下载安装next主题
下载next主题,只需输入指令:
git clone https://github.com/theme-next/hexo-theme-next themes/next但是速度会比较慢。因为众所周知的原因。可以多尝试几下。然后如果要想更新主题的话,可以
cd themes/next
git pull安装完成后到博客的根目录下的_config.yml文件中更改为next主题即可。
Next主题下_config.yml的配置
SITE设置
title: 填写标题 subtitle: 填写副标题 description: 简介 keywords: 关键词 author: 作者,文章中显示的作者名称 language: 设置语言,zh-CN是简体中文,en是英语
# Site
title: 嵌入式的一只菜鸟
subtitle: ''
description: '永远相信美好的事情即将发生'
keywords:
author: WYW
language: zh-CN
timezone: 'Asia/Shanghai'
URL设置
我用的是国内的码云搭建的博客。url设置的时候一般情况就是设置为你创建的仓库名字。或者就是你博客的网址。root这里的话就写你博客的仓库名字。其余都默认就可以。
# URL
## If your site is put in a subdirectory, set url as 'http://yoursite.com/child' and root as '/child/'
url:  http://xxxxxx/xxxxx
root: /blog2
permalink: :year/:month/:day/:title/
permalink_defaults:
pretty_urls:
  trailing_index: true # Set to false to remove trailing 'index.html' from permalinks
  trailing_html: true # Set to false to remove trailing '.html' from permalinks
翻页设置
per_page用于控制每页显示多少篇博客文章。
# Home page setting
# path: Root path for your blogs index page. (default = '')
# per_page: Posts displayed per page. (0 = disable pagination)
# order_by: Posts order. (Order by date descending by default)
index_generator:
  path: ''
  per_page: 10
  order_by: -date
Deployment设置
这里的设置就是你上传博客内容到你的仓库的方式。也就是git方式。repo替换为你自己的就可以。获取这个repo在各个平台都是大同小异的。分支的话我们这里填写master.因为初始化仓库默认是master分支。
# Deployment
## Docs: https://hexo.io/docs/deployment.html
deploy:
  type: 'git'
  repository:  git@gitee.com:yourname/blog2.git
branch: masterNext主题下的_config.yml的配置。
网站logo设置:
反正我配置Logo就是不好使,图片路径什么都是正确的,结果就是不好使。有毒。你把你要想要的图片放进\themes\next\source\images这个路径下。但是图片尺寸要正确。下面我推荐一个网站,上面的图标很多。
favicon:
  small: http://xxxxxx/xxxxxx/images/favicon-16x16-next.png
  medium: http://xxxxxx/xxxxxx/images/favicon-32x32-next.png
  # apple_touch_icon: /images/apple-touch-icon-next.png
  # safari_pinned_tab: /images/logo.svg
  #android_manifest: /images/manifest.json
  #ms_browserconfig: /images/browserconfig.xml
页脚设置:
footer:
  # Specify the date when the site was setup. If not defined, current year will be used.
  since: 2020

  # Icon between year and copyright info.
  icon:
    # Icon name in Font Awesome. See: https://fontawesome.com/v4.7.0/icons/
    # `heart` is recommended with animation in red (#ff0000).
    name: heart
    # If you want to animate the icon, set it to true.
    animated: true
    # Change the color of icon, using Hex Code.
    color: "#808080"

  # If not defined, `author` from Hexo `_config.yml` will be used.
  copyright: WYW@HD

  powered:
    # Hexo link (Powered by Hexo).
    enable: false
    # Version info of Hexo after Hexo link (vX.X.X).
    version: false

  theme:
    # Theme & scheme info link (Theme - NexT.scheme).
    enable: false
    # Version info of NexT after scheme info (vX.X.X).
    version: false
页脚设置就是网页最底下那一部分。鸽了n天后决定接着写。指的是下面图这一部分。


since指的是你博客开始的年份,icon的话默认的是心形。animated设置为true是显示。false则是关闭。colour指的是Icon的颜色。copyright如果没有提到的话则默认用的是你根目录下_config.yml中设置的作者名字,这里我设置的都是一样的。都是一个名字。powered指的是页面下是否显示hexo和hexo的版本。true就是显示。反之false。theme也是类似的。
Next主题风格:
# Schemes
#scheme: Muse
#scheme: Mist
# scheme: Pisces
scheme: Gemini
next的主题风格一共是有四种,在这里我用的是最后一种: Gemini。其它类型的风格可能配置后略有不同,自己可以尝试一下。
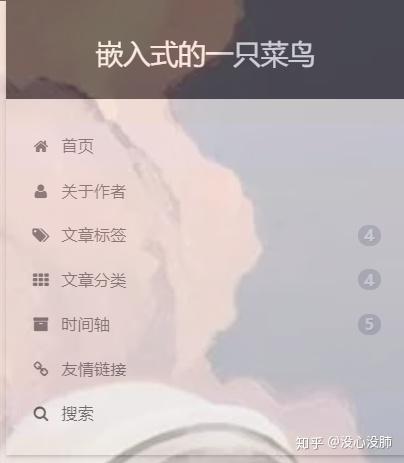
菜单栏设置:
菜单栏的设置刚开始配置文件中都是注释起来的,自己需要哪个把注释取消掉即可。效果如图所示:
# ---------------------------------------------------------------
# Menu Settings
# ---------------------------------------------------------------

# Usage: `Key: /link/ || icon`
# Key is the name of menu item. If the translation for this item is available, the translated text will be loaded, otherwise the Key name will be used. Key is case-senstive.
# Value before `||` delimiter is the target link, value after `||` delimiter is the name of Font Awesome icon.
# When running the site in a subdirectory (e.g. yoursite.com/blog), remove the leading slash from link value (/archives -> archives).
# External url should start with http:// or https://
menu:
  home: / || home
  about: /about/ || user
  tags: /tags/ || tags
  categories: /categories/ || th
  archives: /archives/ || archive
  # schedule: /schedule/ || calendar
  #sitemap: /sitemap.xml || sitemap
  #commonweal: /404/ || heartbeat
  links: /links/ || link

# Enable / Disable menu icons / item badges.
menu_settings:
  icons: true
badges: true举个例子,home对应的就是图片上方的首页。那么这个中文名称是在哪个文件更改呢?下面就是在博客根目录下的\themes\next\languages这个路径下的zh-CN.yml.打开后就可以看到了:
menu:
  home: 首页
  archives: 时间轴
  categories: 文章分类
  tags: 文章标签
  about: 关于作者
  search: 搜索
  schedule: 日历
  links: 友情链接
  sitemap: 站点地图
commonweal: 公益 404meau_settings下面的俩个参数默认即可。
侧边栏设置:
# ---------------------------------------------------------------
# Sidebar Settings
# See: https://theme-next.org/docs/theme-settings/sidebar
# ---------------------------------------------------------------

sidebar:
  # Sidebar Position.
  # position: left
  position: right

  # Manual define the sidebar width. If commented, will be default for:
  # Muse | Mist: 320
  # Pisces | Gemini: 240
  width: 320

  # Sidebar Display (only for Muse | Mist), available values:
  #  - post    expand on posts automatically. Default.
  #  - always  expand for all pages automatically.
  #  - hide    expand only when click on the sidebar toggle icon.
  #  - remove  totally remove sidebar including sidebar toggle.
  display: post

  # Sidebar padding in pixels.
  padding: 18
  # Sidebar offset from top menubar in pixels (only for Pisces | Gemini).
  offset: 12
  # Enable sidebar on narrow view (only for Muse | Mist).
  onmobile: true

# Sidebar Avatar
avatar:
  # Replace the default image and set the url here.
  url: /images/avatar.png
  # If true, the avatar will be dispalyed in circle.
  rounded:  true
  # If true, the avatar will be rotated with the cursor.
  rotated:  true

# Posts / Categories / Tags in sidebar.
site_state: trueposition设置的是侧边栏的位置,width设置的是宽度,默认即可,avatar指的头像的具体设置,url指的是你头像的路径,你可以把你想用的图像照片放进博客根目录下的\themes\next\source\images这个路径下,但是头像尺寸大小要符合,大小为512*512.rounded:指的是头像是否以圆形展示,true就是开启。rotated指的是把鼠标放在头像上的时候是否旋转。
社交链接:
社交链接下面需要什么把相应的注释去掉即可。加上自己的链接即可。或者可以将它原来的名字修改为你要的。
# Social Links
# Usage: `Key: permalink || icon`
# Key is the link label showing to end users.
# Value before `||` delimiter is the target permalink, value after `||` delimiter is the name of Font Awesome icon.
social:
  GitHub: https://github.com/wywaihandan || github
  E-Mail: 2838177495@qq.com|| envelope
  CSDN: https://me.csdn.net/qq_44219883 ||stack-overflow
  哔哩哔哩: https://space.bilibili.com/390161354 ||skype
  #Weibo: https://weibo.com/yourname || weibo
  #Google: https://plus.google.com/yourname || google
  #Twitter: https://twitter.com/yourname || twitter
  #FB Page: https://www.facebook.com/yourname || facebook
  #StackOverflow: https://stackoverflow.com/yourname || stack-overflow
  #YouTube: https://youtube.com/yourname || youtube
  #Instagram: https://instagram.com/yourname || instagram
  #Skype: skype:yourname?call|chat || skype

social_icons:
  enable: true
  icons_only: false
  transition: false
打赏设置:
# Reward (Donate)
# Front-matter variable (unsupport animation).
reward_settings:
  # If true, reward will be displayed in every article by default.
  enable: true
  animation: true
  comment: 坚持原创技术分享,您的支持将鼓励我继续创作!.

reward:
  wechatpay: /images/wechat.jpg
  alipay: /images/alipay.jpg

  #paypal: /images/paypal.png
  #bitcoin: /images/bitcoin.png

# Subscribe through Telegram Channel, Twitter, etc.
# Usage: `Key: permalink || icon` (Font Awesome)
follow_me:
  #Twitter: https://twitter.com/username || twitter
  #Telegram: https://t.me/channel_name || telegram
  WeChat: http://wyw_hd.gitee.io/blog2/images/6.jpg || wechat
  哔哩哔哩: https://space.bilibili.com/390161354?share_medium=android&share_source=copy_link&bbid=XY4332D4EDDC2E23C34503D72EE3B1E71BE02&ts=1582201848748 || rss
# RSS: /atom.xml || rssenable设置为true则是开启打赏设置,comment则是显示的一句话,可以换成自己喜欢的,微信和支付宝的照片依旧放在博客根目录下的\themes\next\source\images中。followe_me下面的设置可以设置你的其他发布渠道,wechat我放的是我的公众号,哔哩哔哩的文章也有,只不过我最近太懒了,鸽了好久,具体设置完后的效果图如图所示:


文章底部评论设置:
# Valine
# For more information: https://valine.js.org, https://github.com/xCss/Valine
valine:
  enable: true
  appid: *************** # Your leancloud application appid
  appkey: ***************** # Your leancloud application appkey
  notify: false # Mail notifier
  verify: false # Verification code
  placeholder: 留下你的评论吧 # Comment box placeholder
  avatar: mm # Gravatar style
  guest_info: nick,mail,link # Custom comment header
  pageSize: 10 # Pagination size
  language: # Language, available values: en, zh-cn
  visitor: true # Article reading statistic
  comment_count: true # If false, comment count will only be displayed in post page, not in home page
  recordIP: true # Whether to record the commenter IP
  serverURLs: # When the custom domain name is enabled, fill it in here (it will be detected automatically by default, no need to fill in)
#post_meta_order: 0文章底部评论我刚开始用的github的gittalk,后来由于github的服务器在国外,速度太慢了。而且每次用都要初始化下评论,就放弃了gittalk评论。改用valine评论。使用valine需要先注册下账号然后实名认证。然后创建应用得到appid和appkey.该网站的链接为:https://valine.js.org/quickstart.html。
之后把appid和appkey填入即可。使能打开即可。
Github角标
# `Follow me on GitHub` banner in the top-right corner.
github_banner:
  enable: true
  permalink: https://github.com/Siriusq
title: Follow me on GitHubenable:用于设置是否在页面右上角显示Github三角标 permalink:后面填写你的Github地址 title:用于设置鼠标移动到图标后显示的文字
返回顶部按钮
back2top:
  enable: true
  # Back to top in sidebar.
  sidebar: true
  # Scroll percent label in b2t button.
scrollpercent: trueenable:用于设置是否开启回到顶部按钮 sidebar:用于设置是否将按钮放到侧边栏中 scrollpercent:用于设置是否显示阅读进度百分比
文章搜索:
可以方便快捷的搜索文章,但是需要安装插件:
具体指令:
```visual basic npm install hexo-generator-searchdb --save
之后找到以下内容改为下图即可。

```python
# Local Search
# Dependencies: https://github.com/theme-next/hexo-generator-searchdb
local_search:
  enable: true
  # If auto, trigger search by changing input.
  # If manual, trigger search by pressing enter key or search button.
  trigger: auto
  # Show top n results per article, show all results by setting to -1
  top_n_per_article: 1
  # Unescape html strings to the readable one.
  unescape: false
  # Preload the search data when the page loads.
  preload: false
动态背景
Next主题默认提供了三种动态背景
Canvas-nest
这是在网页背景显示的动态效果。
安装
切换到Next主题文件夹
cd themes/next安装模块
git clone https://github.com/theme-next/theme-next-canvas-nest source/lib/canvas-nest修改配置文件
打开Next主题路径下的配置文件_config.yml修改下列代码
# Canvas-nest
# Dependencies: https://github.com/theme-next/theme-next-canvas-nest
canvas_nest:
  enable: true
  onmobile: true # 是否在手机上显示
  color: "255,51,51" # RGB颜色设置
  opacity: 0.5 # 线条透明度
  zIndex: -1 # 显示级别
  count: 160 # 线条的数量,越多越卡
如果想使用CDN加速的话需要设置
vendors:
  ...
  canvas_nest: //cdn.jsdelivr.net/gh/theme-next/theme-next-canvas-nest@1.0.0/canvas-nest.min.js
  canvas_nest_nomobile: //cdn.jsdelivr.net/gh/theme-next/theme-next-canvas-nest@1.0
网站运行时间
打开.\themes\next\layout\_partials\footer.swig并添加下列代码
<div>
<span id="timeDate">载入天数...</span><span id="times">载入时分秒...</span>
<script>
    var now = new Date();
    function createtime() {
        var grt= new Date("03/04/2020 00:00:00");
        now.setTime(now.getTime()+250);
        days = (now - grt ) / 1000 / 60 / 60 / 24; dnum = Math.floor(days);
        hours = (now - grt ) / 1000 / 60 / 60 - (24 * dnum); hnum = Math.floor(hours);
        if(String(hnum).length ==1 ){hnum = "0" + hnum;} minutes = (now - grt ) / 1000 /60 - (24 * 60 * dnum) - (60 * hnum);
        mnum = Math.floor(minutes); if(String(mnum).length ==1 ){mnum = "0" + mnum;}
        seconds = (now - grt ) / 1000 - (24 * 60 * 60 * dnum) - (60 * 60 * hnum) - (60 * mnum);
        snum = Math.round(seconds); if(String(snum).length ==1 ){snum = "0" + snum;}
        document.getElementById("timeDate").innerHTML = "本站已安全运行 "+dnum+" 天 ";
        document.getElementById("times").innerHTML = hnum + " 小时 " + mnum + " 分 " + snum + " 秒";
    }
setInterval("createtime()",250);
</script>
</div>
上面的代码可以修改为你创建博客的时间,
访客统计 :
# Show Views / Visitors of the website / page with busuanzi.
# Get more information on http://ibruce.info/2015/04/04/busuanzi
busuanzi_count:
  enable: true
  total_visitors: true
  total_visitors_icon: user
  total_views: true
  total_views_icon: eye
  post_views: true
  post_views_icon: eye
next主题中已经内置了访客统计的功能,所以这里我们只需开启就行。
文章目录:
文章目录我们用markdown写东西的时候会有一级标题,二级标题,文章目录就是由这些构成的。然后网上有的教程是让修改那个_custom文件。但是那个文件这个版本的next实际是没有的,然后有另外一种方法,就是在根目录下source\data新建一个styles.styl文件。然后找到next主题下的:
# Define custom file paths.
# Create your custom files in site directory `source/_data` and uncomment needed files below.
custom_file_path:
  #head: source/_data/head.swig
  #header: source/_data/header.swig
  #sidebar: source/_data/sidebar.swig
  #postMeta: source/_data/post-meta.swig
  #postBodyEnd: source/_data/post-body-end.swig
  #footer: source/_data/footer.swig
  #bodyEnd: source/_data/body-end.swig
  #variable: source/_data/variables.styl
  #mixin: source/_data/mixins.styl
style: source/_data/styles.styl将style前的注释取消掉即可。接下来就可以编辑在styles.styl编辑一些东西:比如网页背景以及透明度。
//文章目录默认展开
.post-toc .nav .nav-child { display: block; }
.post-toc ol {
  font-size : 13px;
}接下来初始化文章目录我们来到主题配置文件位于themes/next/_config.yml。
可以找到如下:
# Table of Contents in the Sidebar
# Front-matter variable (unsupport wrap expand_all).
toc:
  enable: true
  # Automatically add list number to toc.
  number: true
  # If true, all words will placed on next lines if header width longer then sidebar width.
  wrap: true
  # If true, all level of TOC in a post will be displayed, rather than the activated part of it.
  expand_all: true
  # Maximum heading depth of generated toc.
  max_depth: 6
按照上面配置即可。
网站背景:
写的我自己要吐了。网站没有背景其实真的很空洞,所以我们可以加上背景并设置透明度.........肝不动了。。。。明天再说。接着来写了。关于主题配置的话网上有好多说的仍旧是那个_custom文件。但是这个next主题是没有这个文件的。所以我们仍旧在style.styl文件中配置。配置内容如下:
body {
    background:url(http://***********/******/images/bg.jpg);//图片路径
    background-repeat: no-repeat;//是否重复平铺
    background-attachment:fixed;//是否随着网页上下滚动而滚动,fixed为固定
    background-position:50% 50%;//图片位置
    background-size: cover;//图片展示大小
    -webkit-background-size: cover;
    -o-background-size: cover;
    -moz-background-size: cover;
    -ms-background-size: cover;
    opacity: 0.6;//设置整个页面的透明度。该透明度如果不加在这里会出现bug,bug就是菜单栏无法点击。
     #footer > div > div {
        color:#000000;//底部文字颜色
    }
}
.header-inner {
    background: #fff;//设置侧边栏透明
    opacity: 1;//这里设置为1,否则搜索栏会消失
}
.main-inner {
  background: #fff;
  opacity: 1;
}图片的url照着替换为你博客的网址+images即可。
文章分类以及标签:
还记得_config.yml中有关于meau的设置把。我们如果想将文章分类以及添加标签的话。首先在根目录执行 hexo new page categories。之后你会发现在博客根目录下source文件夹会生成一个categories文件夹。我们进入这个文件夹。用VSCODE打开里面的index.md进行编辑,在当中添加type类型。
---
title: categories
date: 2020-02-19 22:27:43
type: categories
---
标签的操作也是类似这样。输入指令 hexo new page tags。接下来编辑index.md这个文件即可。添加type属性即可。
以上完成后我们就可以在文章中添加分类以及标签了。类似这样:
---
title: hexo+next主题配置
date: 2020-03-04 23:22
categories: hexo博客主题配置
tags: Next主题美化
mathjax: true
---
这样我们就可以查看我们自己文章的分类以及标签了。
友情链接links:
菜单栏中还有一项友情链接。这里可以放上常用的网站。具体设置如下:首先在根目录下\themes\next\layout新建一个links.swig并添加如下内容:
{% block content %}
  {######################}
  {### LINKS BLOCK ###}
  {######################}

    <div id="links">
        <style>

            #links{
               margin-top: 5rem;
            }

            .links-content{
                margin-top:1rem;
            }

            .link-navigation::after {
                content: " ";
                display: block;
                clear: both;
            }

            .card {
                width: 300px;
                font-size: 1rem;
                padding: 10px 20px;
                border-radius: 4px;
                transition-duration: 0.15s;
                margin-bottom: 1rem;
                display:flex;
            }
            .card:nth-child(odd) {
                float: left;
            }
            .card:nth-child(even) {
                float: right;
            }
            .card:hover {
                transform: scale(1.1);
                box-shadow: 0 2px 6px 0 rgba(0, 0, 0, 0.12), 0 0 6px 0 rgba(0, 0, 0, 0.04);
            }
            .card a {
                border:none;
            }
            .card .ava {
                width: 3rem!important;
                height: 3rem!important;
                margin:0!important;
                margin-right: 1em!important;
                border-radius:4px;

            }
            .card .card-header {
                font-style: italic;
                overflow: hidden;
                width: 236px;
            }
            .card .card-header a {
                font-style: normal;
                color: #2bbc8a;
                font-weight: bold;
                text-decoration: none;
            }
            .card .card-header a:hover {
                color: #d480aa;
                text-decoration: none;
            }
            .card .card-header .info {
                font-style:normal;
                color:#a3a3a3;
                font-size:14px;
                min-width: 0;
                text-overflow: ellipsis;
                overflow: hidden;
                white-space: nowrap;
            }
        </style>
        <div class="links-content">
            <div class="link-navigation">

                {% for link in theme.mylinks %}

                    <div class="card">
                        <img class="ava" src="{{ link.avatar }}"/>
                        <div class="card-header">
                           <div>
                              <a href="{{ link.site }}" target="_blank"> {{ link.nickname }}</a>
                              <a href="{{ link.site }}" target="_blank"><span class="focus-links">关注</span></a>
                           </div>
                           <div class="info">{{ link.info }}</div>
                        </div>
                    </div>

                {% endfor %}

            </div>
            {{ page.content }}
            </div>
        </div>

  {##########################}
  {### END LINKS BLOCK ###}
  {##########################}
{% endblock %}
然后修改 hexo/themems/next/layout/page.swig 文件,在
复制
文件位置:hexo/themems/next/layout/page.swig#}{% elif page.type === "tags" and not page.title %}{#
    #}{{ __('title.tag') + page_title_suffix }}{#
位置添加如下代码:
复制
<!-- 友情链接-->
#}{% elif page.type === 'links' and not page.title %}{#
  #}{{ __('title.links') + page_title_suffix }}{#
然后还是在这个 page.swig 文件中,引入刚才新建的 swig 页面:
复制
<!-- 友情链接-->
{% elif page.type === 'links' %}
    {% include 'links.swig' %}
这个代码位置可以放到下面
复制
{% elif page.type === 'categories' %}
      <div class="category-all-page">
        <div class="category-all-title">
            {{ _p('counter.categories', site.categories.length) }}
        </div>
        <div class="category-all">
          {{ list_categories() }}
        </div>
      </div>
+      {% elif page.type === 'links' %}
+          {% include 'links.swig' %}
    {% else %}
      {{ page.content }}
    {% endif %}
  </div>
然后我们使用 GitBash 新建一个菜单栏:
复制
命令位置:hexo根目录hexo new page "links"这样在 hexo/source 目录下会生成一个 links 文件夹,打开其中的 index.md 文件,在标题头中写入 type = "links" 这个属性头,如下:
复制
---
title: 友情链接
date: 2019-06-28 20:46:16
+ type: "links"
---
如果需要关闭这个页面的评论的话,可以设置如下:
复制
---
title: 友情链接
date: 2019-06-28 20:46:16
type: "links"
+ comments: false
---
最后,我们添加友链的话,需要在主题配置文件根目录下/themes/next/_config.xml 文件末尾添加:
mylinks:

- nickname: CSDN
  avatar:  http://wyw_hd.gitee.io/blog2/images/csdn.png
  site: https://www.csdn.net/
  info: 各类知识都有

- nickname: 电子开源网
  avatar: http://wyw_hd.gitee.io/blog2/images/naruto.png
  site: http://openedv.com/
  info: 正点原子STM32系列知识

- nickname: 哔哩哔哩
  avatar:  http://wyw_hd.gitee.io/blog2/images/jake.png
  site: https://www.bilibili.com/
  info: 各类教学视频都有啊,学习的小破站

- nickname: github
  avatar:  http://wyw_hd.gitee.io/blog2/images/hah.png
  site: https://github.com/
  info: 上面各种开源代码。值得学习
然后我们还需要在该配置文件下添加links即可;
# ---------------------------------------------------------------
# Menu Settings
# ---------------------------------------------------------------

# Usage: `Key: /link/ || icon`
# Key is the name of menu item. If the translation for this item is available, the translated text will be loaded, otherwise the Key name will be used. Key is case-senstive.
# Value before `||` delimiter is the target link, value after `||` delimiter is the name of Font Awesome icon.
# When running the site in a subdirectory (e.g. yoursite.com/blog), remove the leading slash from link value (/archives -> archives).
# External url should start with http:// or https://
menu:
  home: / || home
  about: /about/ || user
  tags: /tags/ || tags
  categories: /categories/ || th
  archives: /archives/ || archive
  # schedule: /schedule/ || calendar
  #sitemap: /sitemap.xml || sitemap
  #commonweal: /404/ || heartbeat
添加:  links: /links/ || link

# Enable / Disable menu icons / item badges.
menu_settings:
  icons: true
  badges: true
阅读全文按钮开启:
我们首先找到在next主题下的_config.yml代码:
auto_excerpt:
      enable: false
      length: 150
然后把false改为true即可。length是显示摘要的长度。然后在文章添加这个标签即可。
感觉写的差不多了。坑是有点多。踩的多就明白了。希望疫情早日结束,能够开学早点见到她。嘿嘿。
参考博客:
1:next主题美化
有时间再把这个坑再填下。欢迎来到我的博客http://wyw_hd.gitee.io/blog2/。会有一些技术类的很菜的个人总结。