pytorch LSTM 01

2046
官方API:
https://pytorch.org/docs/stable/nn.html?highlight=lstm#torch.nn.LSTM
torch.nn.LSTM(*args, kwargs)**
参数
– input_size
– hidden_size
– num_layers
– bias
– batch_first
– dropout
– bidirectional
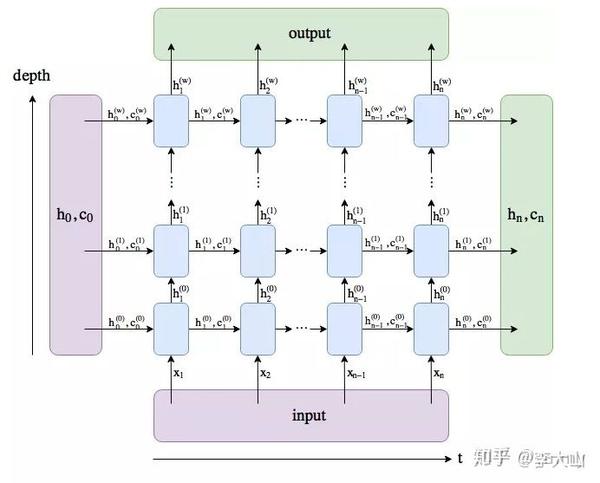
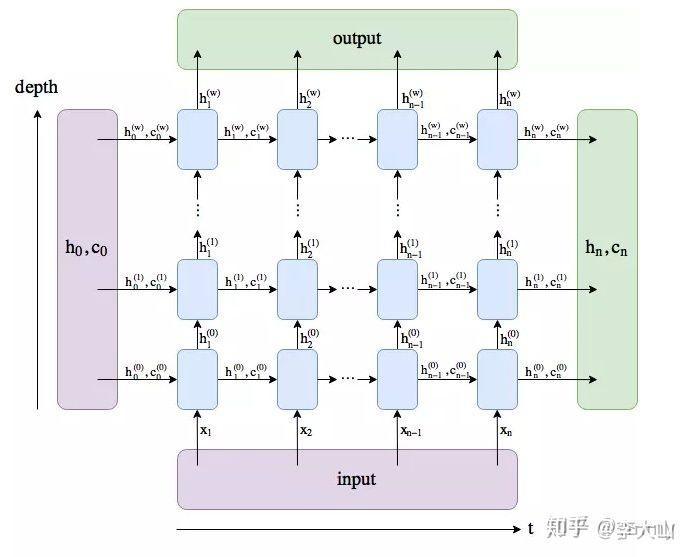
LSTM的输入 input, (h_0, c_0)
– input (seq_len, batch, input_size)
– h_0 (num_layers * num_directions, batch, hidden_size) # 初始的隐藏状态
– c_0 (num_layers * num_directions, batch, hidden_size) # 初始的单元状态,维度与h_0相同
LSTM的输出 output, (h_n, c_n)
– output (seq_len, batch, num_directions * hidden_size)#output保存了最后一层,每个time step的输出h
– h_n (num_layers * num_directions, batch, hidden_size) # 最后时刻的输出隐藏状态
– c_n (num_layers * num_directions, batch, hidden_size) # 最后时刻的输出单元状态,维度与h_n相同先上结论:
1. output保存了最后一层,每个time step的输出h,如果是双向LSTM,每个time step的输出
h = [h正向, h逆向] (同一个time step的正向和逆向的h连接起来)。
2. h_n保存了每一层,最后一个time step的输出h,如果是双向LSTM,单独保存前向和后向的
最后一个time step的输出h。
3. c_n与h_n一致,只是它保存的是c的值。
下面单独分析三个输出
1. output是一个三维的张量,第一维表示序列长度,第二维表示一批的样本数(batch),
第三维是 hidden_size(隐藏层大小) * num_directions , 代码中可以发现num_directions
根据是“否为双向”取值为1或2
2. h_n是一个三维的张量,第一维是num_layers*num_directions,num_layers是我们定义的
神经网络的层数,num_directions在上面介绍过,取值为1或2,表示是否为双向LSTM。第二维表示
batch_size 第三维表示隐藏层的大小。
举个例子,我们定义一个num_layers=3的双向LSTM,h_n第一个维度的大小就等于 6 (2*3),h_n[0]
表示第一层前向传播最后一个time step的输出,h_n[1]表示第一层后向传播最后一个time step的输出,
h_n[2]表示第二层前向传播最后一个time step的输出,h_n[3]表示第二层后向传播最后一个time step的输出,
h_n[4]和h_n[5]分别表示第三层前向和后向传播时最后一个time step的输出。
3. c_n与h_n的结构一样import torch
import torch.nn as nn
"""
定义一个两层双向的LSTM,input size为10,hidden size为20。
随机生成一个输入样本,sequence length为5,batch size为3,input size与定义的网络一致,为10。
手动初始化h0和c0,两个结构一致(num_layers * 2, batch, hidden_size) = (4, 3, 20)。
如果不初始化,PyTorch默认初始化为全零的张量
"""
bilstm = nn.LSTM(input_size=10, hidden_size=20, num_layers=2, bidirectional=True)
input = torch.randn(5, 3, 10)
h0 = torch.randn(4, 3, 20) # 初始化
c0 = torch.randn(4, 3, 20)
output, (hn, cn) = bilstm(input, (h0, c0))
# 查看output,hn,cn的维度
print('output shape: ', output.shape) # output shape: torch.Size([5, 3, 40])
print('hn shape: ', hn.shape) # hn shape: torch.Size([4, 3, 20])
print('cn shape: ', cn.shape) # cn shape: torch.Size([4, 3, 20])
# 根据一开始结论,我们来验证下
#1.前向传播时,output中最后一个time step的前20个与hn最后一层前向传播的输出应该一致
print(output[4,0,:20], hn[2, 0], output[4, 0, :20] == hn[2, 0])
#2.后向传播时,output中最后一个time step的后20个与hn最后一层后向传播的输出应该一致。
print(output[0,0,20:], hn[3, 0], output[0,0,20:] == hn[3, 0])import torch
from torch import nn
torch.manual_seed(1)
lstm = nn.LSTM(3, 3) # 输入单词用一个维度为3的向量表示, 隐藏层的一个维度3,仅有一层的神经元,
#记住就是神经元,这个时候神经层的详细结构还没确定,仅仅是说这个网络可以接受
#[seq_len,batch_size,3]的数据输入
#print(lstm.all_weights)
inputs = [torch.randn(1, 3) for _ in range(5)] # input(seq_len, batch, input_size)
# 构造一个由5个单单词组成的句子 构造出来的形状是 [5,1,3]也就是明确告诉网络结构我一个句子
#由5个单词组成, 每个单词由一个1X3的向量组成,就是这个样子[1,2,3]
#print('Inputs:',inputs)
inputs = torch.cat(inputs).view(len(inputs), 1, -1) # (5, 1, 3)
hidden = (torch.randn(1, 1, 3), torch.randn(1, 1, 3)) # h0, c0 初始化
out, (h_n, c_n) = lstm(inputs, hidden)
#h_n是一个三维的张量,第一维是num_layers*num_directions,num_layers
#第二维表示batch_size 第三维表示隐藏层的大小
#通过"out"你能取得任何一个时刻的隐藏状态,而h_n的值是用来进行序列的反向传播运算
print(out, h_n, out[-1] == h_n) # ... tensor([[[True, True, True]]])# -*- coding:utf-8 -*-
import torch
from torch import nn
import torchvision.datasets as dsets
import torchvision.transforms as transforms
import matplotlib.pyplot as plt
# torch.manual_seed(1) # reproducible
#https://blog.csdn.net/out_of_memory_error/article/details/81456501
#https://msd.misuland.com/pd/2884250103256718290
# Hyper Parameters
EPOCH = 1 # train the training data n times, to save time, we just train 1 epoch
BATCH_SIZE = 64
TIME_STEP = 28 # rnn time step / image height
INPUT_SIZE = 28 # rnn input size / image width
LR = 0.01 # learning rate
DOWNLOAD_MNIST = True # 如果你已经下载好了mnist数据就写上 False
# Mnist digital dataset
train_data = dsets.MNIST(
root='mnist',
train=True, # this is training data
transform=transforms.ToTensor(), # Converts a PIL.Image or numpy.ndarray to
# torch.FloatTensor of shape (C x H x W) and normalize in the range [0.0, 1.0]
download=DOWNLOAD_MNIST, # download it if you don't have it
)
# plot one example
print(train_data.data.size()) # (60000, 28, 28)
print(train_data.targets.size()) # (60000)
def show():
#plt.imshow(train_data.train_data[0].numpy(), cmap='gray')
# train_data.train_data --> train_data has been renamed data
plt.imshow(train_data.data[0].numpy(), cmap='gray')
#plt.title('%i' % train_data.train_labels[0])
#train_data.train_labels --> train_labels has been renamed targets
plt.title('%i' % train_data.targets[0])
plt.show()
#show()
# # 批训练 64samples, 1 channel, 28x28 (64, 1, 28, 28)
train_loader = torch.utils.data.DataLoader(dataset=train_data, batch_size=BATCH_SIZE, shuffle=True)
# 为了节约时间, 我们测试时只测试前2000个
test_data = dsets.MNIST(root='mnist', train=False, transform=transforms.ToTensor())
test_x = test_data.data.type(torch.FloatTensor)[:2000]/255.
# shape (2000, 28, 28) value in range(0,1)
#print("test_x.shape ", test_x.shape) # ---> test_x.shape torch.Size([2000, 28, 28])
test_y = test_data.targets.numpy().squeeze()[:2000] # covert to numpy array
class RNN(nn.Module):
def __init__(self):
super(RNN, self).__init__()
self.rnn = nn.LSTM( # LSTM 效果要比 nn.RNN() 好多了
input_size=INPUT_SIZE,
hidden_size=64, # rnn hidden unit
num_layers=2, # number of rnn layer
batch_first=True,
# input & output will has batch size as 1s dimension. e.g. (batch, time_step, input_size)
)
self.out = nn.Linear(64, 10)
def forward(self, x):
# x shape (batch, time_step, input_size) # num_directions 默认为1
# r_out shape (batch, time_step, num_directions *hidden_size) 64* 28*64
# h_n shape (n_layers*num_directions , batch, hidden_size) 2*64*64
# h_c shape (n_layers*num_directions, batch, hidden_size) 2*64*64
r_out, (h_n, h_c) = self.rnn(x, None) # None 表示 hidden state 会用全0的 state
# choose r_out at the last time step, 选取最后一个时间点的 r_out 输出
# 这里 r_out[:, -1, :] = h_n[-1] 的值, 因为num_layers = 2
#print("h_n[-1].size() --> ", h_n[-1].size(), h_n[-1][0])
# h_n[-1].size() --> torch.Size([64, 64]) ...
#print("r_out[:, -1, :] --> ", r_out[:, -1, :].size(), r_out[:, -1, :][0])
# r_out[:, -1, :] --> torch.Size([64, 64]) ...
out = self.out(r_out[:, -1, :])
return out
rnn = RNN()
print(rnn)
"""
RNN(
(rnn): LSTM(28, 64, num_layers=2, batch_first=True)
(out): Linear(in_features=64, out_features=10, bias=True)
)
"""
optimizer = torch.optim.Adam(rnn.parameters(), lr=LR) # optimize all cnn parameters
loss_func = nn.CrossEntropyLoss() # the target label is not one-hotted
# training and testing
for epoch in range(EPOCH):
for step, (b_x, b_y) in enumerate(train_loader): # gives batch data
# print("b_x.shape -------> ",b_x.shape) # torch.Size([64, 1, 28, 28])
b_x = b_x.view(-1, 28, 28) # reshape x to (batch, time_step, input_size)
output = rnn(b_x) # rnn output
loss = loss_func(output, b_y) # cross entropy loss
optimizer.zero_grad() # clear gradients for this training step
loss.backward() # backpropagation, compute gradients
optimizer.step() # apply gradients
if step % 50 == 0:
test_output = rnn(test_x) # (samples, time_step, input_size)
pred_y = torch.max(test_output, 1)[1].data.numpy().squeeze()
accuracy = float((pred_y == test_y).astype(int).sum()) / float(test_y.size)
print('Epoch: ', epoch, '| train loss: %.4f' % loss.data.numpy(),
'| test accuracy: %.2f' % accuracy)
# print 10 predictions from test data
test_output = rnn(test_x[:10].view(-1, 28, 28))
pred_y = torch.max(test_output, 1)[1].data.numpy().squeeze()
print(pred_y, 'prediction number')
print(test_y[:10], 'real number')
'''
[7 2 1 0 4 1 4 9 6 9] prediction number
[7 2 1 0 4 1 4 9 5 9] real number
'''编辑于 2020-08-12 09:06