2. 整体把握 CocoaPods 核心组件

CocoaPods历险记这个专题是Edmond和冬瓜共同撰写,对于 iOS / macOS 工程中版本管理工具 CocoaPods 的实现细节、原理、源码、实践与经验的分享记录,旨在帮助大家能够更加了解这个依赖管理工具,而不仅局限于pod install和pod update。
本文知识目录

引子
在上文 版本管理工具及 Ruby 工具链环境 中,我们聊到如何统一管理团队小伙伴的 CocoaPods 生产环境及使用到的 Ruby 工具链。今天让我们将目光转到 CocoaPods 身上,一起来聊聊它的主要构成,以及各个组件在整个 Pods 工作流的关系。
为了整体把握 CocoaPods 这个项目,建议大家去入门一下 Ruby 这门脚本语言。另外本文基于 CocoaPods 1.9.2 版本。
CocoaPods 的核心组件
作为包管理工具,CocoaPods 随着 Apple 生态的蓬勃发展也在不断迭代和进化,并且各部分核心功能也都演化出相对独立的组件。这些功能独立的组件,均拆分出一个个独立的 Gem 包,而 CocoaPods 则是这些组件的“集大成者”。
CocoaPods 依赖总览
我们知道在 Pod 管理的项目中,Podfile 文件里描述了它所依赖的 dependencies,类似的 Gem 的依赖可以在 Gemfile 中查看。那 CocoaPods 的 Gemfile 有哪些依赖呢?
SKIP_UNRELEASED_VERSIONS = false
# ...

source 'https://rubygems.org'
gemspec
gem 'json', :git => 'https://github.com/segiddins/json.git', :branch => 'seg-1.7.7-ruby-2.2'

group :development do
  cp_gem 'claide',                'CLAide'
  cp_gem 'cocoapods-core',        'Core', '1-9-stable'
  cp_gem 'cocoapods-deintegrate', 'cocoapods-deintegrate'
  cp_gem 'cocoapods-downloader',  'cocoapods-downloader'
  cp_gem 'cocoapods-plugins',     'cocoapods-plugins'
  cp_gem 'cocoapods-search',      'cocoapods-search'
  cp_gem 'cocoapods-stats',       'cocoapods-stats'
  cp_gem 'cocoapods-trunk',       'cocoapods-trunk'
  cp_gem 'cocoapods-try',         'cocoapods-try'
  cp_gem 'molinillo',             'Molinillo'
  cp_gem 'nanaimo',               'Nanaimo'
  cp_gem 'xcodeproj',             'Xcodeproj'

  gem 'cocoapods-dependencies', '~> 1.0.beta.1'
  # ...
  # Integration tests
  gem 'diffy'
  gem 'clintegracon'
  # Code Quality
  gem 'inch_by_inch'
  gem 'rubocop'
  gem 'danger'
end

group :debugging do
  gem 'cocoapods_debug'

  gem 'rb-fsevent'
  gem 'kicker'
  gem 'awesome_print'
  gem 'ruby-prof', :platforms => [:ruby]
end
上面的 Gemfile 中我们看到很多通过 cp_gem 装载的 Gem 库,其方法如下:
def cp_gem(name, repo_name, branch = 'master', path: false)
  return gem name if SKIP_UNRELEASED_VERSIONS
  opts = if path
           { :path => "../#{repo_name}" }
         else
           url = "https://github.com/CocoaPods/#{repo_name}.git"
           { :git => url, :branch => branch }
         end
  gem name, opts
end
它是用于方便开发和调试,当 **SKIP_UNRELEASED_VERSIONS** 为 false && path 为 true 时会使用与本地的 CocoaPods 项目同级目录下的 git 仓库,否则会使用对应的项目直接通过 Gem 加载。
通过简单的目录分割和 Gemfile 管理,就实现了最基本又最直观的热插拔,对组件开发十分友好。所以你只要将多个仓库如下图方式排列,即可实现跨仓库组件开发:
$ ls -l
lrwxr-xr-x  1 gua  staff    31 Jul 30 21:34 CocoaPods
lrwxr-xr-x  1 gua  staff    26 Jul 31 13:27 Core
lrwxr-xr-x  1 gua  staff    31 Jul 31 10:14 Molinillo
lrwxr-xr-x  1 gua  staff    31 Aug 15 11:32 Xcodeproj
lrwxr-xr-x  1 gua  staff    42 Jul 31 10:14 cocoapods-downloader
组件构成和对应职责
通过上面对于 Gemfile 的简单分析,可以看出 CocoaPods 不仅仅是一个仓库那么简单,它作为一个三方库版本管理工具,对自身组件的管理和组件化也是十分讲究的。我们继续来看这份 Gemfile 中的核心开发组件:
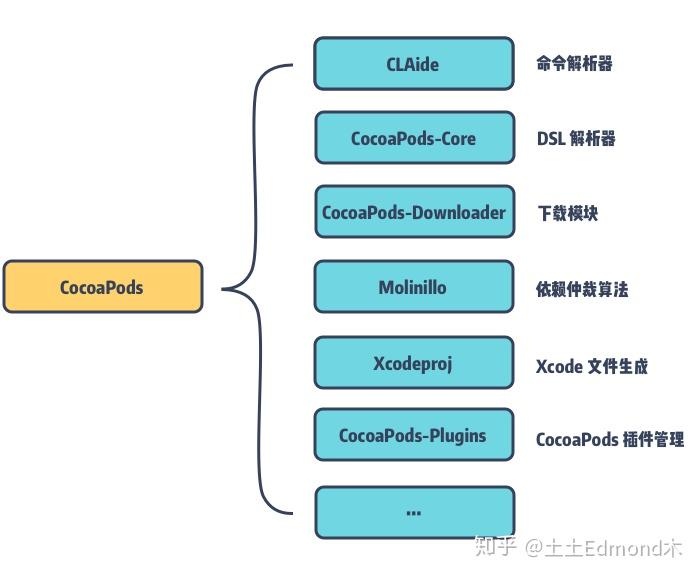

CLAide
The CLAide gem is a simple command line parser, which provides an API that allows you to quickly create a full featured command-line interface.
CLAide 虽然是一个简单的命令行解释器,但它提供了功能齐全的命令行界面和 API。它不仅负责解析我们使用到的 Pods 命令,如:pod install, pod update 等,还可用于封装常用的一些脚本,将其打包成简单的命令行小工具。
PS: 所谓命令行解释器就是从标准输入或者文件中读取命令并执行的程序。详见 Wiki。
cocoapods-core
The CocoaPods-Core gem provides support to work with the models of CocoaPods, for example the Podspecs or the Podfile.
CocoaPods-Core 用于 CocoaPods 中模板文件的解析,包括 Podfile、.podspec,以及所有的 .lock 文件中特殊的 YAML 文件。
cocoapods-downloader
The Cocoapods-downloader gem is a small library that provides downloaders for various source control types (HTTP/SVN/Git/Mercurial). It can deal with tags, commits, revisions, branches, extracting files from zips and almost anything these source control system would use.
Cocoapods-Downloader 是用于下载源码的小工具,它支持各种类型的版本管理工具,包括 HTTP / SVN / Git / Mercurial。它可以提供 tags、commites,revisions,branches 以及 zips 文件的下载和解压缩操作。
Molinillo
The Molinillo gem is a generic dependency resolution algorithm, used in CocoaPods, Bundler and RubyGems.
Molinillo 是 CocoaPods 对于依赖仲裁算法的封装,它是一个具有前向检察的回溯算法。不仅在 Pods 中,Bundler 和 RubyGems 也是使用的这一套仲裁算法。
Xcodeproj
The Xcodeproj gem lets you create and modify Xcode projects from Ruby. Script boring management tasks or build Xcode-friendly libraries. Also includes support for Xcode workspaces (.xcworkspace) and configuration files (.xcconfig).
Xcodeproj 可通过 Ruby 来操作 Xcode 项目的创建和编辑等。可友好的支持 Xcode 项目的脚本管理和 libraries 构建,以及 Xcode 工作空间 (.xcworkspace) 和配置文件 .xcconfig 的管理。
cocoapods-plugins
CocoaPods plugin which shows info about available CocoaPods plugins or helps you get started developing a new plugin. Yeah, it's very meta.
cocoapods-plugins 插件管理功能,其中有 pod plugin 全套命令,支持对于 CocoaPods 插件的列表一览(list)、搜索(search)、创建(create)功能。
当然,上面还有很多组件这里就不一一介绍了。通过查看 Gemfile 可以看出 Pod 对于组件的拆分粒度是比较细微的,通过对各种组件的组合达到现在的完整版本。这些组件中,笔者的了解也十分有限,不过我们会在之后的一系列文章来逐一介绍学习。
CocoaPods 初探
接下来,结合 pod install 安装流程来展示各个组件在 Pods 工作流中的上下游关系。
命令入口
每当我们输入 pod xxx 命令时,系统会首先调用 pod 命令。所有的命令都是在 /bin 目录下存放的脚本,当然 Ruby 环境的也不例外。我们可以通过 which pod 来查看命令所在位置:
$ which pod
/Users/edmond/.rvm/gems/ruby-2.6.1/bin/pod
这里的显示路径不是 /usr/local/bin/pod 的原因是因为使用 RVM 进行版本控制的。我们通过 cat 命令来查看一下这个入口脚本执行了什么
$ cat /Users/edmond/.rvm/gems/ruby-2.6.1/bin/pod
输出如下:
#!/usr/bin/env ruby_executable_hooks

require 'rubygems'
version = ">= 0.a"

str = ARGV.first
if str
  str = str.b[/\A_(.*)_\z/, 1]
  if str and Gem::Version.correct?(str)
    version = str
    ARGV.shift
  end
end

if Gem.respond_to?(:activate_bin_path)
    load Gem.activate_bin_path('cocoapods', 'pod', version)
else
    gem "cocoapods", version
    load Gem.bin_path("cocoapods", "pod", version)
end
程序 CocoaPods 是作为 Gem 被安装的,此脚本用于唤起 CocoaPods。逻辑比较简单,就是一个单纯的命令转发。Gem.activate_bin_path 和 Gem.bin_path 用于找到 CocoaPods 的安装目录 cocoapods/bin,最终加载该目录下的 /pod 文件:
#!/usr/bin/env ruby
# ... 忽略一些对于编码处理的代码

require 'cocoapods'

# 这里手动输出一下调用栈,来关注一下
puts caller

# 如果环境配置中指定了 ruby-prof 配置文件,会对执行命令过程进行性能监控
if profile_filename = ENV['COCOAPODS_PROFILE']
  require 'ruby-prof'
  # 依据配置文件类型加载不同的 reporter 解析器
  # ...
  File.open(profile_filename, 'w') do |io|
    reporter.new(RubyProf.profile { Pod::Command.run(ARGV) }).print(io)
  end
else
  Pod::Command.run(ARGV)
end
一起来查看一下 pod 命令的输出结果:
$ pod
/Users/edmond/.rvm/gems/ruby-2.6.1/bin/pod:24:in `load'
/Users/edmond/.rvm/gems/ruby-2.6.1/bin/pod:24:in `<main>'
/Users/edmond/.rvm/gems/ruby-2.6.1/bin/ruby_executable_hooks:24:in `eval'
/Users/edmond/.rvm/gems/ruby-2.6.1/bin/ruby_executable_hooks:24:in `<main>'
ruby_executable_hooks 通过 bin 目录下的 pod 入口唤醒,再通过 eval 的手段调起我们需要的 CocoaPods 工程。这是 RVM 的自身行为,它利用了 executable-hook 来注入 Gems 插件来定制扩展。
PS:大多数动态语言都支持 eval 这一神奇的函数。打 Lisp 开始就支持了,它通过接受一个字符串类型作为参数,将其解析成语句并混合在当前作用域内运行。详细可以参考这篇 文章。在入口的最后部分,通过调用 Pod::Command.run(ARGV),实例化了一个 CLAide::Command 对象,开始我们的 CLAide 命令解析阶段。这里不对 CLAide 这个命令解析工具做过多的分析,这个是后面系列文章的内容。这里我们仅仅需要知道:
每个 CLAide 命令的执行,最终都会对应到具体 Command Class 的 run 方法。Pod 命令对应的 run 方法实现如下:
module Pod
  class Command
    class Install < Command
      # ...
      def run
        # 判断是否存在 Podfile 文件
        verify_podfile_exists!
        # 从 Config 中获取一个 Instraller 实例
        installer = installer_for_config
        # 默认是不执行 update
        installer.repo_update = repo_update?(:default => false)
        installer.update = false
        installer.deployment = @deployment
        # install 的真正过程
        installer.install!
      end
    end
  end
end
上述所见的 Command::Install 类对应的命令为 pod install。pod install 过程是依赖于 Podfile文件的,所以在入口处会做检测,如果不存在 Podfile 则直接抛出 No 'Podfile' found in the project directory 的异常 警告并结束命令。
执行功能主体
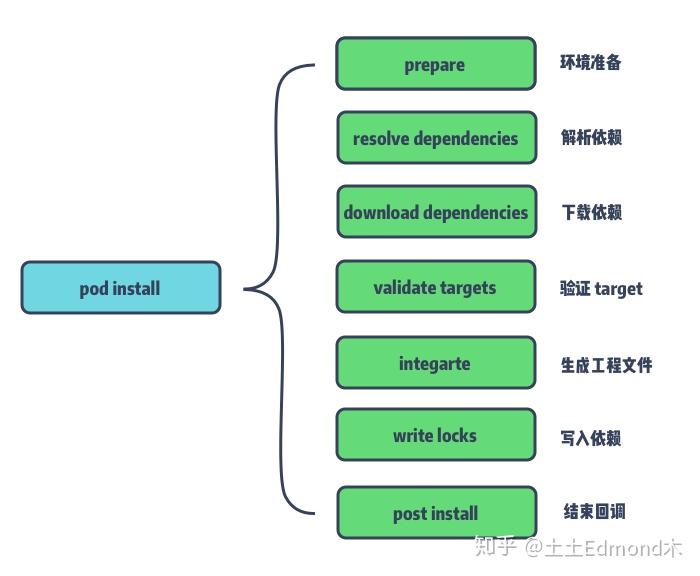
在 installer 实例组装完成之后,调用其 install! 方法,这时候才进入了我们 pod install 命令的主体部分,流程如下图:

对应的实现如下:
def install!
    prepare
    resolve_dependencies
    download_dependencies
    validate_targets
    if installation_options.skip_pods_project_generation?
        show_skip_pods_project_generation_message
    else
        integrate
    end
    write_lockfiles
    perform_post_install_actions
end

def integrate
    generate_pods_project
    if installation_options.integrate_targets?
        integrate_user_project
    else
        UI.section 'Skipping User Project Integration'
    end
end
0x1 Install 环境准备(prepare)
def prepare
  # 如果检测出当前目录是 Pods,直接 raise 终止
  if Dir.pwd.start_with?(sandbox.root.to_path)
    message = 'Command should be run from a directory outside Pods directory.'
    message << "\n\n\tCurrent directory is #{UI.path(Pathname.pwd)}\n"
    raise Informative, message
  end
  UI.message 'Preparing' do
    # 如果 lock 文件的 CocoaPods 主版本和当前版本不同,将以新版本的配置对 xcodeproj 工程文件进行更新
    deintegrate_if_different_major_version
    # 对 sandbox(Pods) 目录建立子目录结构
    sandbox.prepare
    # 检测 PluginManager 是否有 pre-install 的 plugin
    ensure_plugins_are_installed!
    # 执行插件中 pre-install 的所有 hooks 方法
    run_plugins_pre_install_hooks
  end
end
在 prepare 阶段会将 pod install 的环境准备完成,包括版本一致性、目录结构以及将 pre-install 的装载插件脚本全部取出,并执行对应的 pre_install hook。
0x2 解决依赖冲突(resolve_dependencies)
def resolve_dependencies
    # 获取 Sources
    plugin_sources = run_source_provider_hooks
    # 创建一个 Analyzer
    analyzer = create_analyzer(plugin_sources)

    # 如果带有 repo_update 标记
    UI.section 'Updating local specs repositories' do
        # 执行 Analyzer 的更新 Repo 操作
        analyzer.update_repositories
    end if repo_update?

    UI.section 'Analyzing dependencies' do
        # 从 analyzer 取出最新的分析结果,@analysis_result,@aggregate_targets,@pod_targets
        analyze(analyzer)
        # 拼写错误降级识别,白名单过滤
        validate_build_configurations
    end

    # 如果 deployment? 为 true,会验证 podfile & lockfile 是否需要更新
    UI.section 'Verifying no changes' do
        verify_no_podfile_changes!
        verify_no_lockfile_changes!
    end if deployment?

    analyzer
end
依赖解析过程就是通过 Podfile、Podfile.lock 以及沙盒中的 manifest 生成 Analyzer 对象。Analyzer内部会使用 Molinillo (具体的是 Molinillo::DependencyGraph 图算法)解析得到一张依赖关系表。
PS:通过 Analyzer 能获取到很多依赖信息,例如 Podfile 文件的依赖分析结果,也可以从 specs_by_target 来查看各个 target 相关的 specs。
另外,需要注意的是 analyze 的过程中有一个 pre_download 的阶段,即在 --verbose 下看到的 Fetching external sources 过程。这个 pre_download 阶段不属于依赖下载过程,而是在当前的依赖分析阶段。
PS:该过程主要是解决当我们在通过 Git 地址引入的 Pod 仓库的情况下,系统无法从默认的 Source 拿到对应的 Spec,需要直接访问我们的 Git 地址下载仓库的 zip 包,并取出对应的 podspec 文件,从而进行对比分析。0x3 下载依赖文件(download_dependencies)
def download_dependencies
  UI.section 'Downloading dependencies' do
    # 初始化 sandbox 文件访问器
    create_file_accessors
    # 构造 Pod Source Installer
    install_pod_sources
    # 执行 podfile 定义的 pre install 的 hooks
    run_podfile_pre_install_hooks
    # 根据配置清理 pod sources 信息,主要是清理无用 platform 相关内容
    clean_pod_sources
  end
end
在 create_file_accessors 中会创建沙盒目录的文件访问器,通过构造 FileAccessor 实例来解析沙盒中的各种文件。接着是最重要的 install_pod_sources 过程,它会调用对应 Pod 的 install! 方法进行资源下载。
先来看看 install_pod_sources 方法的实现:
def install_pod_sources
 @installed_specs = []
 # install 的 Pod 只需要这两种状态,added 和 changed 状态的并集
 pods_to_install = sandbox_state.added | sandbox_state.changed
 title_options = { :verbose_prefix => '-> '.green }
 puts "root_specs"
 root_specs.each do |item|
   puts item
 end
 # 将 Podfile 解析后排序处理
 root_specs.sort_by(&:name).each do |spec|
   # 如果是 added 或 changed 状态的 Pod
   if pods_to_install.include?(spec.name)
     # 如果是 changed 状态并且 manifest 已经有记录
     if sandbox_state.changed.include?(spec.name) && sandbox.manifest
       # 版本更新
       current_version = spec.version
       # 被更新版本记录
       previous_version = sandbox.manifest.version(spec.name)
       # 变动记录
       has_changed_version = current_version != previous_version
       # 找到第一个包含 spec.name 的 Pod,获取对应的 Repo,其实就是 find 方法
       current_repo = analysis_result.specs_by_source.detect { |key, values| break key if values.map(&:name).include?(spec.name) }
       # 获取当前仓库
       current_repo &&= current_repo.url || current_repo.name
       # 获取之前该仓库的信息
       previous_spec_repo = sandbox.manifest.spec_repo(spec.name)
       # 是否仓库有变动
       has_changed_repo = !previous_spec_repo.nil? && current_repo && (current_repo != previous_spec_repo)

       # 通过 title 输出上面的详细变更信息
       title = ...
     else
       # 非 changed 状态,展示 Installing 这个是经常见的 log
       title = "Installing #{spec}"
     end
     UI.titled_section(title.green, title_options) do
       # 通过 name 拿到对应的 installer,记录到 @pod_installers 中
       install_source_of_pod(spec.name)
     end
   else
     # 如果没有 changed 情况,直接展示 Using,也是经常见到的 log
     UI.titled_section("Using #{spec}", title_options) do
       # # 通过 sandbox, specs 的 platform 信息生成 Installer 实例,记录到 @pod_installers 中
       create_pod_installer(spec.name)
     end
   end
 end
end

# 通过缓存返回 PodSourceInstaller 实例
def create_pod_installer(pod_name)
    specs_by_platform = specs_for_pod(pod_name)

    # 当通过 pod_name 无法找到对应的 pod_target 或 platform 配置,主动抛出错误信息
    if specs_by_platform.empty?
        requiring_targets = pod_targets.select { |pt| pt.recursive_dependent_targets.any? { |dt| dt.pod_name == pod_name } }
        # message = "..."
        raise StandardError, message
    end
    # 通过 sandbox, specs 的 platform 信息生成 Installer 实例
    pod_installer = PodSourceInstaller.new(sandbox, podfile, specs_by_platform, :can_cache => installation_options.clean?)
    pod_installers << pod_installer
    pod_installer
end

# 如果 resolver 声明一个 Pod 已经安装或者已经存在,将会将其删除并重新安装。如果不存在则直接安装。
def install_source_of_pod(pod_name)
  pod_installer = create_pod_installer(pod_name)
  pod_installer.install!
  @installed_specs.concat(pod_installer.specs_by_platform.values.flatten.uniq)
end
在方法的开始,root_specs 方法是通过 analysis_result 拿出所有根 spec
def root_specs
  analysis_result.specifications.map(&:root).uniq
end
下面再来看看 pod_installer 中的 install! 方法,主要是通过调用 cocoapods-downloader 组件,将 Pod 对应的 Source 下载到本地。实现如下:
def install!
    download_source unless predownloaded? || local?
    PodSourcePreparer.new(root_spec, root).prepare! if local?
    sandbox.remove_local_podspec(name) unless predownloaded? || local? || external?
end
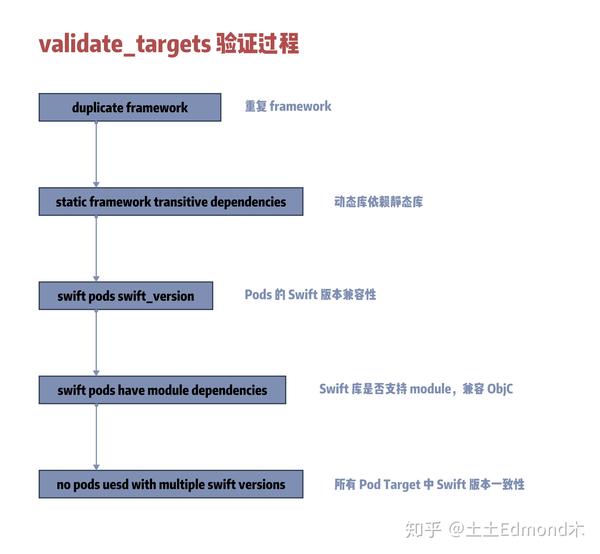
0x4 验证 targets (validate_targets)
用来验证之前流程中的产物 (pod 所生成的 Targets) 的合法性。主要作用就是构造 TargetValidator,并执行 validate! 方法:
def validate_targets
    validator = Xcode::TargetValidator.new(aggregate_targets, pod_targets, installation_options)
    validator.validate!
end

def validate!
    verify_no_duplicate_framework_and_library_names
    verify_no_static_framework_transitive_dependencies
    verify_swift_pods_swift_version
    verify_swift_pods_have_module_dependencies
    verify_no_multiple_project_names if installation_options.generate_multiple_pod_projects?
end
验证环节在整个 Install 过程中仅占很小的一部分。因为只是验证部分,是完全解耦的。
1 verify_no_duplicate_framework_and_library_names
验证是否有重名的 framework,如果有冲突会直接抛出 frameworks with conflicting names 异常。
2 verify_no_static_framework_transitive_dependencies
验证动态库中是否有静态链接库 (.a 或者 .framework) 依赖,如果存在则会触发 transitive dependencies that include static binaries... 错误。假设存在以下场景:
- 组件 A 和组件 B 同时依赖了组件 C,C 为静态库,如
Weibo_SDK - 组件 A 依赖组件 B,而组件 B 的
.podspec文件中存在以下设置时,组件 B 将被判定为存在静态库依赖: - podspec 设置了
s.static_framework = true - podspec 以
s.dependency 'xxx_SDK依赖了静态库xxx_SDK - podspec 以
s.vendored_libraries = 'libxxx.a'方式内嵌了静态库libxxx
此时如果项目的 Podfile 设置了 use_framework! 以动态链接方式打包的时,则会触发该错误。
问题原因
Podfile 中不使用 use_frameworks! 时,每个 pod 是会生成相应的 .a(静态链接库)文件,然后通过 static libraries 来管理 pod 代码,在 Linked 时会包含该 pod 引用的其他的 pod 的 .a 文件。 Podfile 中使用 use_frameworks! 时是会生成相应的 .framework 文件,然后通过 dynamic frameworks 的方式来管理 pod 代码,在 Linked 时会包含该 pod 引用的其他的 pod 的 .framework 文件。 上述场景中虽然以 framework 的方式引用了 B 组件,然而 B 组件实际上是一个静态库,需要拷贝并链接到该 pod 中,然而 dynamic frameworks 方式并不会这么做,所以就报错了。
解决方案
- 修改 pod 库中 podspec,增加 pod_target_xcconfig,定义好 FRAMEWORK_SEARCH_PATHS 和 OTHER_LDFLAGS 两个环境变量;
- hook verify_no_static_framework_transitive_dependencies 的方法,将其干掉!对应 issue
- 修改 pod 库中 podspec,开启 static_framework 配置 s.static_framework = true
3 verify_swift_pods_swift_version
确保 Swift Pod 的 Swift 版本正确配置且互相兼容的。
4 verify_swift_pods_have_module_dependencies
检测 Swift 库的依赖库是否支持了 module,这里的 module 主要是针对 Objective-C 库而言。 首先,Swift 是天然支持 module 系统来管理代码的,Swift Module 是构建在 LLVM Module 之上的模块系统。Swift 库在解析后会生成对应的 modulemap 和 umbrella.h 文件,这是 LLVM Module 的标配,同样 Objective-C 也是支持 LLVM Module。当我们以 Dynamic Framework 的方式引入 Objective-C 库时,Xcode 支持配置并生成 header,而静态库 .a 需要自己编写对应的 umbrella.h 和 modulemap。 其次,如果你的 Swift Pod 依赖了 Objective-C 库,又希望以静态链接的方式来打包 Swift Pod 时,就需要保证 Objective-C 库启用了 modular_headers,这样 CocoaPods 会为我们生成对应 modulemap 和 umbrella.h 来支持 LLVM Module。你可以从这个地址 - http://blog.cocoapods.org/CocoaPods-1.5.0/ 查看到更多细节。
5 verify_no_pods_used_with_multiple_swift_versions
检测是否所有的 Pod Target 中版本一致性问题。
用一个流程图来概括这一验证环节:

0x5 生成工程 (Integrate)
工程文件的生成是 pod install 的最后一步,他会将之前版本仲裁后的所有组件通过 Project 文件的形式组织起来,并且会对 Project 中做一些用户指定的配置。
def integrate
    generate_pods_project
    if installation_options.integrate_targets?
        # 集成用户配置,读取依赖项,使用 xcconfig 来配置
        integrate_user_project
    else
        UI.section 'Skipping User Project Integration'
    end
end

def generate_pods_project
    # 创建 stage sanbox 用于保存安装前的沙盒状态,以支持增量编译的对比
    stage_sandbox(sandbox, pod_targets)
    # 检查是否支持增量编译,如果支持将返回 cache result
    cache_analysis_result = analyze_project_cache
    # 需要重新生成的 target
    pod_targets_to_generate = cache_analysis_result.pod_targets_to_generate
    # 需要重新生成的 aggregate target
    aggregate_targets_to_generate = cache_analysis_result.aggregate_targets_to_generate

    # 清理需要重新生成 target 的 header 和 pod folders
    clean_sandbox(pod_targets_to_generate)
    # 生成 Pod Project,组装 sandbox 中所有 Pod 的 path、build setting、源文件引用、静态库文件、资源文件等
    create_and_save_projects(pod_targets_to_generate, aggregate_targets_to_generate,
                                cache_analysis_result.build_configurations, cache_analysis_result.project_object_version)

    # SandboxDirCleaner 用于清理增量 pod 安装中的无用 headers、target support files 目录
    SandboxDirCleaner.new(sandbox, pod_targets, aggregate_targets).clean!
    # 更新安装后的 cache 结果到目录 `Pods/.project_cache` 下
    update_project_cache(cache_analysis_result, target_installation_results)
end
在 install 过程中,除去依赖仲裁部分和下载部分的时间消耗,在工程文件生成也会有相对较大的时间开销。这里往往也是速度优化核心位置。
0x6 写入依赖 (write_lockfiles)
将依赖更新写入 Podfile.lock 和 Manifest.lock
0x7 结束回调(perform_post_install_action)
最后一步收尾工作,为所有插件提供 post-installation 操作以及 hook。
def perform_post_install_actions
    # 调用 HooksManager 执行每个插件的 post_install 方法
    run_plugins_post_install_hooks
    # 打印过期 pod target 警告
    warn_for_deprecations
    # 如果 pod 配置了 script phases 脚本,会主动输出一条提示消息
    warn_for_installed_script_phases
    # 输出结束信息 `Pod installation complete!`
    print_post_install_message
end
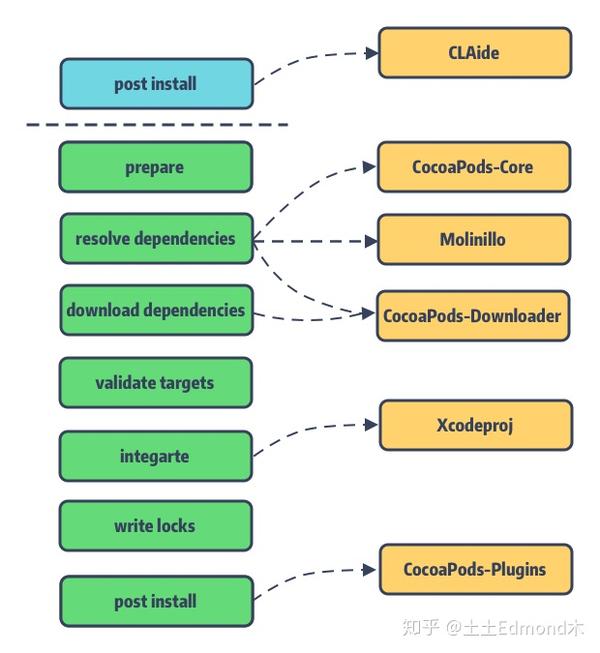
核心组件在 pod install 各阶段的作用如下:

总结
当我们知道 CocoaPods 在 install 的大致过程后,我们可以对其做一些修改和控制。例如知道了插件的 pre_install 和 post_install 的具体时机,我们就可以在 Podfile 中执行对应的 Ruby 脚本,达到我们的预期。同时了解 install 过程也有助于我们进行每个阶段的性能分析,以优化和提高 Install 效率。
后续,将学习 CocoaPods 中每一个组件的实现,将所有的问题在代码中找到答案。
知识点问题梳理
这里罗列了四个问题用来考察你是否已经掌握了这篇文章,如果没有建议你加入收藏再次阅读:
- 简单概述 CocoaPods 的核心模块?
pod命令是如何找到并启动 CocoaPods 程序的?- 简述 pod install 流程?
resolve_dependencies阶段中的pre_download是为了解决什么问题?validate_targets都做了哪些校验工作?