机器学习进阶笔记之二 | 深入理解Neural Style

引言
TensorFlow是Google基于DistBelief进行研发的第二代人工智能学习系统,被广泛用于语音识别或图像识别等多项机器深度学习领域。其命名来源于本身的运行原理。Tensor(张量)意味着N维数组,Flow(流)意味着基于数据流图的计算,TensorFlow代表着张量从图象的一端流动到另一端计算过程,是将复杂的数据结构传输至人工智能神经网中进行分析和处理的过程。
TensorFlow完全开源,任何人都可以使用。可在小到一部智能手机、大到数千台数据中心服务器的各种设备上运行。
『机器学习进阶笔记』系列是将深入解析TensorFlow系统的技术实践,从零开始,由浅入深,与大家一起走上机器学习的进阶之路。
前面《机器学习进阶笔记之一 | TensorFlow安装与入门 》 简单讲了下怎么在Ubuntu安装tensorflow gpu版本,也跑了下基于Mnist的比较基本的LR算法,但是Tensorflow可远远不止这些,它能做很多很有意思的东西,这篇文章主要针对Tensorflow利用CNN的方法对艺术照片做下Neural Style的相关工作。首先,我会详细解释下A Neural Algorithm of Artistic Style这篇paper是怎么做的,然后会结合一个开源的[Tensorflow的Neural Style版本][3]来领略下大神的风采。
A Neural Algorithm of Artistic Style
在艺术领域,尤其是绘画,艺术家们通过创造不同的内容与风格,并相互交融影响来创立独立的视觉体验。如果给定两张图像,现在的技术手段,完全有能力让计算机识别出图像具体内容。而风格是一种很抽象的东西,在计算机的眼中,当然就是一些pixel,但人眼就能很有效地的辨别出不同画家不同的style,是否有一些更复杂的feature来构成,最开始学习DeepLearning的paper时,多层网络的实质其实就是找出更复杂、更内在的features,所以图像的style理论上可以通过多层网络来提取里面可能一些有意思的东西。而这篇文章就是利用卷积神经网络(利用pretrain的Pre-trained VGG network model)来分别做Content、Style的reconstruction,在合成时考虑content loss 与style loss的最小化(其实还包括去噪变化的的loss),这样合成出来的图像会保证在content 和style的重构上更准确。

文章大纲
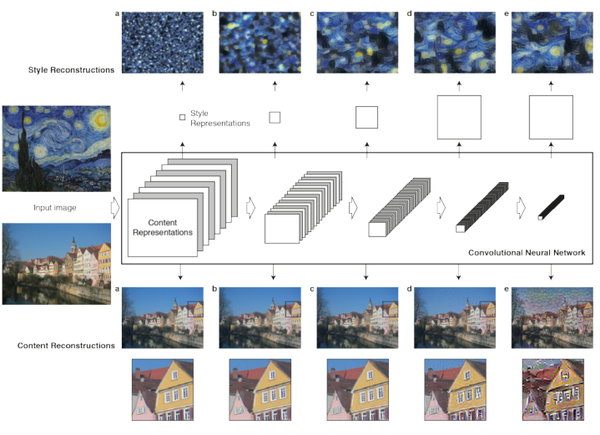
这里是整个paper在neural style的工作流,理解这幅图对理解整篇paper的逻辑很关键,主要分为两部分:
Content Reconstruction: 上图中下面部分是Content Reconstruction对应于CNN中的a,b,c,d,e层,注意最开始标了Content Representations的部分不是原始图片(可以理解是给计算机比如分类器看的图片,因此如果可视化它,可能完全就不知道是什么内容),而是经过了Pre-trained之后的VGG network model的图像数据, 该model主要用来做object recognition, 这里主要用来生成图像的Content Representations。理解了这里,后面就比较容易了,经过五层卷积网络来做Content的重构,文章作者实验发现在前3层的Content Reconstruction效果比较好,d,e两层丢失了部分细节信息,保留了比较high-level的信息。
- Style Reconstruction: Style的重构比较复杂,很难去模型化Style这个东西,Style Represention的生成也是和Content Representation的生成类似,也是由VGG network model去做的,不同点在于a,b,c,d,e的处理方式不同,Style Represention的Reconstruction是在CNN的不同的子集上来计算的,怎么说呢,它会分别构造conv1_1(a),[conv1_1, conv2_1](b),[conv1_1, conv2_1, conv3_1],[conv1_1, conv2_1, conv3_1,conv4_1],[conv1_1, conv2_1, conv3_1, conv4_1, conv5_1]。这样重构的Style 会在各个不同的尺度上更加匹配图像本身的style,忽略场景的全局信息。
methods
理解了以上两点,剩下的就是建模的数据问题了,这里按Content和Style来分别计算loss,Content loss的method比较简单:

Style的loss基本也和Content loss一样,只不过要包含每一层输出的errors之和
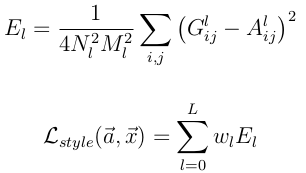
其中A^l 是原始style图片在第l的数据表示,而G^l是产生的Style Representation在第l层的表示
定义好loss之后就是采用优化方法来最小化模型loss(注意paper当中只有content loss和style loss),源码当中还涉及到降噪的loss:


优化方法这里就不讲了,tensorflow有内置的如Adam这样的方法来处理
Tensorflow版本源码解读
项目github地址:<GitHub - anishathalye/neural-style: Neural style in TensorFlow!>
代码主要包括三个文件:neural_style.py, stylize.py, vgg.py。一些基本的接口代码我就不描述了,直接来核心代码:
g = tf.Graph()
with g.as_default(), g.device(‘/cpu:0’), tf.Session() as sess:
    image = tf.placeholder('float', shape=shape)
    net, mean_pixel = vgg.net(network, image)
    content_pre = np.array([vgg.preprocess(content, mean_pixel)])
    content_features[CONTENT_LAYER] = net[CONTENT_LAYER].eval(
        feed_dict={image: content_pre})
这里会调用imagenet-vgg-verydeep-19.mat这个model,在这个基础上通过vgg里面的net构建前文当中提到的abcde那五个卷积层conv1_1, conv2_1, conv3_1, conv4_1, conv5_1,net每个不同的key表示对应的层,然后ceontent_pre得到经过model输出后再经过abcde后的content的的feature
 for i in range(len(styles)):
     g = tf.Graph()
     with g.as_default(), g.device('/cpu:0'), tf.Session() as sess:
         image = tf.placeholder('float', shape=style_shapes[i])
         net, _ = vgg.net(network, image)
         style_pre = np.array([vgg.preprocess(styles[i], mean_pixel)])
         for layer in STYLE_LAYERS:
             features = net[layer].eval(feed_dict={image: style_pre})
             features = np.reshape(features, (-1, features.shape[3]))
             gram = np.dot(features.T, features) / features.size
             style_features[i][layer] = gram
这里和content的feature的计算一样,只不过,由于计算loss的方法不同(style loss 为total loss包括每一层输出的loss),因此CONTENT_LAYER = 'relu4_2'``STYLE_LAYERS = ('relu1_1', 'relu2_1', 'relu3_1', 'relu4_1', 'relu5_1').
然后就是最小化loss的过程:
 with tf.Graph().as_default():
     if initial is None:
         noise = np.random.normal(size=shape, scale=np.std(content) * 0.1)
         initial = tf.random_normal(shape) * 0.256
     else:
         initial = np.array([vgg.preprocess(initial, mean_pixel)])
         initial = initial.astype('float32')
     image = tf.Variable(initial)
     net, _ = vgg.net(network, image)

     # content loss
     content_loss = content_weight * (2 * tf.nn.l2_loss(
             net[CONTENT_LAYER] - content_features[CONTENT_LAYER]) /
             content_features[CONTENT_LAYER].size)
     # style loss
     style_loss = 0
     for i in range(len(styles)):
         style_losses = []
         for style_layer in STYLE_LAYERS:
             layer = net[style_layer]
             _, height, width, number = map(lambda i: i.value, layer.get_shape())
             size = height * width * number
             feats = tf.reshape(layer, (-1, number))
             gram = tf.matmul(tf.transpose(feats), feats) / size
             style_gram = style_features[i][style_layer]
             style_losses.append(2 * tf.nn.l2_loss(gram - style_gram) / style_gram.size)
         style_loss += style_weight * style_blend_weights[i] * reduce(tf.add, style_losses)
     # total variation denoising
     tv_y_size = _tensor_size(image[:,1:,:,:])
     tv_x_size = _tensor_size(image[:,:,1:,:])
     tv_loss = tv_weight * 2 * (
             (tf.nn.l2_loss(image[:,1:,:,:] - image[:,:shape[1]-1,:,:]) /
                 tv_y_size) +
             (tf.nn.l2_loss(image[:,:,1:,:] - image[:,:,:shape[2]-1,:]) /
                 tv_x_size))
     # overall loss
     loss = content_loss + style_loss + tv_loss

     # optimizer setup
     train_step = tf.train.AdamOptimizer(learning_rate).minimize(loss)
和上文中提到的公式一一对应,除了多了一个total variation denoising,定义好 total loss后调用AdamOptimizer来进行迭代计算,最小化loss注意这里的代码还是按像素点计算,并未向量化,所以看起来会有点头疼,后面如果更加熟悉tensorflow后,我再来这儿试图改改,看看能不能把这里计算的部分做稍微高效点。
如果想要详细了解这部分代码的童靴,可以clone这个项目下来,仔细研究研究,当做学习tensorflow。
Neural Style Demo


大家也可以用一些有意思的图片来多试试看看效果:)
Reference
1 Gatys, Leon A., Alexander S. Ecker, and Matthias Bethge. “A neural algorithm of artistic style.” arXiv preprint arXiv:1508.06576 (2015). 2 Pre-trained VGG network [http://www.vlfeat.org/matconvnet/models/beta16/imagenet-vgg-verydeep-19.mat](http://www.vlfeat.org/matconvnet/models/beta16/imagenet-vgg-verydeep-19.mat) [3][3] Neural Style with Tensorflow <GitHub - anishathalye/neural-style: Neural style in TensorFlow!>
[3]: GitHub - anishathalye/neural-style: Neural style in TensorFlow!
相关阅读推荐:
机器学习进阶笔记之一 | TensorFlow安装与入门 - UCloud云计算的文章 - 知乎专栏本文由『UCloud内核与虚拟化研发团队』提供。
关于作者:
Burness(@段石石 ), UCloud平台研发中心深度学习研发工程师,tflearn Contributor,做过电商推荐、精准化营销相关算法工作,专注于分布式深度学习框架、计算机视觉算法研究,平时喜欢玩玩算法,研究研究开源的项目,偶尔也会去一些数据比赛打打酱油,生活中是个极客,对新技术、新技能痴迷。
「UCloud机构号」将独家分享云计算领域的技术洞见、行业资讯以及一切你想知道的相关讯息。
欢迎提问&求关注 o(*////▽////*)q~
以上。