用 Kotlin 开发现代 Android 项目 Part 1

简评:目前,在 Android 开发中找到一个覆盖所有的新技术的项目难如登天,所以作者决定自己写一个。本文所有使用的技术包括:
0. Android Studio 3, beta1
1. Kotlin 语言
2. 构建变体
3. ConstraintLayout
4. 数据绑定库
5. MVVM 架构 + 存储库模式(使用映射器)+ Android Manager Wrappers(Part 2)
6. RxJava2 及它如何在架构中起作用
7. Dagger 2.11,什么是依赖注入,为什么需要它
8. 改造(使用 Rx Java2)
9. Room(使用 Rx Java2)
我们的 app 看起来是什么样的?
我们的 app 将会是最简单的,将使用所有上面提到的技术,只用一个功能:拉取 GitHub 上的所有 google 案例仓库,把这些数据保存到本地数据库并展示给用户。
我将尽可能地解释每一行代码。你可以从 github 上跟进我提交的代码。
让我们一起动手:
0. Android Studio
要安装 Android Studio 3 beta1(现在已发布正式版),你要进入这个页面。
注意:如果你想要和之前安装的某个版本共存,在 Mac 上你应该在应用文件夹中重命名久的版本,如“Android Studio Old”。你可以在这里找到更多信息,包括 Windows 和 Linux。
Android Studio 现已支持 Kotlin。去创建 Android 项目,你会发现新东西:支持 Kotlin 的标签可选框。它是默认选中的。按两下 next,然后选择 Empty Activity,这样就完成了。
1. Kotlin
看看 MainActivity.kt:
package me.fleka.modernandroidapp

import android.support.v7.app.AppCompatActivity
import android.os.Bundle

class MainActivity : AppCompatActivity() {

    override fun onCreate(savedInstanceState: Bundle?) {
        super.onCreate(savedInstanceState)
        setContentView(R.layout.activity_main)
    }
}
kt 后缀意味着 Kotlin 文件。
MainActivity: AppCompatActivity() 意味着我们正在继承 AppCompatActivity。
此外,所有的方法都有一个 fun 关键字,在 Kotlin 中你可以不必使用,取决于你的喜好。你必须使用 override 关键字,而不是注解。
那么, savedInstanceState: Bundle? 中的 ?表示什么意思呢?意味着 savedInstanceState 参数可能是 Bundle 类型或者为 null。Kotlin 是空安全的语言。如果你定义了:
var a : String你将得到一个编译错误,因为 a 必须被初始化,它不能为 null。意味着你必须这样写:
var a : String = "Init value"同样地,如果你这样写你将得到一个编译错误:
a = null要让 a 成为可空的,你必须这样:
var a : String?为什么这是 Kotlin 语言的一个重要功能呢?因为它帮我们避免了空指针异常。相信 Android 的开发者们都饱受过空指针的折磨。即便是 null 的创造者,Tony Hoare 先生,也为发明出 null 而道歉了。假设我们有一个可空的 nameTextView。以下代码将会造成 NPE 如果它是 null 的话:
nameTextView.setEnabled(true)实际上,Kotlin 将不允许我们做类似于这样的事。它强制我们使用 ? 或者 !! 操作符,如果我们使用 ? 操作符:
nameTextView?.setEnabled(true)这行代码仅当 nameTextView 不为 null 才会执行。换句话说,如果我们使用了 !! 操作符:
nameTextView!!.setEnabled(true)如果 nameTextView 为 null,它将报 NPE。冒险家才会使用 :)
这只是 Kotlin 的一点小小的介绍,随着我们深入,我将不再介绍其他 Kotlin 特性代码。
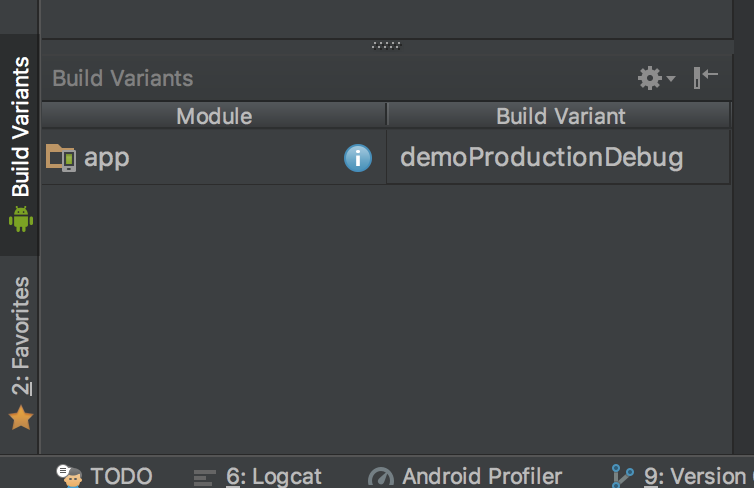
2. 构建变体
在开发中,你通常会有不同的环境。最常见的就是测试和生产环境。这些环境在服务器 url,图标,名字,目标 api 上等等有所不同。在 fleka,我们的每一个项目都要遵守:
- finalProduction, 在 Google Play 商店中发布
- demoProduction,这个版本有着生产服务器 url 和新功能,但是不会在 Google Play 商店中上线。我们的客户会和 Google Play 发布的版本一起安装,他们会测试这个版本并给我们反馈。
- demoTesting,和 demoProduction 一样,但是使用的是测试服务器 url。
- mock,对于开发者和设计者来说很有用。有时候我们的设计准备好了,但是 API 还没准备好。等待 API 准备好才进行开发不是一个很好的选择。这个版本会使用假数据,这样设计团队就可以测试它,并给予我们反馈。一旦 API 准备好了,我们就会切换到 demoTesting 环境。
在这个应用中,我们将会用上述所有的环境。它们有不同的名字和 applicationId。在 gradle 3.0.0 中有一个新的 api 叫 flavorDimension,允许你混合不同的开发环境,这样你可以混合 demo 和 minApi23。在我们的 app 中,我们将使用默认的 flavorDimension。打开 build.gradle,然后在 android{} 中插入下面的代码:
flavorDimensions "default"

productFlavors {

    finalProduction {
        dimension "default"
        applicationId "me.fleka.modernandroidapp"
        resValue "string", "app_name", "Modern App"
    }

    demoProduction {
        dimension "default"
        applicationId "me.fleka.modernandroidapp.demoproduction"
        resValue "string", "app_name", "Modern App Demo P"
    }

    demoTesting {
        dimension "default"
        applicationId "me.fleka.modernandroidapp.demotesting"
        resValue "string", "app_name", "Modern App Demo T"
    }


    mock {
        dimension "default"
        applicationId "me.fleka.modernandroidapp.mock"
        resValue "string", "app_name", "Modern App Mock"
    }
}
打开 string.xml,删除 app_name 字符串,这样就没有冲突了。然后点击 Sync。如果你打开 Build Variants 界面,你会看到四种不同的变体,每个都有两种构建类型:Debug 和 Release。切换到 demoProduction,然后运行,接着切换到另一个,然后运行。你应该会看到两个不同名字的应用。

3. ConstraintLayout
如果你打开 activity_main.xml,你应该会看到 ConstrainLayout 布局。如果你写过 iOS 应用,你应该知道 AutoLayout。ConstrainsLayout 和它非常相似。它们甚至使用了相同的 Cassowary 算法。
<?xml version="1.0" encoding="utf-8"?>
<android.support.constraint.ConstraintLayout xmlns:android="http://schemas.android.com/apk/res/android"
    xmlns:app="http://schemas.android.com/apk/res-auto"
    xmlns:tools="http://schemas.android.com/tools"
    android:layout_width="match_parent"
    android:layout_height="match_parent"
    tools:context="me.fleka.modernandroidapp.MainActivity">

    <TextView
        android:layout_width="wrap_content"
        android:layout_height="wrap_content"
        android:text="Hello World!"
        app:layout_constraintBottom_toBottomOf="parent"
        app:layout_constraintLeft_toLeftOf="parent"
        app:layout_constraintRight_toRightOf="parent"
        app:layout_constraintTop_toTopOf="parent" />

</android.support.constraint.ConstraintLayout>
约束帮助我们描述视图之间的关系。每个视图都有 4 个约束,每边一个。上面的代码中,我们的视图每一边都被约束到父视图。
如果你在 Design 选项卡中把 Hello World 文本视图往上挪动一点点,在 Text 选项卡中会出现一行新代码:
app:layout_constraintVertical_bias="0.28"
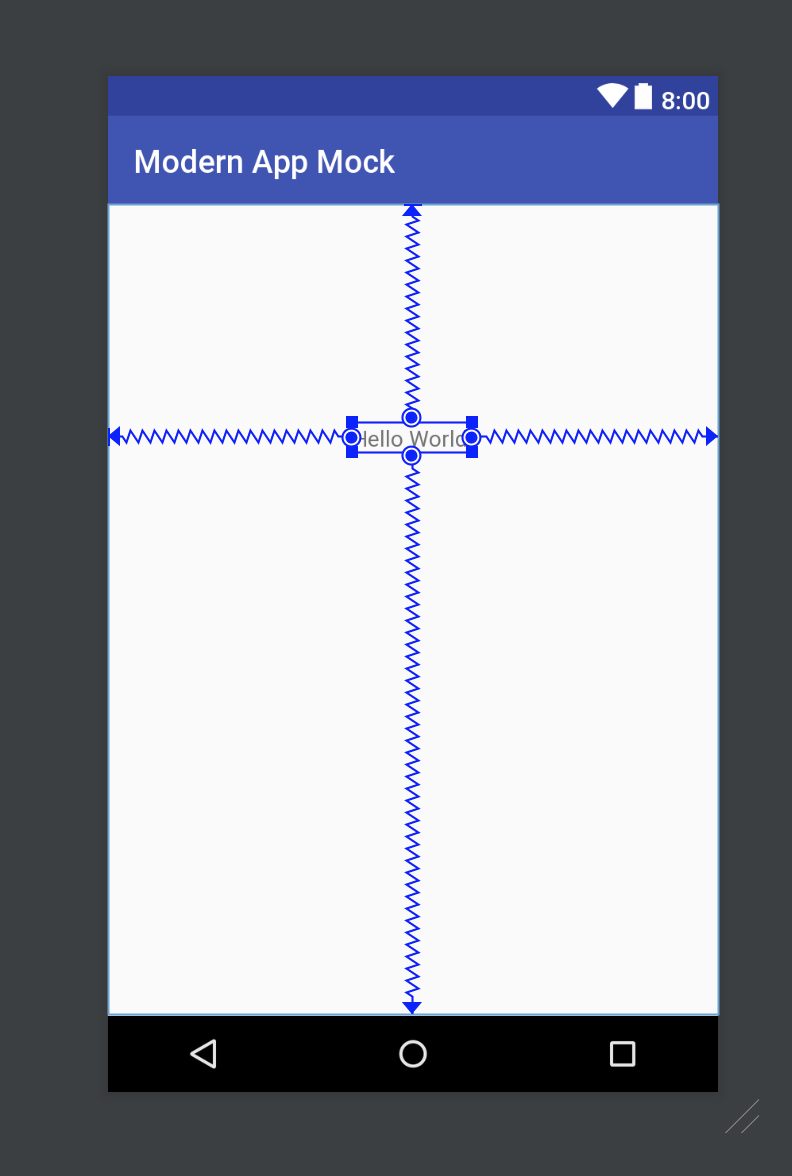
Design 和 Text 选项卡是同步的。我们在 Design 上的移动影响了 Text 选项卡中的 xml,反之亦然。垂直偏差描述了视图在它的约束中的垂直的趋势。如果你想要视图垂直居中,你应该使用:
app:layout_constraintVertical_bias="0.28"让我们的 Activity 仅仅显示一个仓库。它将会有一个仓库名,关注数,拥有者以及会显示仓库有没有问题。

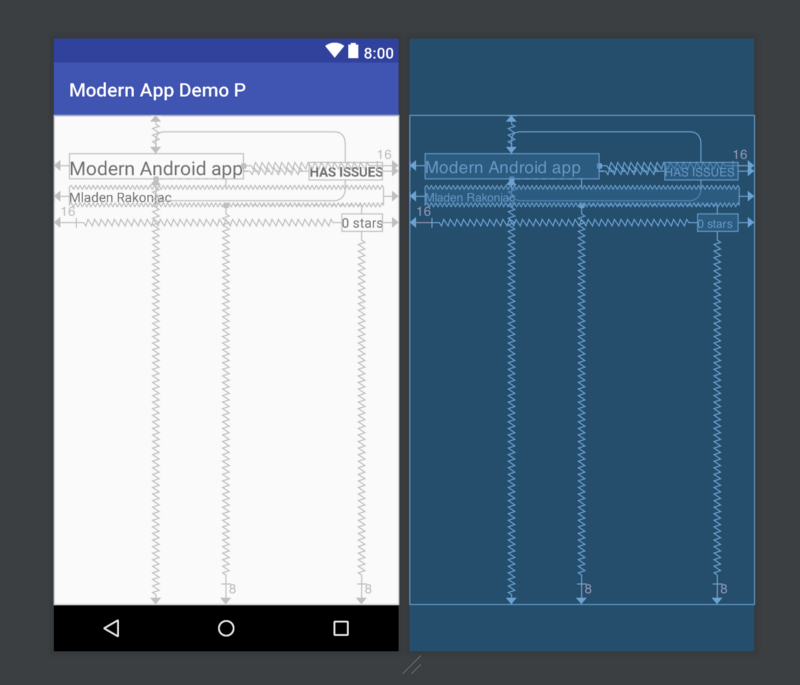
要获得这样的布局,xml 是这样的:
<?xml version="1.0" encoding="utf-8"?>
<android.support.constraint.ConstraintLayout xmlns:android="http://schemas.android.com/apk/res/android"
    xmlns:app="http://schemas.android.com/apk/res-auto"
    xmlns:tools="http://schemas.android.com/tools"
    android:layout_width="match_parent"
    android:layout_height="match_parent"
    tools:context="me.fleka.modernandroidapp.MainActivity">

    <TextView
        android:id="@+id/repository_name"
        android:layout_width="wrap_content"
        android:layout_height="wrap_content"
        android:layout_marginEnd="16dp"
        android:layout_marginStart="16dp"
        android:textSize="20sp"
        app:layout_constraintBottom_toBottomOf="parent"
        app:layout_constraintHorizontal_bias="0.0"
        app:layout_constraintLeft_toLeftOf="parent"
        app:layout_constraintRight_toRightOf="parent"
        app:layout_constraintTop_toTopOf="parent"
        app:layout_constraintVertical_bias="0.083"
        tools:text="Modern Android app" />

    <TextView
        android:id="@+id/repository_has_issues"
        android:layout_width="wrap_content"
        android:layout_height="wrap_content"
        android:layout_marginEnd="16dp"
        android:layout_marginStart="16dp"
        android:layout_marginTop="8dp"
        android:text="@string/has_issues"
        android:textStyle="bold"
        app:layout_constraintBottom_toBottomOf="@+id/repository_name"
        app:layout_constraintEnd_toEndOf="parent"
        app:layout_constraintHorizontal_bias="1.0"
        app:layout_constraintStart_toEndOf="@+id/repository_name"
        app:layout_constraintTop_toTopOf="@+id/repository_name"
        app:layout_constraintVertical_bias="1.0" />

    <TextView
        android:id="@+id/repository_owner"
        android:layout_width="0dp"
        android:layout_height="wrap_content"
        android:layout_marginBottom="8dp"
        android:layout_marginEnd="16dp"
        android:layout_marginStart="16dp"
        android:layout_marginTop="8dp"
        app:layout_constraintBottom_toBottomOf="parent"
        app:layout_constraintEnd_toEndOf="parent"
        app:layout_constraintStart_toStartOf="parent"
        app:layout_constraintTop_toBottomOf="@+id/repository_name"
        app:layout_constraintVertical_bias="0.0"
        tools:text="Mladen Rakonjac" />

    <TextView
        android:id="@+id/number_of_starts"
        android:layout_width="wrap_content"
        android:layout_height="wrap_content"
        android:layout_marginBottom="8dp"
        android:layout_marginEnd="16dp"
        android:layout_marginStart="16dp"
        android:layout_marginTop="8dp"
        app:layout_constraintBottom_toBottomOf="parent"
        app:layout_constraintEnd_toEndOf="parent"
        app:layout_constraintHorizontal_bias="1"
        app:layout_constraintStart_toStartOf="parent"
        app:layout_constraintTop_toBottomOf="@+id/repository_owner"
        app:layout_constraintVertical_bias="0.0"
        tools:text="0 stars" />

</android.support.constraint.ConstraintLayout>
不要因为 tools:text 而困惑,它仅仅是让我们的布局预览更好看。
我们可以注意到我们的布局是扁平的。没有嵌套的布局。你应该尽可能地避免使用嵌套的布局,因为它会影响性能。可以在这里找到更多信息。同样的,ConstraintLayout 在不同的屏幕尺寸上也能很好的工作。

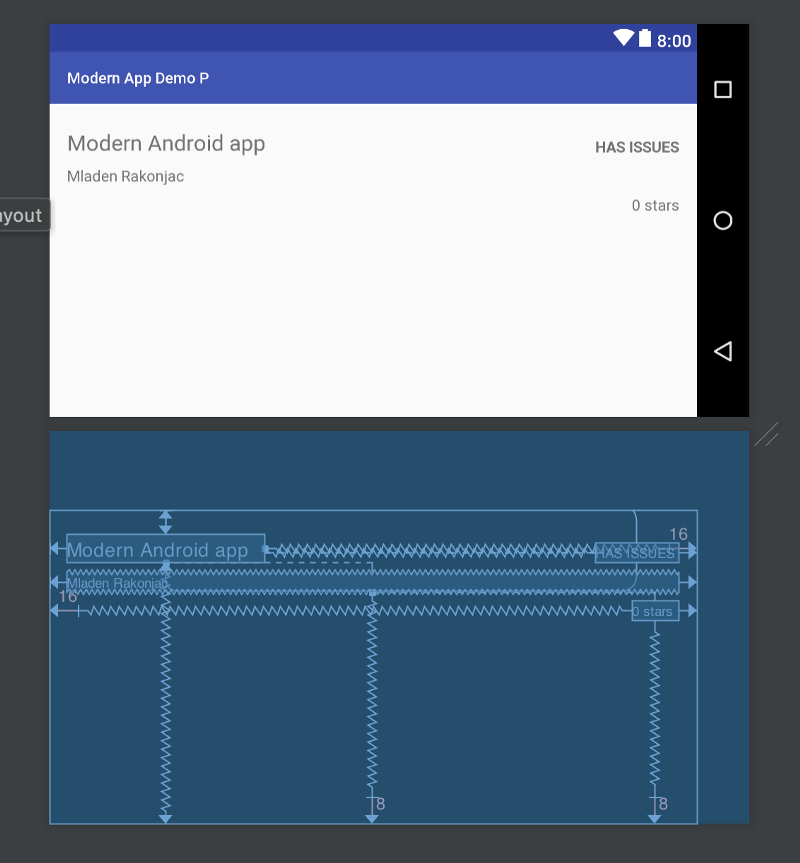
我有种感觉可以相当快地得到我想要的界面。这就是 ConstraintLayout 的一些小介绍。你可以在Google 代码实验室中找到,在 github 中也有关于 ConstraintLayout 的文档。
4. 数据绑定库
当我听说数据绑定库时,我问我自己的第一件事就是,我为什么要用它呢?一旦我学习了更多数据绑定的知识后,我发现 Butterknife 真的非常好用。另外,我在使用一个让我从 xml 中得到视图的插件。(原文中可能有排版错误)
ButterKnife 可以帮到我们什么?
ButterKnife 帮助我们摆脱枯燥的 findViewById。如果你有 5 个视图,没有 ButterKnife,你会有 5 + 5 行代码来绑定你的视图。用了 ButterKnife,你只用 5 行代码,这就是为什么。
ButterKnife 的缺点是什么?
ButterKnife 仍然没有解决维护代码的问题。当我使用 ButterKnife 时,我经常得到一个运行时异常,因为我在 xml 中删除了一个视图,而且我在 activity/fragment 中忘了删除绑定代码。同样地,当你在 xml 中添加了一个视图,你必须重新绑定一次。这相当枯燥。你在维护绑定时浪费了时间。
什么是数据绑定库?
有许多好处!使用数据绑定库,你只用一行代码绑定你的视图!让我来展示一下它是如何工作的。首先添加依赖:
// at the top of file
apply plugin: 'kotlin-kapt'


android {
    //other things that we already used
    dataBinding.enabled = true
}
dependencies {
    //other dependencies that we used
    kapt "com.android.databinding:compiler:3.0.0-beta1"
}
注意到上面的数据绑定库的编译器和你的项目的 build.gradle 中的 gradle 版本一致:
classpath 'com.android.tools.build:gradle:3.0.0-beta1'现在点击 Sync 按钮。打开 activity_main.xml 然后用 layout 标签包裹住 ConstraintLayout:
<?xml version="1.0" encoding="utf-8"?>
<layout xmlns:android="http://schemas.android.com/apk/res/android"
    xmlns:app="http://schemas.android.com/apk/res-auto"
    xmlns:tools="http://schemas.android.com/tools">

    <android.support.constraint.ConstraintLayout
        android:layout_width="match_parent"
        android:layout_height="match_parent"
        tools:context="me.fleka.modernandroidapp.MainActivity">

        <TextView
            android:id="@+id/repository_name"
            android:layout_width="wrap_content"
            android:layout_height="wrap_content"
            android:layout_marginEnd="16dp"
            android:layout_marginStart="16dp"
            android:textSize="20sp"
            app:layout_constraintBottom_toBottomOf="parent"
            app:layout_constraintHorizontal_bias="0.0"
            app:layout_constraintLeft_toLeftOf="parent"
            app:layout_constraintRight_toRightOf="parent"
            app:layout_constraintTop_toTopOf="parent"
            app:layout_constraintVertical_bias="0.083"
            tools:text="Modern Android app" />

        <TextView
            android:id="@+id/repository_has_issues"
            android:layout_width="wrap_content"
            android:layout_height="wrap_content"
            android:layout_marginEnd="16dp"
            android:layout_marginStart="16dp"
            android:layout_marginTop="8dp"
            android:text="@string/has_issues"
            android:textStyle="bold"
            app:layout_constraintBottom_toBottomOf="@+id/repository_name"
            app:layout_constraintEnd_toEndOf="parent"
            app:layout_constraintHorizontal_bias="1.0"
            app:layout_constraintStart_toEndOf="@+id/repository_name"
            app:layout_constraintTop_toTopOf="@+id/repository_name"
            app:layout_constraintVertical_bias="1.0" />

        <TextView
            android:id="@+id/repository_owner"
            android:layout_width="0dp"
            android:layout_height="wrap_content"
            android:layout_marginBottom="8dp"
            android:layout_marginEnd="16dp"
            android:layout_marginStart="16dp"
            android:layout_marginTop="8dp"
            app:layout_constraintBottom_toBottomOf="parent"
            app:layout_constraintEnd_toEndOf="parent"
            app:layout_constraintStart_toStartOf="parent"
            app:layout_constraintTop_toBottomOf="@+id/repository_name"
            app:layout_constraintVertical_bias="0.0"
            tools:text="Mladen Rakonjac" />

        <TextView
            android:id="@+id/number_of_starts"
            android:layout_width="wrap_content"
            android:layout_height="wrap_content"
            android:layout_marginBottom="8dp"
            android:layout_marginEnd="16dp"
            android:layout_marginStart="16dp"
            android:layout_marginTop="8dp"
            app:layout_constraintBottom_toBottomOf="parent"
            app:layout_constraintEnd_toEndOf="parent"
            app:layout_constraintHorizontal_bias="1"
            app:layout_constraintStart_toStartOf="parent"
            app:layout_constraintTop_toBottomOf="@+id/repository_owner"
            app:layout_constraintVertical_bias="0.0"
            tools:text="0 stars" />

    </android.support.constraint.ConstraintLayout>

</layout>
把所有的 xmlns 移动到 layout 标签。然后点击 Build 按钮,或者使用快捷键 Cmd + F9. 我们需要构建项目,这样数据绑定库能够生成 ActivityMainBinding 类,我们将在 MainActivity 中使用它。
如果你不构建项目,那么你不能够看到 ActivityMainBinding 类,因为它是在编译时生成的。我们还没有完成绑定,我们只是定义了一个非空的 ActivityMainBinding 类型的变量。你会注意到我没有把 ? 放在 ActivityMainBinding 的后面,而且也没有初始化它。这怎么可能?lateinit 关键字允许我们使用非空的等待被初始化的变量。和 ButterKnife 类似,初始化绑定需要在 onCreate 方法中进行,在我们的布局准备完成后。此外,你不应该在 onCreate 方法中声明绑定,因为你很有可能在 onCreate 方法外使用它。我们的 binding 不能为空,所以这就是我们使用 lateinit 的原因。使用 lateinit 修饰,我们不需要在每次访问它的时候检查 binding 变量是否为空。
让我们初始化我们的 binding 变量,你应该把这句:
setContentView(R.layout.activity_main)替换成:
binding = DataBindingUtil.setContentView(this, R.layout.activity_main)就这样!你成功地绑定了自己的视图。现在你可以访问它并做一些改动。例如,让我们把仓库的名字改为“Modern Android Medium Article”:
binding.repositoryName.text = "Modern Android Medium Article"你可以看到我们通过 binding 变量来访问 activity_main.xml 中的所有视图(当然是有 id 的那些)。这就是为什么数据绑定比 ButterKnife 更好的原因。
Kotlin 中的 Getters 和 setters
很可能,你已经注意到了我们没有像 Java 中的 .setText() 方法。我会在这里解释一下与 Java 相比,Kotlin 中的 getters 和 setters 是如何工作的。
首先,你应该知道为什么我们要用 setters 和 getters。我们用它来隐藏类中的变量,仅允许使用方法来访问这些变量,这样我们就可以向用户隐藏类中的细节,并禁止用户直接修改我们的类。假设我们用 Java 写了一个 Square 类:
public class Square {
  private int a;

  Square(){
    a = 1;
  }

  public void setA(int a){
    this.a = Math.abs(a);
  }

  public int getA(){
    return this.a;
  }

}
使用 setA() 方法,我们禁止用户把 a 设置为负数,因为正方形的边不为负数。我们把 a 设置为 private,这样它就不能直接被设置。同样意味着我们这个类的用户不能直接地拿到 a,所以我们提供了 getter。getter 返回 a。如果你有 10 个变量,类似地,你要提供 10 个 getters。写这些不经思考的代码很无聊。
Kotlin 让我们开发者的生活更加简单,如果你调用:
var side: Int = square.a这并不意味着你直接地访问 a,而是类似这样的:
int side = square.getA();Kotlin 自动生成默认的 getter 和 setter,除非你需要特殊的 setter 和 getter,你需要定义它们 :
var a = 1
   set(value) { field = Math.abs(value) }
field ?这又是什么?为了看起来更清楚,我们来看看下面的代码:
var a = 1
   set(value) { a = Math.abs(value) }
这意味着你你在 set 方法中调用了 set 方法,因为在 Kotlin 中,你不能直接访问属性。这会造成无穷递归,当你调用 a = something 时,它自动调用了 set 方法。现在你应该知道为什么要使用 field 关键字了。
回到我们的代码,我将向你展示 Kotlin 语言中更棒的功能:apply:
class MainActivity : AppCompatActivity() {

    lateinit var binding: ActivityMainBinding

    override fun onCreate(savedInstanceState: Bundle?) {
        super.onCreate(savedInstanceState)

        binding = DataBindingUtil.setContentView(this, R.layout.activity_main)
        binding.apply {
            repositoryName.text = "Medium Android Repository Article"
            repositoryOwner.text = "Fleka"
            numberOfStarts.text = "1000 stars"

        }
    }
}
apply 允许你调用一个实例的多个方法。我们还没有完成数据绑定,还有更棒的事情。让我们为仓库(这是 GitHub 仓库的 UI 模型类,存放了我们要展示的数据,别和仓库模式搞混了)定义一个 ui 模型类。点击 New -> Kotlin File/Class 来创建 Kotlin 类:
class Repository(var repositoryName: String?,var repositoryOwner: String?,var numberOfStars: Int? ,var hasIssues: Boolean = false)在 Kotlin 中,首要构造函数是类的头部的一部分。如果你不提供第二个构造函数,这样就是了!你创建类的工作完成了。没有构造函数参数赋值,也没有 getter 和 setter,全部的类只用一行代码!
回到 MainActivity.kt,创建一个 Repository 类的实例:
var repository = Repository("Medium Android Repository Article",
        "Fleka", 1000, true)
可以看到,在对象创建中没有 new 关键字。现在打开 activity_main.xml,然后添加一个 data 标签:
<data>
      <variable
        name="repository"
        type="me.fleka.modernandroidapp.uimodels.Repository"
        />
</data>
我们可以在 layout 中访问我们的 Repository 类型的 repository 变量。例如,我们可以在 TextView 中使用 repositoryName:
android:text="@{repository.repositoryName}"这个 TextView 将会展示从 repository 变量中得到的 repositoryName 属性。最后剩下的就是绑定 xml 中的 repository 和 MainActivity.kt 中的 repository 变量。点击 Build 按钮,让数据绑定库生成所需的类,然后回到 MainActivity 添加下面的代码:
binding.repository = repository
binding.executePendingBindings()
如果你运行 app,你会看到 TextView 展示“Medium Android Repository Article”。很棒的功能,对吧?:)
但如果我们这样做:
Handler().postDelayed({repository.repositoryName="New Name"}, 2000)新的文本会在 2000 毫秒后显示出来吗?并不会。你需要重新设置 repository。像这样:
Handler().postDelayed({repository.repositoryName="New Name"
    binding.repository = repository
binding.executePendingBindings()}, 2000)如果我们每次都这样做就非常无趣了,有一个更好的解决方案叫属性观察者。让我们先来描述一下什么是观察者模式,因为我们在 RxJava 章节中需要它。
很可能你已经听说过 http://androidweekly.net/。它是个关于 Android 开发的每周时事资讯。当你想收到资讯,你需要在给定的邮箱地址中订阅它。一段时间后,你可能决定取消订阅。
这就是一个观察者/可观察的模式的例子。这个例子中,Android Weekly 是可观察的,它每周放出资讯,读者是观察者,因为他们在上面订阅了,等待新资讯发送,一旦他们收到了,他们就可以阅读。如果某些人不喜欢,他/她就可以停止监听。
我们所用的属性观察者就是 xml 布局,他们会监听 Repository 实例的变化。所以,Repository 是可观察的。例如,一旦 Repository 实例的仓库名字这个属性变化了,xml 就能够更新而不必调用:
binding.repository = repository
binding.executePendingBindings()
怎样才能做到?数据绑定库给我们提供了 BaseObservable 类,Repository 类应该实现这个类:
class Repository(repositoryName : String, var repositoryOwner: String?, var numberOfStars: Int?
                 , var hasIssues: Boolean = false) : BaseObservable(){

    @get:Bindable
    var repositoryName : String = ""
    set(value) {
        field = value
        notifyPropertyChanged(BR.repositoryName)
    }

}
一旦使用了 Bindable 注解,就会自动生成 BR 类。你会看到,一旦新的值设置后,我们就通知它。现在运行 app 你将看到仓库的名字在 2 秒后改变而不必再次调用 executePendingBindings()。
原文链接:Modern Android development with Kotlin (September 2017) Part 1