iOS进阶-细数iOS中的锁

锁的种类
互斥锁 自旋锁
- 互斥锁:保证在任何时候,都只有一个线程访问对象。当获取锁操作失败时,线程会进入睡眠,等待锁释放时被唤醒;
- 自旋锁:与互斥锁有点类似,只是自旋锁 不会引起调用者睡眠,如果自旋锁已经被别的执行单元保持,调用者就一直循环尝试,直到该自旋锁的保持者已经释放了锁;因为不会引起调用者睡眠,所以效率高于互斥锁;
- 自旋锁缺点:
- 调用者在未获得锁的情况下,一直运行--自旋,所以占用着CPU,如果不能在很短的时间内获得锁,会使CPU效率降低。所以自旋锁就主要用在临界区持锁时间非常短且CPU资源不紧张的情况下
- 在用自旋锁时有可能造成死锁,当递归调用时有可能造成死锁
两种锁的加锁原理
- 互斥锁:线程会从sleep(加锁)——>running(解锁),过程中有上下文的切换,cpu的抢占,信号的发送等开销。
- 自旋锁:线程一直是running(加锁——>解锁),死循环检测锁的标志位,机制不复杂。
递归锁
特殊的互斥锁,加了递归功能
iOS中的锁
1.@synchronized
@synchronized (self) {
要锁的代码
}
打断点使用汇编查看内部实现,可看到被执行的代码会被下文中的两句代码包裹
objc_sync_enter
要锁的代码
objc_sync_exit
在objc中源码查看
######### objc_sync_enter
// Begin synchronizing on 'obj'.
// Allocates recursive mutex associated with 'obj' if needed.
// Returns OBJC_SYNC_SUCCESS once lock is acquired.
int objc_sync_enter(id obj)
{
    int result = OBJC_SYNC_SUCCESS;

    if (obj) {//判断对象是否存在
        SyncData* data = id2data(obj, ACQUIRE);//从表中取出需要锁的数据
        assert(data);
        data->mutex.lock();//对数据加锁
    } else {
        // @synchronized(nil) does nothing
        if (DebugNilSync) {
            _objc_inform("NIL SYNC DEBUG: @synchronized(nil); set a breakpoint on objc_sync_nil to debug");
        }
        objc_sync_nil(); //如果对象不存在,什么事情都不做!
    }
    return result;
}

######### SyncData
typedef struct alignas(CacheLineSize) SyncData {
    struct SyncData* nextData;
    DisguisedPtr<objc_object> object;
    int32_t threadCount;  // number of THREADS using this block
    recursive_mutex_t mutex; //递归锁
} SyncData;
@synchronized结论:
- 是对互斥锁的一种封装
- 具体点是种特殊的互斥锁->递归锁,内部搭配
nil防止死锁 - 通过
表的结构存要锁的对象 - 表内部的对象又是通过哈希存储的
坑点:在大量线程异步同时操作同一个对象时,因为递归锁会不停的alloc/release,在某一个对象会是nil;而此时 @synchronized (obj) 会判断obj==nil,就不会再加锁,导致线程访问冲突;eg
#import "KTest.h"
@interface KTest()
@property (nonatomic,strong) NSMutableArray *testArray;

@end

@implementation KTest

- (void)crash {
    //_testArray
    //nil 不加锁 - old release
    //hash objc - nil
    for (int i = 0; i < 20000; i++) {
        dispatch_async(dispatch_get_global_queue(0, 0), ^{
            @synchronized (_testArray) {//在某一刻_testArray= nil,导致加锁失败
                _testArray = [NSMutableArray array];
            }
        });
    }
}
//解决NSLock
- (void)NO_crash {
    NSLock *lock = [[NSLock alloc] init];
    for (int i = 0; i < 20000; i++) {
        dispatch_async(dispatch_get_global_queue(0, 0), ^{
            [lock lock];
            _testArray = [NSMutableArray array];
            [lock unlock];
        });
    }
}
@end
2.NSLock
在上面的例子里我们用NSLock去解决在大量线程异步同时操作同一个对象的内存安全问题;那我们细看下NSLock的源码,NSLock属于Foundation,需要在Foundation中查找,我这里是Swift版本的Foundation,我对源码做了一些简化方便查看
open class NSLock: NSObject, NSLocking {
    internal var mutex = _MutexPointer.allocate(capacity: 1)
    private var timeoutCond = _ConditionVariablePointer.allocate(capacity: 1)
    private var timeoutMutex = _MutexPointer.allocate(capacity: 1)

    public override init() {
        pthread_mutex_init(mutex, nil)
        pthread_cond_init(timeoutCond, nil)
        pthread_mutex_init(timeoutMutex, nil)
    }

    deinit {
        pthread_mutex_destroy(mutex)
        mutex.deinitialize(count: 1)
        mutex.deallocate()
        deallocateTimedLockData(cond: timeoutCond, mutex: timeoutMutex)
    }

    open func lock() {
        pthread_mutex_lock(mutex)
    }

    open func unlock() {
        pthread_mutex_unlock(mutex)
        // Wakeup any threads waiting in lock(before:)
        pthread_mutex_lock(timeoutMutex)
        pthread_cond_broadcast(timeoutCond)
        pthread_mutex_unlock(timeoutMutex)
    }

    open func `try`() -> Bool {
        return pthread_mutex_trylock(mutex) == 0
    }

    open func lock(before limit: Date) -> Bool {
        if pthread_mutex_trylock(mutex) == 0 {
            return true
        }
        return timedLock(mutex: mutex, endTime: limit, using: timeoutCond, with: timeoutMutex)
    }
    open var name: String?
}
面源码可看出:
- NSLock是对pthread_mutex的封装
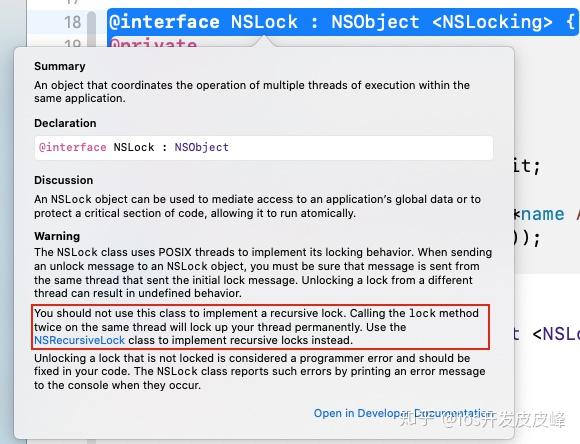
- NSLock还有timeout超时控制 坑点:当NSLock对同一个线程锁两次,就会造成死锁;即不能实现递归锁,这种情况需要用到
NSRecursiveLock先看官方文档上的话

递归调用示例:
//NSLock
- (void)NSLock_crash {
    NSLock *lock = [[NSLock alloc] init];
    dispatch_async(dispatch_get_global_queue(0, 0), ^{
        static void (^testBlock)(int);
        testBlock = ^(int value) {
            [lock lock];
            if (value > 0) {
                NSLog(@"value-->%d",value);
                testBlock(value-1);//递归调用,用递归锁
            }
            [lock unlock];
        };
        testBlock(10);
    });
}

//递归锁NSRecursiveLock
- (void)NSRecursiveLock_NO_crash {
    NSRecursiveLock *lock = [[NSRecursiveLock alloc] init];
    dispatch_async(dispatch_get_global_queue(0, 0), ^{
        static void (^testBlock)(int);
        testBlock = ^(int value) {
            [lock lock];
            if (value > 0) {
                NSLog(@"value-->%d",value);
                testBlock(value-1);//递归调用,用递归锁
            }
            [lock unlock];
        };
        testBlock(10);
    });
}
3.NSRecursiveLock
在上面的例子已经说明了NSRecursiveLock能够处理递归调用;但是还是要看看源码
open class NSRecursiveLock: NSObject, NSLocking {
    internal var mutex = _RecursiveMutexPointer.allocate(capacity: 1)
    private var timeoutCond = _ConditionVariablePointer.allocate(capacity: 1)
    private var timeoutMutex = _MutexPointer.allocate(capacity: 1)

    public override init() {
        super.init()
        var attrib = pthread_mutexattr_t()
        pthread_cond_init(timeoutCond, nil)
        pthread_mutex_init(timeoutMutex, nil)
    }

    deinit {
        pthread_mutex_destroy(mutex)
        mutex.deinitialize(count: 1)
        mutex.deallocate()
        deallocateTimedLockData(cond: timeoutCond, mutex: timeoutMutex)
    }

    open func lock() {
        pthread_mutex_lock(mutex)
    }

    open func unlock() {
        pthread_mutex_unlock(mutex)
        // Wakeup any threads waiting in lock(before:)
        pthread_mutex_lock(timeoutMutex)
        pthread_cond_broadcast(timeoutCond)
        pthread_mutex_unlock(timeoutMutex)
    }

    open func `try`() -> Bool {
        return pthread_mutex_trylock(mutex) == 0
    }

    open func lock(before limit: Date) -> Bool {
        if pthread_mutex_trylock(mutex) == 0 {
            return true
        }
        return timedLock(mutex: mutex, endTime: limit, using: timeoutCond, with: timeoutMutex)
    }
    open var name: String?
}
上面源码可看出:
- NSRecursiveLock也是对pthread_mutex的封装,不同的是加Recursive递归调用功能;
- NSRecursiveLock同样也有timeout超时控制
4. NSCondition
相对来说NSCondition用的比较少,但也需要了解。先看源码
open class NSCondition: NSObject, NSLocking {
    internal var mutex = _MutexPointer.allocate(capacity: 1)
    internal var cond = _ConditionVariablePointer.allocate(capacity: 1)

    public override init() {
        pthread_mutex_init(mutex, nil)
        pthread_cond_init(cond, nil)
    }

    deinit {
        pthread_mutex_destroy(mutex)
        pthread_cond_destroy(cond)
        mutex.deinitialize(count: 1)
        cond.deinitialize(count: 1)
        mutex.deallocate()
        cond.deallocate()
    }

    open func lock() {
        pthread_mutex_lock(mutex)
    }

    open func unlock() {
        pthread_mutex_unlock(mutex)
    }

    open func wait() {
        pthread_cond_wait(cond, mutex)
    }

    open func wait(until limit: Date) -> Bool {
        guard var timeout = timeSpecFrom(date: limit) else {
            return false
        }
        return pthread_cond_timedwait(cond, mutex, &timeout) == 0
    }

    open func signal() {
        pthread_cond_signal(cond)
    }

    open func broadcast() {
        // 汇编分析 - 猜 (多看多玩)
        pthread_cond_broadcast(cond) // wait  signal
    }
    open var name: String?
}
由上面源码可以看出:
- NSCondition 也是对pthread_mutex的封装
- 使用wait信号可以让当前线程处于等待中
- 使用signal信号可以告诉其他某一个线程不用再等待了,可以继续执行
- 内部还有一个broadcast(广播)信号,用于发送(signal)信号给其他所有线程 用法:
    NSCondition *lock = [[NSCondition alloc] init];
    NSMutableArray *array = [[NSMutableArray alloc] init];
    //线程1
    dispatch_async(dispatch_get_global_queue(DISPATCH_QUEUE_PRIORITY_DEFAULT, 0), ^{
        [lock lock];
        while (!array.count) {
            [lock wait];
        }
        [array removeAllObjects];
        NSLog(@"array removeAllObjects");
        [lock unlock];
    });

    //线程2
    dispatch_async(dispatch_get_global_queue(DISPATCH_QUEUE_PRIORITY_DEFAULT, 0), ^{
        sleep(1);//以保证让线程2的代码后执行
        [lock lock];
        [array addObject:@1];
        NSLog(@"array addObject:@1");
        [lock signal];
        [lock unlock];
    });
5.NSConditionLock类似于信号量
先看源码
open class NSConditionLock : NSObject, NSLocking {
    internal var _cond = NSCondition()
    internal var _value: Int
    internal var _thread: _swift_CFThreadRef?

    public convenience override init() {
        self.init(condition: 0)
    }

    public init(condition: Int) {
        _value = condition
    }

    open func lock() {
        let _ = lock(before: Date.distantFuture)
    }

    open func unlock() {
        _cond.lock()
        _thread = nil
        _cond.broadcast()
        _cond.unlock()
    }

    open var condition: Int {
        return _value
    }

    open func lock(whenCondition condition: Int) {
        let _ = lock(whenCondition: condition, before: Date.distantFuture)
    }

    open func `try`() -> Bool {
        return lock(before: Date.distantPast)
    }

    open func tryLock(whenCondition condition: Int) -> Bool {
        return lock(whenCondition: condition, before: Date.distantPast)
    }

    open func unlock(withCondition condition: Int) {
        _cond.lock()
        _thread = nil
        _value = condition
        _cond.broadcast()
        _cond.unlock()
    }

    open func lock(before limit: Date) -> Bool {
        _cond.lock()
        while _thread != nil {
            if !_cond.wait(until: limit) {
                _cond.unlock()
                return false
            }
        }
        _thread = pthread_self()
        _cond.unlock()
        return true
    }

    open func lock(whenCondition condition: Int, before limit: Date) -> Bool {
        _cond.lock()
        while _thread != nil || _value != condition {
            if !_cond.wait(until: limit) {
                _cond.unlock()
                return false
            }
        }
        _thread = pthread_self()
        _cond.unlock()
        return true
    }

    open var name: String?
}
由源码可知:
- NSConditionLock 是 对NSCondition+线程数的封装,即NSConditionLock = NSCondition + lock
internal var _thread: _swift_CFThreadRef?:_thread就是当前可以同事操作的线程数,通过搭配NSCondition可以达到dispatch_semaphore的效果lock(before: Date.distantFuture):也有超时时间 用法示例:
#pragma mark -- NSConditionLock
- (void)testConditonLock{
    // 信号量
    NSConditionLock *conditionLock = [[NSConditionLock alloc] initWithCondition:2];
    dispatch_async(dispatch_get_global_queue(DISPATCH_QUEUE_PRIORITY_HIGH, 0), ^{
       [conditionLock lockWhenCondition:1];
       NSLog(@"线程 1");
       [conditionLock unlockWithCondition:0];
    });

    dispatch_async(dispatch_get_global_queue(DISPATCH_QUEUE_PRIORITY_LOW, 0), ^{

       [conditionLock lockWhenCondition:2];

       NSLog(@"线程 2");

       [conditionLock unlockWithCondition:1];
    });
    dispatch_async(dispatch_get_global_queue(0, 0), ^{

       [conditionLock lock];
       NSLog(@"线程 3");
       [conditionLock unlock];
    });
}
6.dispatch_semaphore
dispatch_semaphore 是 GCD 用来同步的一种方式,与他相关的只有三个函数,一个是创建信号量,一个是等待信号,一个是发送信号。
dispatch_semaphore_create(long value);
dispatch_semaphore_wait(dispatch_semaphore_t dsema, dispatch_time_t timeout);
dispatch_semaphore_signal(dispatch_semaphore_t dsema);
dispatch_semaphore 和 NSConditionLock 类似,都是一种基于信号的同步方式,但 NSCondition 信号只能发送,不能保存(如果没有线程在等待,则发送的信号会失效)。而 dispatch_semaphore 能保存发送的信号。dispatch_semaphore 的核心是 dispatch_semaphore_t 类型的信号量。 dispatch_semaphore_create(1) 方法可以创建一个 dispatch_semaphore_t 类型的信号量,设定信号量的初始值为 1。注意,这里的传入的参数必须大于或等于 0,否则 dispatch_semaphore_create 会返回 NULL。 dispatch_semaphore_wait(signal, overTime); 方法会判断 signal 的信号值是否大于 0。大于 0 不会阻塞线程,消耗掉一个信号,执行后续任务。如果信号值为 0,该线程会和 NSCondition 一样直接进入 waiting 状态,等待其他线程发送信号唤醒线程去执行后续任务,或者当 overTime 时限到了,也会执行后续任务。 dispatch_semaphore_signal(signal); 发送信号,如果没有等待的线程接受信号,则使 signal 信号值加一(做到对信号的保存)。
用法:
- (void)testDispatch_semaphore_t {
    dispatch_semaphore_t signal = dispatch_semaphore_create(1);
    dispatch_time_t overTime = dispatch_time(DISPATCH_TIME_NOW, 3 * NSEC_PER_SEC);

    dispatch_async(dispatch_get_global_queue(DISPATCH_QUEUE_PRIORITY_DEFAULT, 0), ^{
        dispatch_semaphore_wait(signal, overTime);
        sleep(2);
        NSLog(@"线程1");
        dispatch_semaphore_signal(signal);
    });
    dispatch_async(dispatch_get_global_queue(DISPATCH_QUEUE_PRIORITY_DEFAULT, 0), ^{
        sleep(1);
        dispatch_semaphore_wait(signal, overTime);
        NSLog(@"线程2");
        dispatch_semaphore_signal(signal);
    });
}
从上面的实例代码可以看到,一个 dispatch_semaphore_wait(signal, overTime); 方法会去对应一个 dispatch_semaphore_signal(signal); 看起来像 NSLock 的 lock 和 unlock,其实可以这样理解,区别只在于有信号量这个参数,lock unlock 只能同一时间,一个线程访问被保护的临界区,而如果 dispatch_semaphore 的信号量初始值为 x ,则可以有 x 个线程同时访问被保护的临界区。
7.OSSpinLock - os_unfair_lock
在iOS10 之前,OSSpinLock 是一种自旋锁,也只有加锁,解锁,尝试加锁三个方法。和 NSLock 不同的是 NSLock 请求加锁失败的话,会先轮询,但一秒过后便会使线程进入 waiting 状态,等待唤醒。而 OSSpinLock 会一直轮询,等待时会消耗大量 CPU 资源,不适用于较长时间的任务。而因为OSSpinLock不再线程安全,在iOS10之后OSSpinLock被废弃内部封装了os_unfair_lock,os_unfair_lock也是一种互斥锁不会忙等。 typedef int32_t OSSpinLock OSSPINLOCK_DEPRECATED_REPLACE_WITH(os_unfair_lock);
bool    OSSpinLockTry( volatile OSSpinLock *__lock );
void    OSSpinLockLock( volatile OSSpinLock *__lock );
void    OSSpinLockUnlock( volatile OSSpinLock *__lock );
用例示范:
__block OSSpinLock theLock = OS_SPINLOCK_INIT;
    dispatch_async(dispatch_get_global_queue(DISPATCH_QUEUE_PRIORITY_DEFAULT, 0), ^{
        OSSpinLockLock(&theLock);
        NSLog(@"线程1");
        sleep(10);
        OSSpinLockUnlock(&theLock);
        NSLog(@"线程1解锁成功");
    });

    dispatch_async(dispatch_get_global_queue(DISPATCH_QUEUE_PRIORITY_DEFAULT, 0), ^{
        sleep(1);
        OSSpinLockLock(&theLock);
        NSLog(@"线程2");
        OSSpinLockUnlock(&theLock);
    });

2016-08-19 20:25:13.526 ThreadLockControlDemo[2856:316247] 线程1
2016-08-19 20:25:23.528 ThreadLockControlDemo[2856:316247] 线程1解锁成功
2016-08-19 20:25:23.529 ThreadLockControlDemo[2856:316260] 线程2
8.读写锁
读写锁是一种特殊的的自旋锁;它能做到多读单写; 实现: 并发队列 + dispatch_barrier_async
########### .h文件
#import <Foundation/Foundation.h>

NS_ASSUME_NONNULL_BEGIN

@interface RF_RWLock : NSObject
// 读数据
- (id)rf_objectForKey:(NSString *)key;
// 写数据
- (void)rf_setObject:(id)obj forKey:(NSString *)key;
@end

NS_ASSUME_NONNULL_END

########### .m文件
#import "RF_RWLock.h"

@interface RF_RWLock ()
// 定义一个并发队列:
@property (nonatomic, strong) dispatch_queue_t concurrent_queue;
// 用户数据中心, 可能多个线程需要数据访问:
@property (nonatomic, strong) NSMutableDictionary *dataCenterDic;
@end

@implementation RF_RWLock

- (id)init{
    self = [super init];
    if (self){
        // 创建一个并发队列:
        self.concurrent_queue = dispatch_queue_create("read_write_queue", DISPATCH_QUEUE_CONCURRENT);
        // 创建数据字典:
        self.dataCenterDic = [NSMutableDictionary dictionary];
    }
    return self;
}

#pragma mark - 读数据
- (id)rf_objectForKey:(NSString *)key{
    __block id obj;
    // 同步读取指定数据:
    dispatch_sync(self.concurrent_queue, ^{
        obj = [self.dataCenterDic objectForKey:key];
    });
    return obj;
}

#pragma mark - 写数据
- (void)rf_setObject:(id)obj forKey:(NSString *)key{
    // 异步栅栏调用设置数据:
    dispatch_barrier_async(self.concurrent_queue, ^{
        [self.dataCenterDic setObject:obj forKey:key];
    });
}

@end
面试题
atomic
1.atomic的原理?
atomic 在对象get/set的时候,会有一个spinlock_t控制。即当两个线程A和B,如果A正在执行getter时,B如果想要执行settet,就要等A执行getter完成后才能执行
2.atomic修饰的属性绝对安全吗?
atomic只保证set/get方法安全,但是当多个线程不使用set/get方法访问时,就不再安全;- 所以
atomic属性和property的多线程安全并没有什么直接的联系,多线程安全还是要程序员自己保障 atomic的由于使用了自旋锁,性能比nonatomic慢20倍
> 在严峻的iOS市场中竞争, 没有掌握和了解一些具有优势的技术性知识,你怎么与别人进行PK,又怎么征服你的面试官。做过三五年的也未必一定会涉足到里面的技术性知识。在找工作中,技术足了,找不到工作也许你缺少的是一份总结和一份面试题去练习。
> [最新面试大厂常问面试答案一份]、希望真心能够帮助到大家提升技术!
参考 iOS 中的八大锁