Lidar定位:Scan Context

论文不太好找,给一个百度盘的链接。
Github代码:irapkaist/scancontext
paper百度盘链接: https://pan.baidu.com/s/15D_BBdGfNvUewjAvXbwPXA 密码: 0t7s
代码量非常少,400行就搞定了,结合代码和论文中几张关键的示意图,来看看这个算法的思想,如有错误请您指正。
这是一篇用激光点云做场景识别或者定位的文章,当然也可以用来做闭环检测。定位,通常是在历史帧中找到与搜索帧pose最接近的一帧,当然这只用到了pose。如果用点云去做匹配,找到最相似的那一帧点云,怎么做呢,直接3d-3d匹配是可以的,但是不够快。那么降维,把3D点云变成二维,然后去匹配。scan context的做法就是从3D点云上空俯视,得到一张俯视图,当然图上每个点有高度信息,用这个俯视图去做匹配。
1、生成scan context
首先看这两张图,两张图一定要结合起来看,包括图的注释文字。

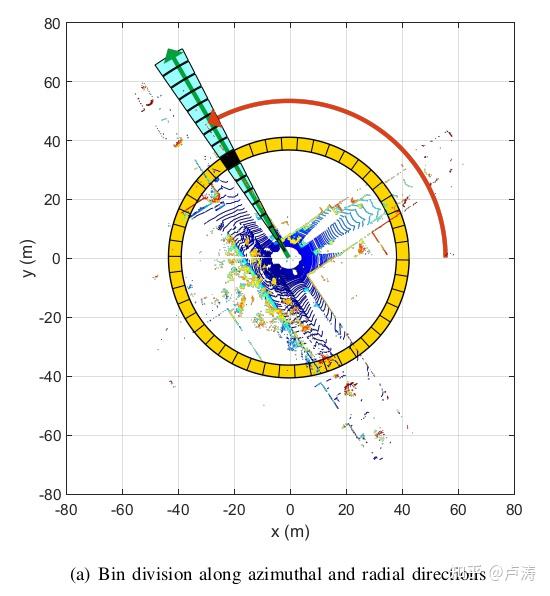
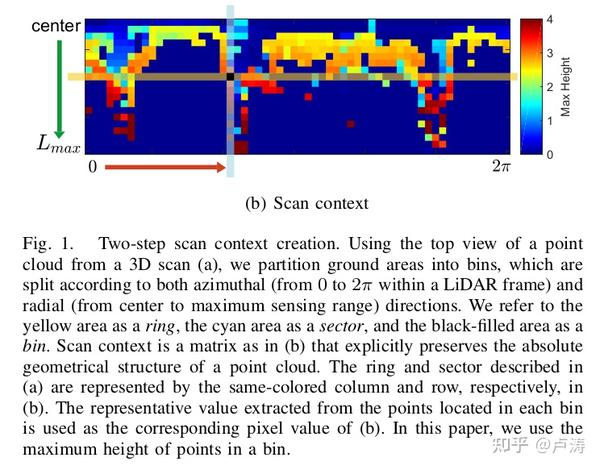

第一幅图是一帧点云的俯视图。黄色的一圈叫做ring(环),从中心点开始,有一个很小的环,慢慢往外扩大,最大到80米的距离,一层一层的环加起来就是整个点云了,一共20个环。青色的那个径向轴叫做sector(扇形),那么很显然这个径向轴划分成了20段,每段对应一个环。一共有60个sector,也就是把360°的ring划分成了60份。
const int    PC_NUM_RING = 20; // 20 in the original paper (IROS 18)
const int    PC_NUM_SECTOR = 60; // 60 in the original paper (IROS 18)
const double PC_MAX_RADIUS = 80.0; // 80 meter max in the original paper (IROS 18)
那么整个点云就可以用20*60=1200个bin(格子),一个二维矩阵来表示。那么每个格子的值是什么呢?是落在这个格子里面所有点的最大高度(z值)。对照第二幅图像看一下,把俯视的圆环图剪开,变成矩形,横向对应一个环,纵向对应距离从近到远。不同的颜色,表示这个格子中点的最大高度。想象成一个带高度的俯视图,或者地形图。
// scan context是一个二维矩阵
MatrixXd desc = NO_POINT * MatrixXd::Ones(PC_NUM_RING, PC_NUM_SECTOR);
上面就把一帧点云用二维的形式表达了,称之为scan context。下面就是算法的第一个接口,根据一帧点云,生成scan context。
// 接口一,一帧点云生成scan context,计算ring key, sector key
void SCManager::makeAndSaveScancontextAndKeys( pcl::PointCloud<SCPointType> & _scan_down )
{
    // scancontext 带高度的俯视图
    Eigen::MatrixXd sc = makeScancontext(_scan_down); // v1
    // 每个环ring的最大高度平均值
    Eigen::MatrixXd ringkey = makeRingkeyFromScancontext( sc );
    // 每个轴向sector的最大高度平均值
    Eigen::MatrixXd sectorkey = makeSectorkeyFromScancontext( sc );
    // 换成数组,这玩意作为scancontext的key,也就是在历史帧里面通过找相同的key来得到候选匹配,然后计算scan context的距离
    std::vector<float> polarcontext_invkey_vec = eig2stdvec( ringkey );

    // 历史数据,全部存起来,供后面查找匹配
    polarcontexts_.push_back( sc );
    polarcontext_invkeys_.push_back( ringkey );
    polarcontext_vkeys_.push_back( sectorkey );
    polarcontext_invkeys_mat_.push_back( polarcontext_invkey_vec );

}

// 一帧点云生成scan context
MatrixXd SCManager::makeScancontext( pcl::PointCloud<SCPointType> & _scan_down )
{
    // 激光点数量
    int num_pts_scan_down = _scan_down.points.size();

    const int NO_POINT = -1000;
    // 这里矩阵的记法跟paper的示意图是一致的
    MatrixXd desc = NO_POINT * MatrixXd::Ones(PC_NUM_RING, PC_NUM_SECTOR);

    SCPointType pt;
    float azim_angle, azim_range; // wihtin 2d plane
    int ring_idx, sctor_idx;
    // 遍历激光点
    for (int pt_idx = 0; pt_idx < num_pts_scan_down; pt_idx++)
    {
        pt.x = _scan_down.points[pt_idx].x;
        pt.y = _scan_down.points[pt_idx].y;
        // 让高度大于0,所有点的高度都加2,不影响匹配结果
        pt.z = _scan_down.points[pt_idx].z + LIDAR_HEIGHT; // naive adding is ok (all points should be > 0).

        // 距离
        azim_range = sqrt(pt.x * pt.x + pt.y * pt.y);
        // 角度,0~360°
        azim_angle = xy2theta(pt.x, pt.y);

        // 距离超过80米的点不考虑了
        if( azim_range > PC_MAX_RADIUS )
            continue;

        // 计算这个点落在哪个bin里面,下标从1开始数
        ring_idx = std::max( std::min( PC_NUM_RING, int(ceil( (azim_range / PC_MAX_RADIUS) * PC_NUM_RING )) ), 1 );
        sctor_idx = std::max( std::min( PC_NUM_SECTOR, int(ceil( (azim_angle / 360.0) * PC_NUM_SECTOR )) ), 1 );

        // 用z值,也就是高度来更新这个格子,存最大的高度;
        if ( desc(ring_idx-1, sctor_idx-1) < pt.z ) // -1 means cpp starts from 0
            desc(ring_idx-1, sctor_idx-1) = pt.z; // update for taking maximum value at that bin
    }

    // reset no points to zero (for cosine dist later)
    for ( int row_idx = 0; row_idx < desc.rows(); row_idx++ )
        for ( int col_idx = 0; col_idx < desc.cols(); col_idx++ )
            if( desc(row_idx, col_idx) == NO_POINT )
                desc(row_idx, col_idx) = 0;

    return desc;
}
2、用scan context做搜索匹配
用scan context来表达一帧点云之后,要做的就是用scan context在历史帧里面找到最相近的scan context。那为了加速查找,通常都是把历史数据构造成kd-tree,直接用scan context,太大了,查找也会变慢(相似度计算耗时)。进一步的,把scan context再降维,得到一个ring key(向量),用这玩意去构造kd-tree,以及搜索。ring key是个啥呢,它是scan context每一行算一个均值,组成的20x1的矩阵。直观上ring key就是每个环的最大高度均值,组合在一起,可以想到ring key跟scan context是一个一对多的关系。但是没关系,通过ring key做一个初步快速的筛选,找到很多候选scan context,然后再精细比较scan context得到最后的结果。
// 由scan context计算ring key,Nx1
MatrixXd SCManager::makeRingkeyFromScancontext( Eigen::MatrixXd &_desc )
{
    // 每行计算一个均值
    Eigen::MatrixXd invariant_key(_desc.rows(), 1);
    for ( int row_idx = 0; row_idx < _desc.rows(); row_idx++ )
    {
        Eigen::MatrixXd curr_row = _desc.row(row_idx);
        invariant_key(row_idx, 0) = curr_row.mean();
    }

    return invariant_key;
}
通过上面这个ring key在kd-tree里面找到了最邻近的几帧,有对应的scan context,接下来就要用当前帧的scan context与这些scan context进行比较,计算距离。这里呢,又要引入一个sector key,与ring key对应,这里对每列计算一个均值,组成一个1x60的矩阵。
// 由scan context计算sector key,1xM
MatrixXd SCManager::makeSectorkeyFromScancontext( Eigen::MatrixXd &_desc )
{
    // 每列计算一个均值
    Eigen::MatrixXd variant_key(1, _desc.cols());
    for ( int col_idx = 0; col_idx < _desc.cols(); col_idx++ )
    {
        Eigen::MatrixXd curr_col = _desc.col(col_idx);
        variant_key(0, col_idx) = curr_col.mean();
    }

    return variant_key;
}
为什么要按列计算均值呢?因为在场景中同一个位置,旋转一下,看向不同的方向,得到的scan context是不一样的(局部ildar系,坐标轴旋转了),对应到scan context上的表现就是矩阵左右偏移了。如果直接用scan context去比,显然就认为两帧是不匹配的,但是实际上是在同一个位置。所以就要对scan context左右循环偏移,找一个最佳的匹配位置,然后用偏移后的scan context去作比较。那么实际上用sector key去计算偏移量,然后施加到scan context上,最后用偏移的scan context做比较。
// _vkey1、_vkey2是两个sector key
// 对_vkey2做循环偏移,计算与_vkey1最佳匹配时的偏移量
int SCManager::fastAlignUsingVkey( MatrixXd & _vkey1, MatrixXd & _vkey2)
{
    int argmin_vkey_shift = 0;
    double min_veky_diff_norm = 10000000;
    for ( int shift_idx = 0; shift_idx < _vkey1.cols(); shift_idx++ )
    {
        // 矩阵的列,循环右移shift个单位
        MatrixXd vkey2_shifted = circshift(_vkey2, shift_idx);
        // 直接相减,sector key是1xN的矩阵
        MatrixXd vkey_diff = _vkey1 - vkey2_shifted;

        // 范数
        double cur_diff_norm = vkey_diff.norm();
        // 记录距离最小时对应的循环偏移量
        if( cur_diff_norm < min_veky_diff_norm )
        {
            argmin_vkey_shift = shift_idx;
            min_veky_diff_norm = cur_diff_norm;
        }
    }

    return argmin_vkey_shift;
}
第二个接口,闭环检测。
// 接口二,执行闭环检测
std::pair<int, float> SCManager::detectLoopClosureID ( void );

/**
 * 计算两个scan context之间的距离
*/
std::pair<double, int> SCManager::distanceBtnScanContext( MatrixXd &_sc1, MatrixXd &_sc2 )
{
    // 1. fast align using variant key (not in original IROS18)
    // 计算sector Key,也就是sector最大高度均值组成的数组,1xN
    MatrixXd vkey_sc1 = makeSectorkeyFromScancontext( _sc1 );
    MatrixXd vkey_sc2 = makeSectorkeyFromScancontext( _sc2 );
    // 这里将_vkey2循环右移,然后跟_vkey1作比较,找到一个最相似(二者做差最小)的时候,记下循环右移的量
    int argmin_vkey_shift = fastAlignUsingVkey( vkey_sc1, vkey_sc2 );

    // 上面用sector key匹配,找到一个初始的偏移量,但肯定不是准确的,再在这个偏移量左右扩展一下搜索空间
    const int SEARCH_RADIUS = round( 0.5 * SEARCH_RATIO * _sc1.cols() ); // a half of search range
    std::vector<int> shift_idx_search_space { argmin_vkey_shift };
    for ( int ii = 1; ii < SEARCH_RADIUS + 1; ii++ )
    {
        shift_idx_search_space.push_back( (argmin_vkey_shift + ii + _sc1.cols()) % _sc1.cols() );
        shift_idx_search_space.push_back( (argmin_vkey_shift - ii + _sc1.cols()) % _sc1.cols() );
    }
    std::sort(shift_idx_search_space.begin(), shift_idx_search_space.end());

    // 2. fast columnwise diff
    int argmin_shift = 0;
    double min_sc_dist = 10000000;
    for ( int num_shift: shift_idx_search_space )
    {
        // 把scan context循环右移一下
        MatrixXd sc2_shifted = circshift(_sc2, num_shift);
        // 计算两个scan context之间的距离
        double cur_sc_dist = distDirectSC( _sc1, sc2_shifted );
        if( cur_sc_dist < min_sc_dist )
        {
            argmin_shift = num_shift;
            min_sc_dist = cur_sc_dist;
        }
    }
    // 最小scan context距离,偏移量
    return make_pair(min_sc_dist, argmin_shift);
}
小结
- 给定一帧点云,划分成20个环,每个环分成60等份,一共1200个格子
- 每个格子存里面点的最大高度值(z值),这样一帧点云就用一个二维图像表示了,想象成一个带高度的俯视图,或者地形图,记为scan context
- scan context进一步计算列的均值,得到一个1x60的向量,记为ring key;计算行的均值,得到一个20x1的向量,记为sector key
- 用ring key构造kd-tree,并且执行knn搜索
- 对于候选匹配scan context,首先要左右循环偏移一下,对齐,实际会用sector key去对齐,得到一个偏移量
- 对候选匹配scan context,施加偏移量,然后作比较