数据加载预处理DALI加速-保姆级教程

在开始之前,我想先说明一件事。通常情况下,训练一个机器学习模型所需的时间=数据加载预处理时间+模型训练时间+模型测试时间。如果我们想要节省时间,那么就要从这三部分下手,在算法已经固定的情况下,能想到的最简单有效的方式就是缩短数据加载预处理时间。
之前发过一篇关于torchvision中DadaLoder如何加速的文章,其中的方法可以起到一定的加速作用。但是受限于CPU计算速度瓶颈,基于torchvision的DadaLoder无法进一步有效地加速。那么,有没有直接把在CPU上预处理的过程搬到速度更快吞吐量更大的GPU上的方法呢?答案是,有!英伟达DALI加速技术可以实现你高效科研的梦想,它可以把复杂的数据预处理搬到GPU上进行,就连数据加载都可以实现CPU和GPU混合加速加载。经过一周多反复研读官方说明文档以及亲身实践,我这次分享一篇目前最新最容易学会的DALI加速文章,以供大家参考(目前大家能搜到的大部分DALI加速代码要么太老,要么有很多bug)。下面我以图像分类为例,其实DALI可支持各种数据域,包括图像、视频、音频和体积数据等,所以像图像分类、目标检测、语音识别这些都是可以实现加速的,可自行查阅资料实现。
DALI加速——代码
平时我们都是用torch.utils.data.DataLoader加载和预处理图像,然后将CPU上的tensor送进GPU进行训练和测试,DALI就是构造一个新的DataLoader,速度比原生pytorch快很多。
我们先看torch.utils.data.DataLoader,这里为了表示更一般的情况,我加入了一个自定义的CUTOUT用于数据增强。
import torch
import numpy as np
from torchvision import transforms, datasets
from torch.utils.data import DataLoader


class CUTOUT(object):
    """Randomly mask out one or more patches from an image.
    Args:
        n_holes (int): Number of patches to cut out of each image.
        length (int): The length (in pixels) of each square patch.
    """

    def __init__(self, n_holes, length):
        self.n_holes = n_holes
        self.length = length

    def __call__(self, img):
        """
        Args:
            img (Tensor): Tensor image of size (C, H, W).
        Returns:
            Tensor: Image with n_holes of dimension length x length cut out of it.
        """
        h = img.size(1)
        w = img.size(2)

        mask = np.ones((h, w), np.float32)

        for n in range(self.n_holes):
            y = np.random.randint(h)
            x = np.random.randint(w)
            y1 = np.clip(y - self.length // 2, 0, h)
            y2 = np.clip(y + self.length // 2, 0, h)
            x1 = np.clip(x - self.length // 2, 0, w)
            x2 = np.clip(x + self.length // 2, 0, w)
            mask[y1: y2, x1: x2] = 0.
        mask = torch.from_numpy(mask)
        mask = mask.expand_as(img)
        img = img * mask

        return img


# 数据预处理
transform_train = transforms.Compose([
    transforms.Resize(int(img_size*1.2)),
    transforms.RandomRotation(20),
    transforms.RandomCrop(img_size),
    transforms.RandomHorizontalFlip(),
    transforms.ColorJitter(
        brightness=0.5,
        contrast=0.5,
        saturation=0.5,
        hue=0.3
    ),
    transforms.ToTensor(),
    transforms.Normalize([0.5, 0.5, 0.5], [0.5, 0.5, 0.5]),
    CUTOUT(n_holes, length),
])
transform_test = transforms.Compose([
    transforms.Resize(img_size),
    transforms.ToTensor(),
    transforms.Normalize([0.5, 0.5, 0.5], [0.5, 0.5, 0.5])
])

# 获取数据
train = datasets.ImageFolder(data_root_train, transform=transform_train)
test = datasets.ImageFolder(data_root_test, transform=transform_test)

# 将数据封装成迭代器
train_loader = DataLoader(
    dataset=train,
    batch_size=batch_size,
    shuffle=True,
    pin_memory=True,
    num_workers=num_workers,
    persistent_workers=True
)
test_loader = DataLoader(
    dataset=test,
    batch_size=batch_size,
    shuffle=False,
    pin_memory=True,
    num_workers=num_workers,
    persistent_workers=True
)
再看下DALI使用GPU预处理的dataloader代码,在这里我们需要注意一个地方,DALI可以选择纯CPU加载和预处理,或者CPU&GPU混合加载+GPU预处理。如果使用GPU预处理,则需要把下面的np换成GPU版本的cupy (pip install cupy-cuda***,***为cuda版本)。但是我发现使用自定义处理的类之后(即CUTOUT),使用GPU的速度还不如CPU快,原因还没搞清楚。
import numpy as np
import cupy as cp
from nvidia.dali.pipeline import Pipeline
import nvidia.dali.ops as ops
from nvidia.dali.plugin.pytorch import DALIClassificationIterator
from nvidia.dali.plugin.base_iterator import LastBatchPolicy


class CUTOUT(object):
    """
    Randomly mask out one or more patches from an image.
    """
    """
    Args:
        n_holes (int): Number of patches to cut out of each image.
        length (int): The length (in pixels) of each square patch.
        img: image of size (C, H, W), dtype=float32.
    Returns:
        Image with n_holes of dimension length x length cut out of it, dtype=float32.
    P.S. If you set device='gpu', you need to replace numpy as cupy (pip install cupy-cuda***)
    """
    def __init__(self, n_holes, length):
        self.n_holes = n_holes
        self.length = length

    def __call__(self, imgs):
        c, h, w = imgs.shape
        mask = np.ones((h, w), np.float32)
        for n in range(self.n_holes):
            y = np.random.randint(h)
            x = np.random.randint(w)
            # 防止mask超过图像范围
            y1 = np.clip(y - self.length // 2, 0, h)
            y2 = np.clip(y + self.length // 2, 0, h)
            x1 = np.clip(x - self.length // 2, 0, w)
            x2 = np.clip(x + self.length // 2, 0, w)
            mask[y1: y2, x1: x2] = 0.
        mask = np.expand_dims(mask, 0).repeat(c, axis=0)
        imgs = imgs * mask

        return imgs


class TrainPipeline(Pipeline):
    def __init__(self, batch_size, num_threads, device_id, data_root, img_size, n_holes, length, custom_cutout=False):
        if custom_cutout:
            super(TrainPipeline, self).__init__(batch_size, num_threads, device_id,
                                                exec_async=False,
                                                exec_pipelined=False)
            mode = 'cpu'
            self.decode = ops.decoders.Image(device='cpu')  # pipeline中定义了一个解码图像的模块,输出的格式为RGB顺序
        else:
            super(TrainPipeline, self).__init__(batch_size, num_threads, device_id, prefetch_queue_depth=4)
            mode = 'gpu'
            self.decode = ops.decoders.Image(device='mixed')

        self.img_size = img_size
        # readers.File类似torchvision.datasets.ImageFolder,dali还有其他高阶API,可自行研究使用
        self.input = ops.readers.File(file_root=data_root, random_shuffle=True)
        # Resize
        self.resize = ops.Resize(device=mode, resize_x=int(img_size*1.2), resize_y=int(img_size*1.2))
        # Randomcrop,类似于torchvision.transforms.RandomCrop
        self.randomcrop = ops.RandomResizedCrop(device=mode, size=img_size, random_area=[0.3, 1.0])
        # CropMirrorNormalize可以实现normalize和随机水平翻转,类似于torchvision.transforms.Normalize & RandomHorizontalFlip
        self.normalize = ops.CropMirrorNormalize(device=mode, mean=[0.5*255, 0.5*255, 0.5*255],
                                                 std=[0.5*255, 0.5*255, 0.5*255])
        # 获取随机数
        self.rng1 = ops.random.Uniform()
        self.rng2 = ops.random.CoinFlip()
        # 实例化改变图片色彩的类,类似于torchvision.transforms.ColorJitter
        self.colortwist = ops.ColorTwist(device=mode)
        # 实例化旋转图像的类,类似于torchvision.transforms.RandomRotation
        self.rotate = ops.Rotate(device=mode, fill_value=0)
        # gridmask,类似于cutout这种随机遮挡块操作
        self.gridmask = ops.GridMask(device=mode)
        """
        自定义cutout预处理,缺点是全部需要用cpu进行,
        需要设exec_async=False和exec_pipelined=False
        """
        self.custom_cutout = custom_cutout
        self.mask = ops.PythonFunction(device=mode, function=CUTOUT(n_holes, length), num_outputs=1)

    # 作用是在调用该pipeline时,应该如何对数据进行实际的操作,可以理解为pytorch的module的forward函数
    def define_graph(self):
        rng1 = self.rng1(range=(0.5, 1.5))  # brightness or contrast
        rng2 = self.rng1(range=(0.5, 1.0))  # saturation
        rng3 = self.rng1(range=(0, 0.3))  # hue
        rng4 = self.rng1(range=(-20, 20))  # rotation
        rng5 = self.rng2(probability=0.5)  # horizontal flip
        rng6 = self.rng1(range=(0.2, 0.6))  # gridmask: ratio between black square width and tile width.
        rng7 = self.rng1(range=(-50, 50))  # gridmask: offset of mask

        jpegs, labels = self.input(name='Reader')
        images = self.decode(jpegs)
        images = self.resize(images)
        images = self.rotate(images, angle=rng4)
        images = self.randomcrop(images)
        images = self.colortwist(images, brightness=rng1, contrast=rng1, saturation=rng2, hue=rng3)
        if self.custom_cutout:
            images = self.mask(images)
        else:
            images = self.gridmask(images, ratio=rng6, shift_x=rng7, shift_y=rng7, tile=int(self.img_size*0.25))
        images = self.normalize(images, mirror=rng5)

        return images, labels


class TestPipeline(Pipeline):
    def __init__(self, batch_size, num_threads, device_id, data_root, img_size):
        super(TestPipeline, self).__init__(batch_size, num_threads, device_id, prefetch_queue_depth=4)

        self.decode = ops.decoders.Image(device='mixed')
        self.input = ops.readers.File(file_root=data_root, random_shuffle=False)
        self.resize = ops.Resize(device='gpu', resize_x=img_size, resize_y=img_size)
        self.normalize = ops.CropMirrorNormalize(device='gpu', mean=[0.5 * 255, 0.5 * 255, 0.5 * 255],
                                                 std=[0.5 * 255, 0.5 * 255, 0.5 * 255])

    def define_graph(self):
        jpegs, labels = self.input(name='Reader')
        images = self.decode(jpegs)
        images = self.resize(images)
        images = self.normalize(images)

        return images, labels


def get_dali_iter(mode, batch_size, num_threads, device_id, data_root, img_size, n_holes, length, custom_cutout):
    if mode == 'train':
        pipe_train = TrainPipeline(batch_size, num_threads, device_id, data_root, img_size, n_holes, length,
                                   custom_cutout=custom_cutout)
        pipe_train.build()
        # DALIClassificationIterator: Returns 2 outputs (data and label) in the form of PyTorch’s Tensor, 即DataLoader
        train_loader = DALIClassificationIterator(pipe_train, size=pipe_train.epoch_size('Reader'),
                                                  last_batch_policy=LastBatchPolicy.PARTIAL, auto_reset=True)
        return train_loader

    elif mode == 'test':
        pipe_test = TestPipeline(batch_size, num_threads, device_id, data_root, img_size)
        pipe_test.build()
        """
        LastBatchPolicy.PARTIAL的作用等同于drop_last=False,保留最后一个batch的样本(该batch的样本数<batch size)
        用于训练或测试,测试的话一定要用这个,不然得到的测试结果会有不准确
        """
        test_loader = DALIClassificationIterator(pipe_test, size=pipe_test.epoch_size('Reader'),
                                                 last_batch_policy=LastBatchPolicy.PARTIAL, auto_reset=True)
        return test_loader
函数get_dali_iter可以根据输入的mode类型('train' or 'test')返回相应的dataloader。
import torch
import torch.nn as nn
from time import time
from torchvision import models


# 导入模型
device = torch.device('cuda:' + device_id if torch.cuda.is_available() else "cpu")
class Resnet18(nn.Module):
    def __init__(self, n_class):
        super(Resnet18, self).__init__()
        model = models.resnet18(pretrained=True)
        self.backbone = nn.Sequential(*list(model.children())[:-1])
        self.fc = nn.Linear(512, n_class)

    def forward(self, x):
        x = self.backbone(x)
        feature = torch.flatten(x, 1)
        out = self.fc(feature)
        return feature, out


# 将模型搬到device上
model = Resnet18(num_classes).to(device)
# 定义损失函数及优化器
criterion = nn.CrossEntropyLoss()
optimizer = torch.optim.SGD(model.parameters(), lr=lr, momentum=0.9)


# torchvision训练+测试代码
def test_cpu(model, eval_loader):
    model.eval()
    correct = 0
    total = 0
    with torch.no_grad():
        for (img, label) in eval_loader:
            img, label = img.to(device), label.to(device)
            _, output = model(img)
            predicted = torch.argmax(output, dim=1)
            total += label.size(0)
            correct += (predicted == label).sum().item()
        accu = correct / total
    return accu


start = time()
for epoch in range(epochs):
    model.train()
    for batch_idx, (img, label) in enumerate(train_loader):
        img, label = img.to(device), label.to(device)
        _, output = model(img)
        loss = criterion(output, label)
        optimizer.zero_grad()
        loss.backward()
        optimizer.step()
    # 测试模型
    if validation:
        t_accu = test_cpu(model, test_loader)
print('Running time of torchvision: {}'.format(time() - start))


# DALI with GPU训练+测试代码
def test_dali(model, eval_loader):
    model.eval()
    correct = 0
    total = 0
    with torch.no_grad():
        for data in eval_loader:
            img = data[0]["data"]
            label = data[0]["label"].squeeze(-1).long().to(device)
            _, output = model(img)
            predicted = torch.argmax(output, dim=1)
            total += label.size(0)
            correct += (predicted == label).sum().item()
        accu = correct / total
    return accu


start = time()
for _ in range(epochs):
    model.train()
    for batch_idx, data in enumerate(train_loader):
        # 图像和标签导入部分跟torchvision不一样,其余都一样
        img = transform(data[0]["data"])
        label = data[0]["label"].squeeze(-1).long().to(device)

        _, output = model(img)
        loss = criterion(output, label)
        optimizer.zero_grad()
        loss.backward()
        optimizer.step()

    # 测试模型
    if validation:
        t_accu = test_dali(model, test_loader)
print('Running time of DALI: {}'.format(time() - start))下面我进行了两组实验来证明DALI的加速效果,模型:ResNet18,训练图像数量:2000+,验证模式下的测试图像数量:700+,训练100个epoch,验证模式下每训完一个epoch测试一轮。
DALI加速——对比实验1
CPU: Intel(R) Core(TM) i9-10980XE CPU @ 3.00GHz
GPU: Tesla T4 16G,图灵架构
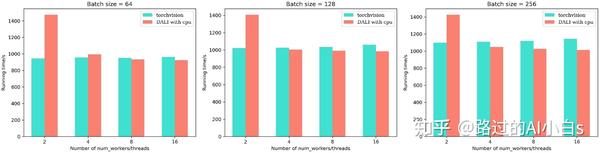
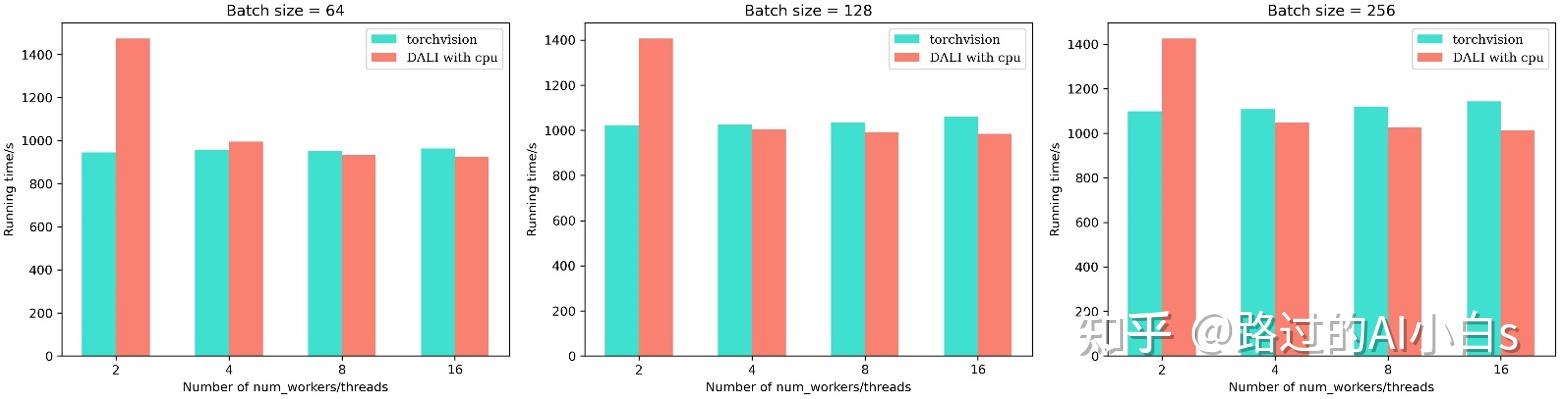
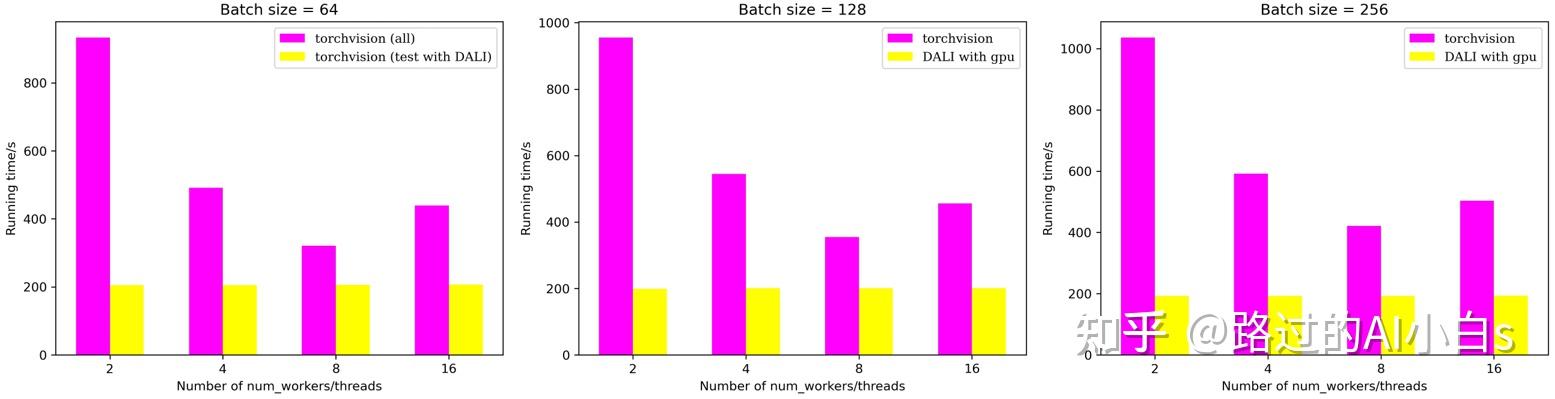
从上图可以发现,在使用线程数较少的情况下,传统的torchvision速度更快,但随着线程数的增加,torchvision速度并没有太大变化,而DALI加速明显(注意,这里为了统一比较,我将torchvision的num_workers变量和DALI的num_threads视为相同变量)。可以看一下右边第三幅图,当使用较多线程时,DALI在只使用CPU的情况下仍然比torchvision要快(注意,这里DALI使用的CUTOUT与torchvision一致)。
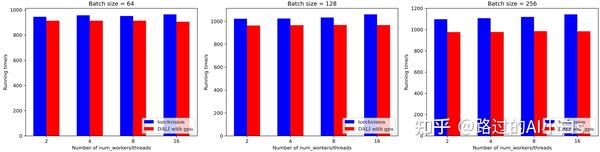

从上图可以发现,在DALI在使用GPU的情况下,加速效果均优于torchvision,特别是在batch size较大的情况下(注意,由于DALI原生API没有CUTOUT的增强操作,这里我用GridMask代替,两者作用都是给图片随机打上马赛克)。
以上两个实验是在仅训练的情况下进行的,下面我做了一个补充实验,验证使用torchvision训练和使用DALI测试能比全部使用torchvision快多少。为什么要进行这个实验,因为有些人担心使用DALI之后,数据增强跟原来不一样(实际上,我测试发现两者的差异几乎可以忽略),或者说自己的数据增强方式在DALI框架下很难实现(实际上,通过自定义增强+DALI with CPU可以实现),那也可以在训练阶段使用torchvision而测试阶段使用DALI加速!因为在测试时我们的图片都是Resize,归一化,Totensor的,DALI和torchvision在该情况下是一模一样的,当我们测试集图片较多时,DALI可以明显加速测试,为什么不用它呢?
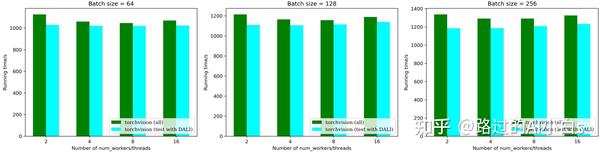
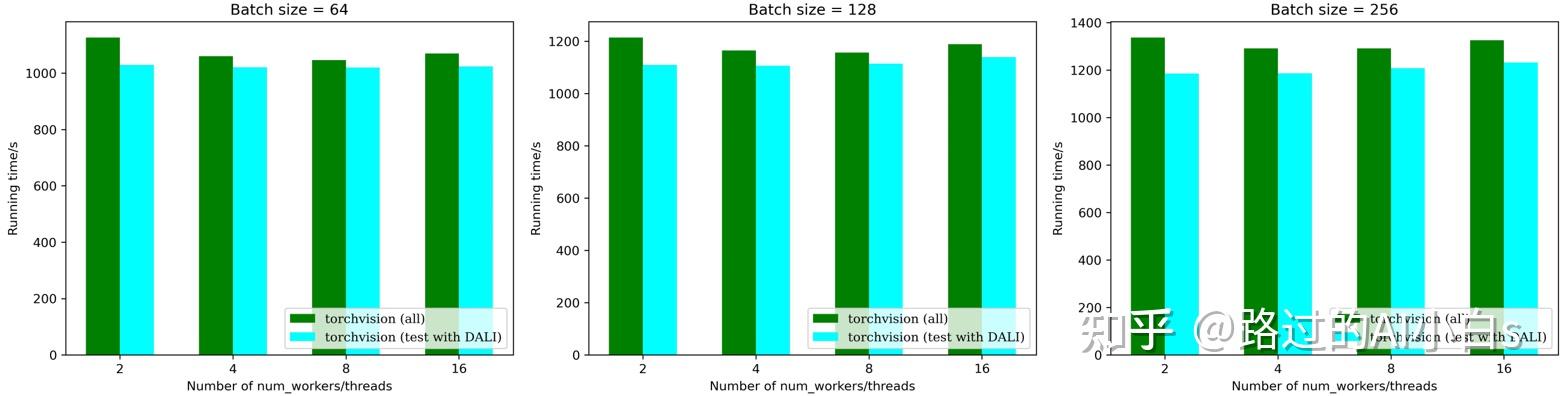
从上图可以发现,当使用DALI代替torchvision进行测试后,运算速度得到了一定幅度的提升,当batch size增大时,这种差距会越来越明显。当我们显存冗余时,我们可以直接把验证的batch size拉满以最大化运算速度。
DALI加速——对比实验2
这个实验我是在租的云服务器上跑的(特别是用云服务器的小伙伴,时间就是金钱,加速省下来的时间就是 。该云服务器配置如下:
CPU: AMD EPYC 7302,分配8个核心
GPU: NVIDIA GeForce RTX 3090,安培架构

从上图可以发现,在使用torchvision的情况下,并不是num_workers数目越大越好,在该云服务器的配置下,num_workers=8可以实现较好的加速效果;另一方面,DALI在使用GPU的情况下,加速效果基本不受batch size和num_threads影响。当我们在某些情况,比如需要固定batch size同时又希望加速实验时(因为调整batch size的同时我们需要调整相应的学习率等超参数,导致需要进一步实验进行超参数验证,得不偿失),DALI是你的不二之选。另外,可以发现,DALI在旗舰卡3090的加持下,加速效果比T4明显许多,基本能在torchvision基础上实现两倍甚至更快的加速效果。这也验证了官方的建议,DALI可以在伏打和安培架构下实现更快的加速,手上有这些架构的显卡的同学要偷笑了。我认为,当用于训练或者测试的图像数量越多,DALI加速效果越明显!
下面列举一些常用的N卡及其架构,其余型号可自行查询。
伏打架构:TITAN V, Tesla V100等
安培架构:30系列
图灵架构:20/16系列, Tesla T4, RTX5000, RTX6000等
使用DALI前后的GPU利用率变化图:

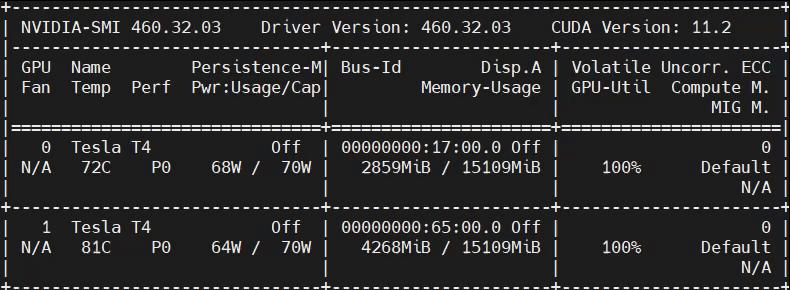
可以发现,使用DALI之后,GPU利用率一直维持在100%附近,而torchvision则是一会高一会低,GPU利用效率不高。使用DALI会占据更多的显存,这也是加速带来的代价。
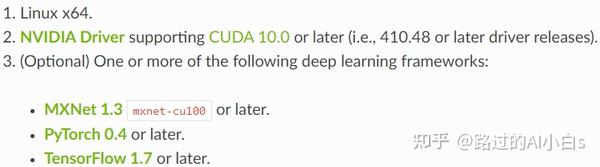
下面简单说一下如何安装DALI,网址:DALI官网
需要三个条件,Linux系统,cuda10.0以后的英伟达驱动,较新的MXNet, pytorch, tensorflow框架。

对于cuda 11.0及以后的驱动,安装命令如下
pip install --extra-index-url https://developer.download.nvidia.com/compute/redist --upgrade nvidia-dali-cuda110官方说明文档很全,可以自行查阅研究。其余有什么问题欢迎在下面留言和讨论。本文原创不易,麻烦点波赞和关注再走~