python实现混淆矩阵

该篇文章介绍了机器学习的一些评估指标,要得到这些指标的基础,就是先求得混淆矩阵,那在代码中怎么获取混淆矩阵呢?
二分类
二分类比较简单,所以我们先来分析一下二分类的情况。
我们利用 sklearn中的 confusion_matrix 函数来得到混淆矩阵,函数原型为:
sklearn.metrics.confusion_matrix(y_true, y_pred, labels=None, sample_weight=None)y_true:样本真实的分类标签列表y_pred:样本预测的分类结果列表labels:类别列表,可用于对类别重新排序或选择类别子集。如果默认,则将y_true或y_pred中至少出现一次的类别按排序顺序构成混淆矩阵。sample_weight:样本权重
先看下面这个例子:
>>> from sklearn.metrics import confusion_matrix
>>> y_true = [0, 1, 0, 1]
>>> y_pred = [1, 1, 1, 0]
>>> confusion_matrix(y_true, y_pred)

[[0 2]
 [1 1]]
我们得到了一个2x2的矩阵,这是什么意思?建议先去看看本文最开始的那篇文章。
在二分类的模型中,混淆矩阵把预测情况与实际情况的所有结果进行组合,形成了真正 (true positive)、假正 (false positive)、真负 (true negative) 和假负 (false negative) 四种情形,分别由TP、FP、TN、FN 表示(T代表预测正确,F代表预测错误)。
返回值是一个形状为[n_classes, n_classes]的混淆矩阵,对于二分类模型,这个2x2的矩阵表示如下:
TN|FP
FN|TP所以我们可以通过ravel()来直接得到这四个值:
tn, fp, fn, tp = confusion_matrix([0, 1, 0, 1], [1, 1, 1, 0]).ravel()如果知道 tn, fp, fn, tp 这四个值的含义,我们也可以自定义函数来获取它们:
def perf_measure(y_true, y_pred):
    TP, FP, TN, FN = 0, 0, 0, 0

    for i in range(len(y_true)):
        if y_true[i] == 1 and y_pred[i] == 1:
           TP += 1
        if y_true[i] == 0 and y_pred[i] == 1:
           FP += 1
        if y_true[i] == 0 and y_pred[i] == 0:
           TN += 1
        if y_true[i] == 1 and y_pred[i] == 0:
           FN += 1

    return TP, FP, TN, FN
多分类
现在来看多分类模型,我们知道了求混淆矩阵的函数返回值是长宽为类别个数的二维矩阵,下面是个三分类的例子:
>>> from sklearn.metrics import confusion_matrix
>>> y_true = [2, 0, 2, 2, 0, 1]
>>> y_pred = [0, 0, 2, 2, 0, 2]
>>> confusion_matrix(y_true, y_pred)

array([[2, 0, 0],
       [0, 0, 1],
[1, 0, 2]])结果是一个3x3的二维矩阵,我们怎么求得tn, fp, fn, tp这四个值呢?
下面这张图可谓是说明得非常清晰了。

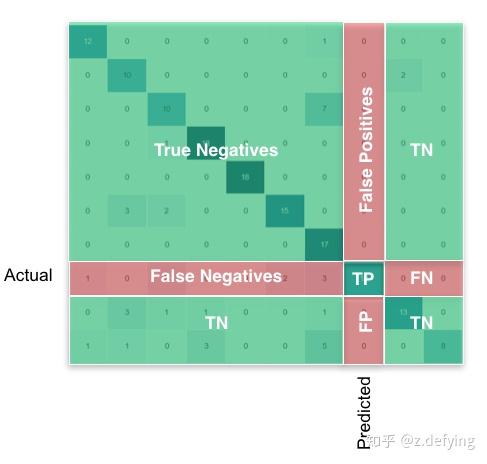
混淆矩阵M的每一行表示真实的类,每一列表示预测的类。即:M[i][j]表示真实类别为i的所有样本中被预测为类别j的样本数目。
我们重点关注混淆矩阵的对角线区域,它表示实际类别和预测类别相一致,即TP区域。
某类的FP:该列所有元素之和减去该列的TP
某类的FN:该行所有元素之和减去该行的TP
某类的TN:整个矩阵之和减去该类的(TP+FP+FN)
下面是得到tn, fp, fn, tp的方法,进而求得其他各项指标:
FP = cm.sum(axis=0) - np.diag(cm)
FN = cm.sum(axis=1) - np.diag(cm)
TP = np.diag(cm)
TN = cm.sum() - (FP + FN + TP)

# Sensitivity, hit rate, recall, or true positive rate
TPR = TP/(TP+FN)
# Specificity or true negative rate
TNR = TN/(TN+FP)
# Precision or positive predictive value
PPV = TP/(TP+FP)
# Negative predictive value
NPV = TN/(TN+FN)
# Fall out or false positive rate
FPR = FP/(FP+TN)
# False negative rate
FNR = FN/(TP+FN)
# False discovery rate
FDR = FP/(TP+FP)

precision = TP / (TP+FP)  # 查准率
recall = TP / (TP+FN)  # 查全率
对于分类问题,一般使用混淆矩阵来分析各类别预测的结果,可视化混淆矩阵来分析预测结果从而得到调参思路。
绘制多分类混淆矩阵
%matplotlib inline
from sklearn.metrics import confusion_matrix
import matplotlib.pyplot as plt
import numpy as np

def plot_confusion_matrix(cm, savename, title='Confusion Matrix'):

    plt.figure(figsize=(12, 8), dpi=100)
    np.set_printoptions(precision=2)

    # 在混淆矩阵中每格的概率值
    ind_array = np.arange(len(classes))
    x, y = np.meshgrid(ind_array, ind_array)
    for x_val, y_val in zip(x.flatten(), y.flatten()):
        c = cm[y_val][x_val]
        if c > 0.001:
            plt.text(x_val, y_val, "%0.2f" % (c,), color='red', fontsize=15, va='center', ha='center')

    plt.imshow(cm, interpolation='nearest', cmap=plt.cm.binary)
    plt.title(title)
    plt.colorbar()
    xlocations = np.array(range(len(classes)))
    plt.xticks(xlocations, classes, rotation=90)
    plt.yticks(xlocations, classes)
    plt.ylabel('Actual label')
    plt.xlabel('Predict label')

    # offset the tick
    tick_marks = np.array(range(len(classes))) + 0.5
    plt.gca().set_xticks(tick_marks, minor=True)
    plt.gca().set_yticks(tick_marks, minor=True)
    plt.gca().xaxis.set_ticks_position('none')
    plt.gca().yaxis.set_ticks_position('none')
    plt.grid(True, which='minor', linestyle='-')
    plt.gcf().subplots_adjust(bottom=0.15)

    # show confusion matrix
    plt.savefig(savename, format='png')
    plt.show()
获取实际标签、预测结果和混淆矩阵:
# classes表示不同类别的名称,比如这有6个类别
classes = ['A', 'B', 'C', 'D', 'E', 'F']

random_numbers = np.random.randint(6, size=50)  # 6个类别,随机生成50个样本
y_true = random_numbers.copy()  # 样本实际标签
random_numbers[:10] = np.random.randint(6, size=10)  # 将前10个样本的值进行随机更改
y_pred = random_numbers  # 样本预测标签

# 获取混淆矩阵
cm = confusion_matrix(y_true, y_pred)
plot_confusion_matrix(cm, 'confusion_matrix.png', title='confusion matrix')
得到如下图所示:
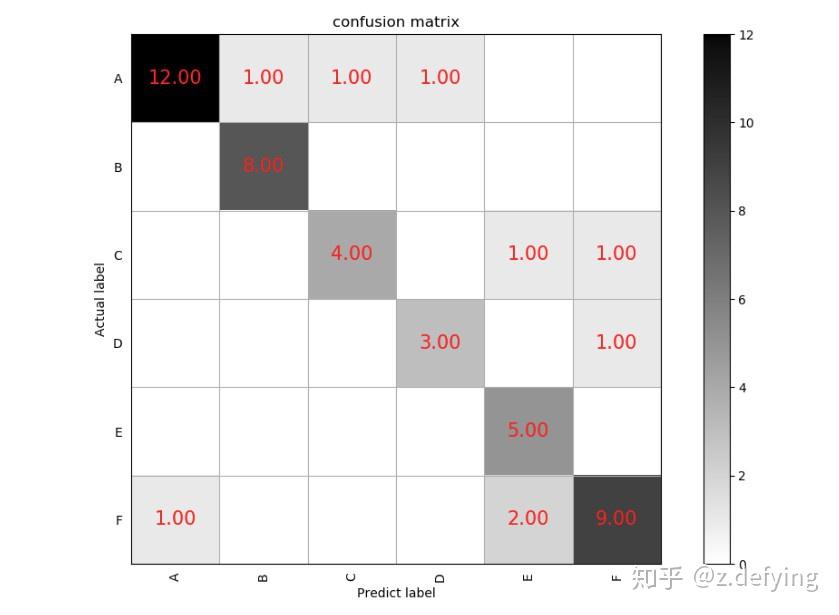

我们看类别A,预测结果和实际标签都为A的有12个样本,把A样本预测为其他类别的有3个样本(同一行的其他样本),而把其他类别预测为A样本的有1个样本(同一列的其他样本)。其他类别也同样这样分析。
通常我们会在绘图前对混淆矩阵按行做一个标准化处理,即得到的是概率值,每行所有的概率之和为1,所以对角线就代表每个类别的查全率(召回率)。
# Normalize by row
cm_normalized = cm.astype('float') / cm.sum(axis=1)[:, np.newaxis]
print(cm_normalized)
输出为如下形式的二维矩阵(和上面的混淆矩阵并不对应):
[[0.7  0.   0.   0.   0.1  0.2 ]
 [0.12 0.88 0.   0.   0.   0.  ]
 [0.   0.   0.71 0.   0.29 0.  ]
 [0.   0.   0.   0.83 0.17 0.  ]
 [0.   0.   0.   0.   1.   0.  ]
 [0.   0.   0.   0.   0.15 0.85]]
都能看到这,想必你对人工智能领域很感兴趣,强烈推荐两本(西瓜书和花书)机器学习和深度学习的经典书籍,帮助你系统学习该领域的知识。
公式太多很难啃,这里有西瓜书详细的公式推导解析供你参考。
参考